Overview
Now that your world is set up you're going to want to set up user accounts for your players, their characters, and the scenes necessary for them to play! It's time to provide you with a basic introduction to the core aspects of Foundry VTT's gameplay, and give you the next set of steps to get your players set up. This article will introduce you to:
- Users. Anyone that connects to a Foundry Virtual Tabletop session is a user, and may be a player or gamemaster. Players in your game will have control of actors, while users who are gamemasters or assistants may spend their time building scenes and running the game for players. All users have a role which determines what they can see and do within Foundry. You can find more information on this in the Users and Permissions article.
- Actors. The protagonists, allies, monsters, antagonists, and persons within the World that you create. The game System being used has control to define the exact types of actors which are relevant for its gameplay, but for most tabletop roleplaying systems these actors will represent the characters which player's control and encounter.
- Items. Similar to actors, in that they have their own statistics and features, but can be associated with or used by actors in gameplay. Items can represent any physical or metaphysical object, from daggers and rocks to trust from an allied noble.
- Scenes. Areas that the players may explore and are generally composed of map images used as backgrounds, or many numerous parts if constructed from Tiles. Scenes may depict anything from world or regional maps to small buildings or dungeons. Scenes can contain Tokens, Lighting, Walls, and Ambient Sounds. To learn more about this key document type visit the Scenes page.
- Encounters. Any combats, races, puzzles or other events where a set of people take turns performing actions in-game can be considered an encounter. Encounters are tied to a specific Scene, usually the scene that is currently active and being viewed when the encounter is created.
Setting up Users
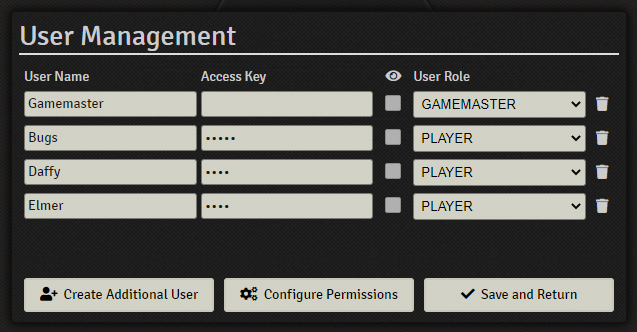
Before players can join a session, you'll need to set up user names and (optionally) access keys for them. To do so, click the Game Settings icon (three cogs icon) on the right sidebar, and then click on Configure Players. From here you should see the gamemaster user, and a button that says "Create Additional User." By clicking this button Foundry will create a new generic user slot, usually named "Player 2" or similar.
You can then rename the user, give them a password, and set their permission level. For the purposes of this guide, players don't need to be assigned a role beyond "Player." Also bear in mind that user passwords are not cryptographically secure, and should not be reused from other important accounts or services you or your players use.
Once all of the needed player accounts have been created, click "Save and Return" and you'll be returned to your game. Players can now join and log in with the credentials you've given them. Though there's a bit more setup to do before they will be able to play.
Creating and Assigning Actors

Actors are the creatures, players, enemies and allies you and your players will use to play the game. They contain data on abilities, attributes, powers, and the like. To create a new Actor, visit the Actors Directory in the sidebar by clicking on the icon that looks like a group of people.
At the top of this directory tab you can create a new Actor. Depending on the system you chose, you may have multiple options here. For most games however, players will be labeled as "player character" and that will be what you want.
Once your actor is named and created, its character sheet should open up, allowing you to configure it as necessary, and it will also appear in the actor directory to the right. Once you've finished editing the actor, you can close the window, and the changes will be saved. You can always double click an actor in the sidebar to reopen the sheet to edit them further if you need.
Once you've created an actor, you'll need to assign them to a player! Right click on an actor you've created and select "Configure Permissions."
From the menu that appears you can choose how all players interact with the actor (by default they cannot), and select how individual users interact with the actor.
Assigning a user the permission level of "owner" allows them to edit the character sheet, and fully control them in scenes. This is the default level you'll want most player characters at, anything less (such as limited or observer) and they will lose the ability to directly control their assigned actors.
Creating Items
Creating items is very similar to creating actors, and both are surprisingly similar to each other: they contain information about a document, what it can do, art, and similar. Items however, are meant to be attached to and be used by actors.
To create an item, select the Items Directory (it's to the right of the Actors Directory), and at the top of the sidebar click "Create Item." Similarly to creating a character, you need to supply a name. Depending on the game system you're using, you may also be able to determine the specific type of item you're creating. For example, the DnD5e system lets you choose between Weapons, Tools, and Consumables among several other item types.
Once you've named and created your item it will open the item configuration menu. From here you write a description of your item, and apply features to it depending on what your game system provides. When you're happy with your item, you can close the item menu, as changes are automatically saved. If you ever need to edit an item, you can click on the item's name to reopen the item sheet again.
Giving Items to Actors
To give an item to an actor, simply open the actor's sheet, and drag the chosen item from the items directory to the sheet. The item will then be added to the actor's inventory. Most game systems have an equipment or inventory tab on actor sheets, though this may vary depending on how the game system handles items, for example an item categorized as a spell might instead be added to an actor's spell list instead of their inventory.
Creating a Scene
To create a new Scene:
- Open the Scenes Directory (the map icon, 3rd from the left) in the Sidebar on the right-side of the screen.
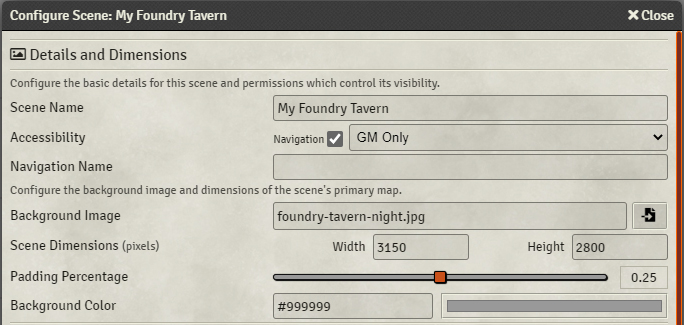
- At the top of the Sidebar click Create New Scene, you'll be prompted to give the scene a name, afterwards clicking create scene will open the scene configuration menu.
If you do not have a map image ready, we have provided one to you here on DeviantArt. This image has the following dimensions: 3150x2800px.
Once you've set the background image and made sure the dimensions match the image you're using you can save changes, and Foundry VTT will create your scene for you.
Navigating Scenes
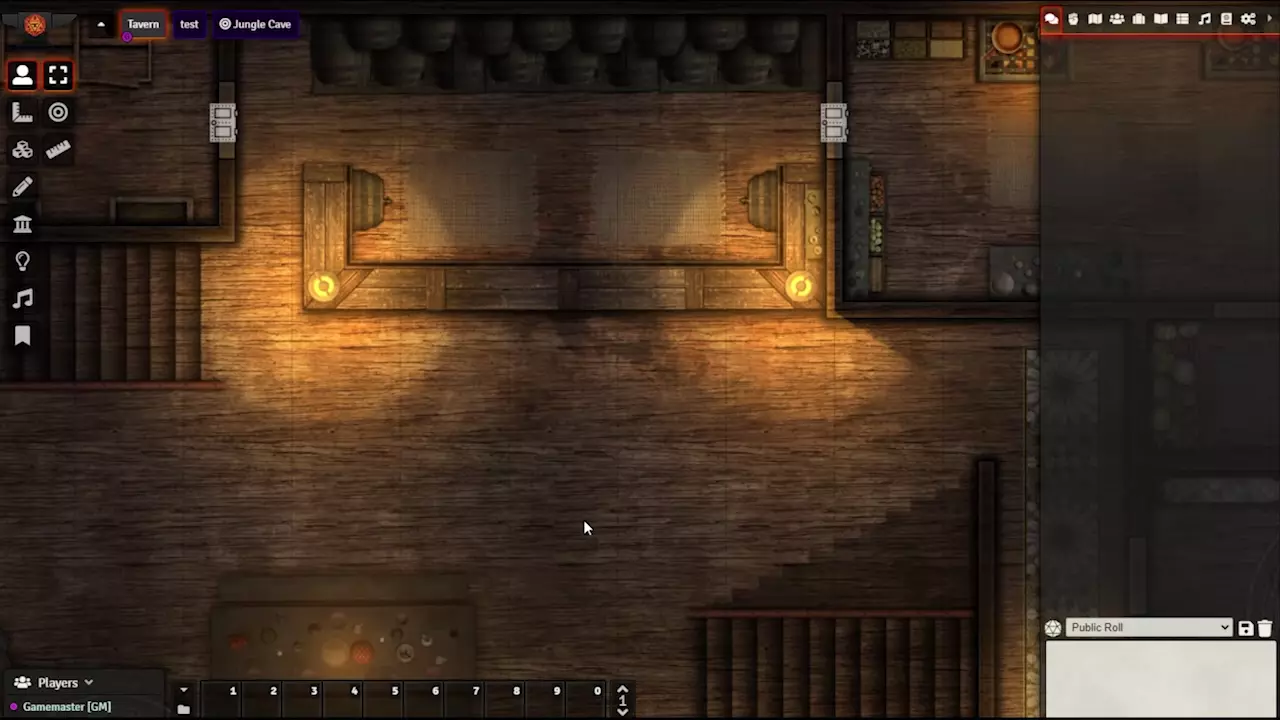
Once you have created a Scene, you'll need to be able to perform basic of navigation. To move your view of the map, click and drag with your right-mouse button to pan the scene. You can also use Control (CMD for macOS) + Arrow Keys to move your view. To zoom in or out, simply use your mouse wheel, or use the page up/down keys. You can press Tab to move your view to the scene's starting point. Since we didn't set specific coordinates for this, it will default to the upper-left corner of the image.
Organizing Scenes
You also have the option to create a folder for organizing scenes into groups, which you can do at any time by creating a folder in the scene directory and dragging the scene to the desired folder.
Changing Scenes
When you have multiple scenes, you can either click on the scene's name on the top of the Foundry VTT screen, which will shift your view to the chosen scene without activating it, or you can right click on the scene and activate it, which will pull all connected players to the scene, including you. You can do the same from the scene directory by right clicking any scene there and choosing view (to simply look at the scene by yourself) or to activate it.
Creating Walls
Now that you have a scene, you will want to place walls to determine how light spreads, and the confines of rooms and terrain. By default, all new scenes have vision enabled, meaning that actors with vision will only be able to see the map if it is lit, and their line of sight allows it. Most of the time player character actors will have vision enabled. Walls are a way to determine how much of an area an actor with vision can see.
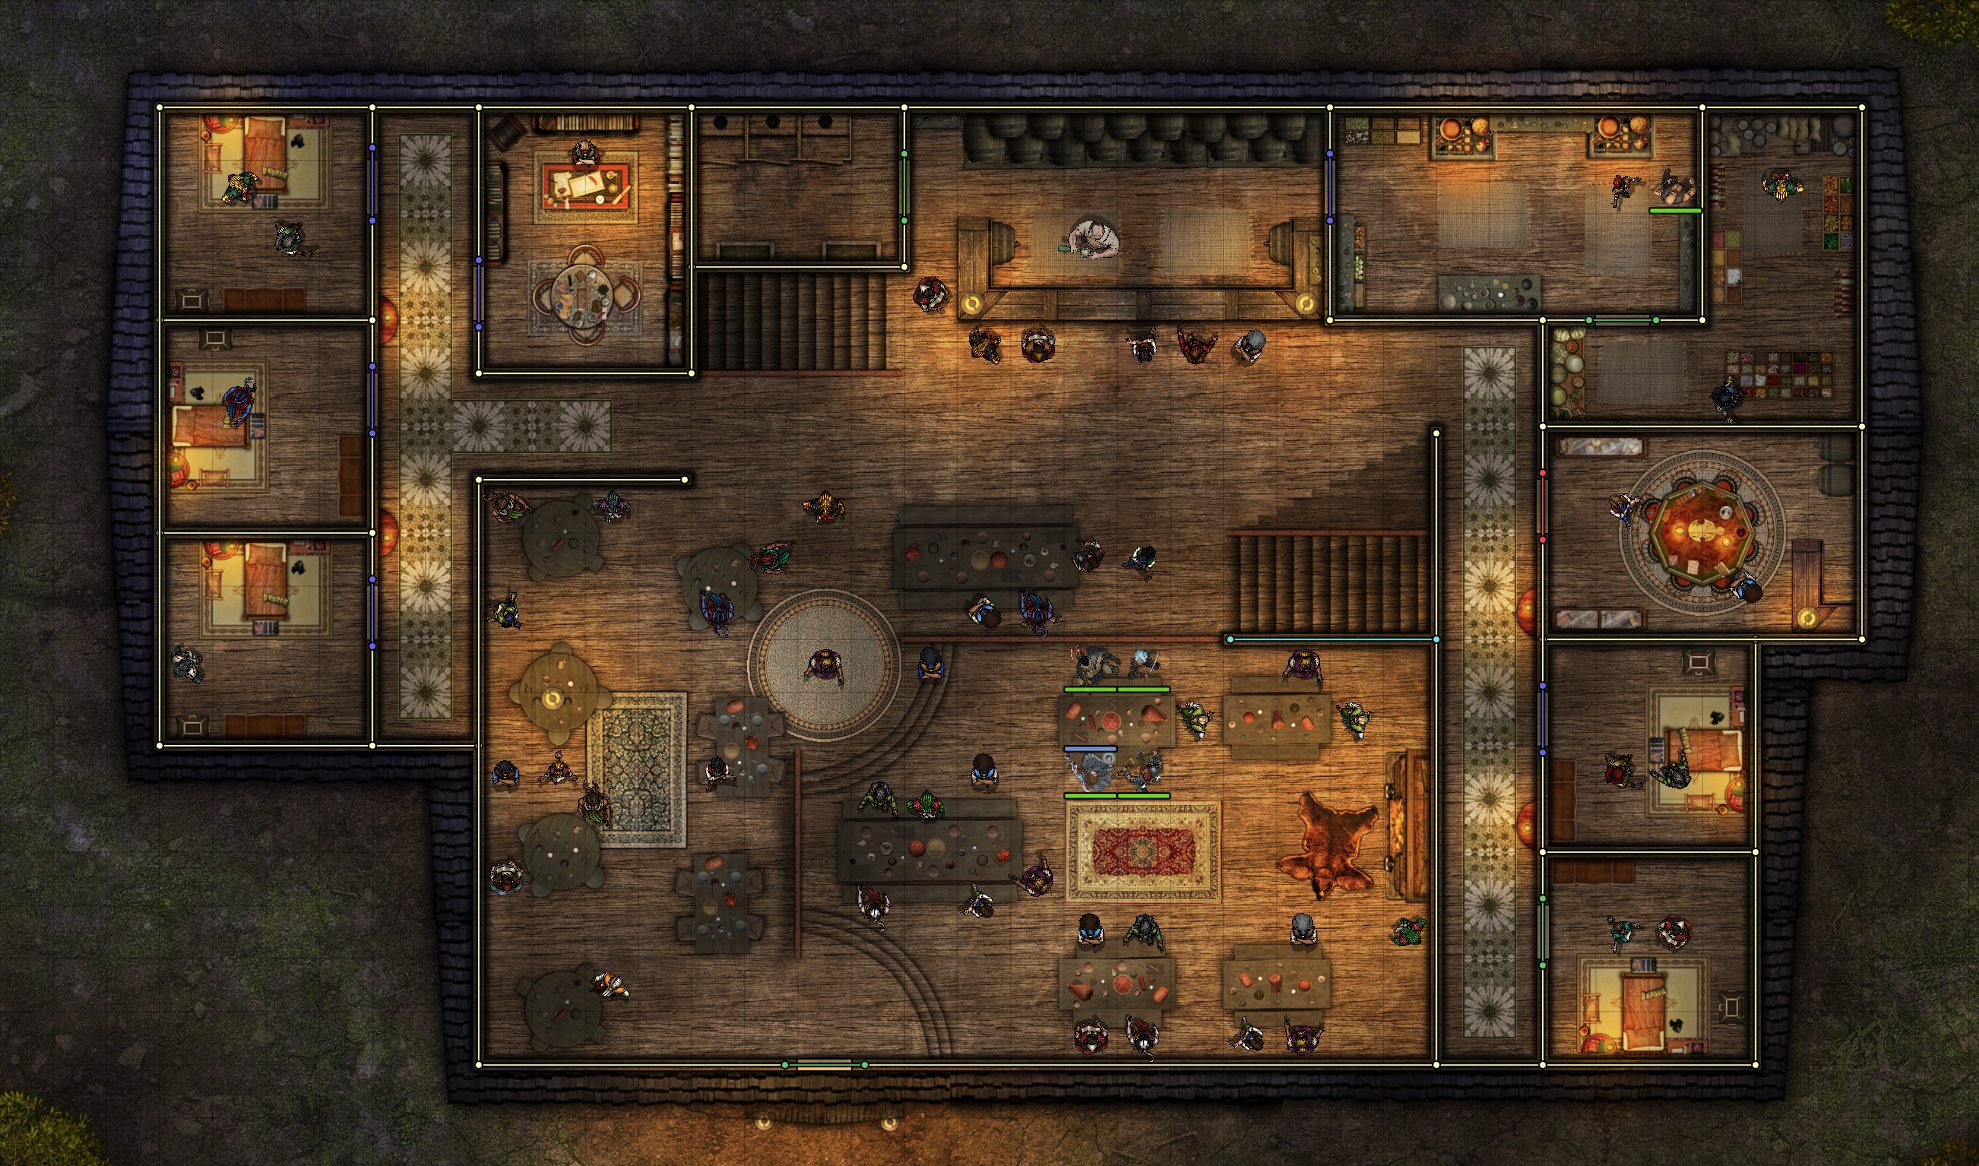
Creating walls is as easy as selecting the wall control tool and dragging out lines to denote a wall that blocks sight. While there are multiple types of walls, which all do slightly different things, the two most common walls you'll use are standard walls and doors.
If you're using the tavern map provided above, you can use the image example as a guide for how the building should be walled in.
You can learn more about walls in the Walls article.
Creating Lights
Lights are necessary for actors to see things, unless the scene has the Global Illumination tag set, in which case the entire scene will be brightly lit. Lights are especially important when the map's darkness level increases, and visibility drops. You can adjust the map's light and darkness level by right clicking on the map in the scene directory and choosing configure, or by going to the lighting controls panel on the left and using the transition to daylight or darkness buttons.
Lights will interact with walls, creating shadows and sections of darkness where the light can't reach. Creating a light is as simple as clicking on a point in the scene and dragging out the light's radius. The two rings visible as the light's being created shows the inner bright radius, and the outer dim radius. Once you have created a light you can double click on it to change its various properties including the color, and specific radii of the bright and dim rings. You can also right click on the light to quickly turn a light on or off without removing it.
You can learn more about lights in the Lighting article.
Placing Actors in a Scene
Once you have created and configured a Scene, gotten used to moving your view, and have put down walls and lights, you'll want to bring one or more actors into the scene. To do this, select the Actors Directory icon to the right of the scenes tab icon, then click and drag an actor from the directory to the active scene. This will place a token representing the actor into the scene, and its owner will be able to see the scene through that token's vision (if it has vision).
As a Gamemaster you can view what any token can see by clicking on it.
You can learn more about actors in the Actors article, and more about tokens in the Tokens article.
Ways to move tokens
Moving a token can be done in several ways, depending on what you and your players need, and what is easiest for you:
- Drag Movement - Click and drag a token to move it in a straight line along the path to a new location. As soon as you release the token Foundry will execute the move. It should be noted that as a gamemaster you can drag tokens through walls and other obstructions, but players cannot.
- Incremental Movement - The arrow or WASD keys can be used to move a controlled actor around a scene. This is especially useful for doing small, incremental moves in tight spaces where walls and terrain might block movement. You can also hold down Shift while using these movement keys to quickly rotate an actor to a particular facing without changing their position on the map.
- Measured (Waypoint) Movement - The measurement tools can be used to to move tokens. This is done quickly holding down the control (CMD for macOS) key, then clicking and dragging in a direction from a token you control. This will show you a path, and distance to the final location. You can left click in additional places along the route to place waypoints the token will follow. To move a token using this method, simply press the spacebar, and Foundry will move the token along the line to the final measured point. You can do the same thing with the measure distance tool if the start of the measurement is on a token you control.
You can learn more about Foundry VTT's control setup in the Game Controls article.
Inviting Players
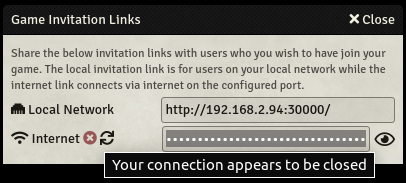
Once your users, actors, items and scenes have been created, you're going to need players. Inviting players to your game is very simple: from the right sidebar click on the Game Settings tab (the gear icon) and then click on Invitation Links. This will pop up a window with two IP Addresses. The first one is for users that are on the same local network as your copy of Foundry, and the second ip is your public IP for outside internet connections. In both cases, users can paste these links into a web browser and join your game.
Note that if you are using a remote hosting solution, there is a good chance you will have a different address to give to players, such as a proper website domain name instead of an IP. This will not be reflected in the invitation panel.
Connection Testing
If you are hosting via an IPV4 connection, the Game Invitation Links application window will display a simple indicator for whether your server is reachable from a remote connection. This occurs by way of the Foundry VTT software triggering an attempt to connect from one of our own remote hosts as a basic 'yes or no' confirmation of connectivity, displaying a notification for whether or not the connection appears to be open or closed.
Link Obscuration
To help prevent cases of users who stream Foundry VTT games accidentally revealing their game invitation links to their audience, the remote invite link is obscured by default. A button has been provided to allow toggling visibility of the link, but clicking the obscured link will copy the address to your clipboard for convenient pasting.
Combat Encounters
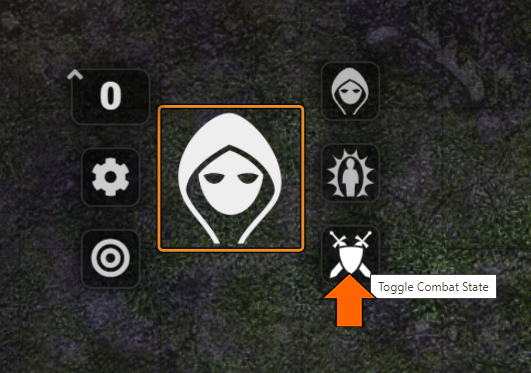
Sometimes scenes are destined to result in violence and combat, or times they need you to track what everyone's doing from moment to moment. For this, you need to use the combat tracker. To make use of the combat tracker you simply need to select an actor in a scene, right click them and click the sword and shield icon. This places them into a new encounter, and sets you up to begin tracking combat.
Once you have all your combatants in the encounter, you can click the d20 icon next to their name in the combat tracker to roll their initiative, and then click the begin combat button to start tracking rounds and turns.
For more on combat encounters, refer to the article on Combat Encounters.
Learning More
Now that you've completed the getting started guide, you should understand the basics of setting up game worlds, players, actors, and scenes. But there's plenty more to learn about Foundry VTT! This article has several links to other articles in the knowledge base which explain concepts in greater detail, which could be good places to start reading.
There is also a fantastic community made Foundry VTT Tutorial video series from Encounter Library which can be found here: Encounter Library Foundry Basics Part 1
You can also join the Foundry Community Discord server to interact with fellow gamemasters and players, learn about Foundry, what it can do, and what resources are available for you to play with as a new user.
Conclusion of Part 2
This concludes part two of the Getting Started Tutorial!
- Return to Tutorial - Gamemaster Part One part one.
- Refer your players to the Tutorial - Player Orientation.