Overview
Foundry Virtual Tabletop includes support for placing Tiles, which are individual pieces of artwork displayed above the background image of the scene to add decorations, props, or custom features to be interacted with or to change the aesthetics of the scene.
This article will familiarize you with the two methods of placing tiles into scenes, and how to manipulate and configure them once placed.
Tile Controls
The Tile Controls panel can be opened by clicking on the stacked cubes icon ( ) on the left-hand side of the user interface. This opens the tool palette, and allows you to draw new tiles or manipulate existing tiles segments.
- Select Tiles ( )
- This tool allows you to select tiles to be moved, edited, or resized. While a tile is selected you can hold down the shift or control keys and use your mouse wheel to rotate it. You can also click and drag it around the scene.
- Place Tile ( )
- This tool allows you to draw out a rectangle then opens a dialog to let you select the specific artwork you want to place inside the confines of the rectangle.
- Open Tile Browser ( )
- This tool opens the File Picker which allows you to browse images in your user data folders. You can click and drag any image in this browser to the canvas, which places that image as a tile.
- Toggle Foreground Layer ( )
- This button switches between editing foreground and background tiles. When on, you can only select and edit overhead tiles, when off you can only select and edit background tiles. This toggle also determines what layer all newly created tiles are placed on. This toggle defaults to off when a scene is loaded.
Placing Tiles
To place or create Tiles, activate the Tiles Layer from the controls palette on the left hand side of the screen, and select one of the tile placement tools. Depending on which tool you select, the process is slightly different:
- Place a custom tile
- To do this use the second tool which looks like a cube and you can left-click drag a box which will form the basic shape for the tile. Once you release your left-mouse button you will be prompted to provide the configuration details for the Tile.
- Use the File Browser
- by clicking the folder icon in the tool palette you will be shown a File Picker where you can drag and drop image assets onto the Scene to create Tiles.
Once a tile has been created in a scene, they can be moved and resized at will with the Select Tiles tool ( ). You can also edit existing tiles by double clicking on them, which opens the tile configuration panel. This configuration panel allows you to modify the appearance, dimensions, and positioning of the tile, as well as enabling options that allow it to function as an overhead tile with special occlusion modes.
Asset Grid Size
In the tile browser, you have an option to set an "asset grid size" which informs Foundry VTT what size of grid it should scale the assets for. This should generally match your current scene grid scale, but can be used to automatically size up or size down assets when they are being dragged from the tile browser. Setting a grid size lower than your current grid size will cause all tiles you place to be larger, while setting the asset grid size to be higher than your current scene grid size will cause all tiles you place to be smaller.
Once a Tile is created, you can configure all the details of the Tile by double-clicking on the Tile. Once any changes to the Tile have been made, click the "Update Tile" button to confirm your changes. The tile configuration options are described below:

Basic
- Tile Sprite
- The image or video file path of the displayed tile. Note that Tiles can be either static images or videos. If using Video tiles, the
.webmformat is recommended to support transparency (if needed). - X/Y-Position
- The x-coordinate (horizontal) location and y-coordinate (vertical) location of the tile. These are set automatically when the tile is initially placed or moved, and uses the top-left corner of the Tile to determine the coordinates of the tile as a whole.
- Z-Index
- The sorting place for the tile among other tiles on that layer, with higher Z-Index numbers being drawn overtop tiles with lower numbers. This can be used to manually sort tiles and how they are layered atop each other.
- Width/Height
- The horizontal width and vertical height of the tile on the canvas. These are automatically set when the tile is placed or when it is resized, but can also be manually edited to fine tune the dimensions of the image.
- Rotation
- The rotation of the Tile, in degrees. You can directly edit this field, or quickly rotate a tile placed in a scene by holding down Shift or Control and using the W-A-S-D keys, the arrow keys, or the mouse wheel. When used with the mouse wheel, Control offers smaller increments of rotation than the Shift key, allowing for finer adjustments.
- Tile Opacity
- The opacity of the tile from 0 (transparent) to 1 (fully opaque). With this slider you can directly affect the default level of transparency the tile has on the canvas, which is good for tiles such as dirt, cracks, damage, and similar overlay tiles that might be too intense or stark at full opacity.
- Tint Color
- The color overlay on a tile represented in hex color code. The color is set to multiply over the art of the tile, which means that the darker the color is the more it will darken the tile. In this case black (#000000) will turn the tile entirely black, while white (#ffffff) will not affect the appearance of the tile at all.
Overhead
The overhead tab of the tile configuration menu tab allows you to configure how a tile interacts with the canvas as an overhead tile.
Please be aware that token occlusion for overhead tiles does not update during a token's movement.
- Is Overhead?
- Toggles if the tile is to be treated as an overhead tile. When on the tile cannot be modified while the Foreground Layer toggle is off in the Tile Layer tool sidebar. Overhead tiles are rendered above background tiles in the Canvas Layers. Overhead tiles are automatically hidden when actors move under them.
- Is Roof?
- Toggles if the tile is to be treated as a roof tile, which render above light sources and blocks weather effects on the map for any tokens under it.
- Occlusion Mode
- The occlusion mode determines how the overhead tile interacts with actor tokens on the canvas.
- Occlusion Alpha
- The occlusion alpha setting determines what level of opacity the overhead tile should maintain even when an actor token is under it. The setting ranges from 0 (transparent) to 1 (fully opaque). This setting defaults to 0, meaning that all overhead tiles fully vanish when an actor token moves under them.
None turns off occlusion, making the tile never fade while tokens are under it.
Fade causes the whole tile to fade when an actor token moves under it. This is the default setting when toggling overhead on.
Radial causes the tile to reveal the background in the vicinity of an actor token under it. The radius is determined by the token's size.
Vision causes the tile to be partially revealed based on the vision of the actor, which does not need to be under the tile to see what's beneath it. This is useful for rooves on buildings where players could see through a window or door, viewing only a portion of what is obscured by the roof itself.
Animation
The animation tab of the tile configuration menu allows you to configure how a video tile behaves on the canvas.- Loop Video
- This toggle determines if the video should automatically start again after playing its last frame of animation.
- Auto-Play Video
- This toggle determines if the video should automatically start playback when the scene loads, or if it should wait for the play button to be pressed on the token HUD.
- Video Volume
- This slider determines the volume of video tiles that have sound. By default all tiles start with a volume setting of 0 (muted) to prevent unwanted audio playback.
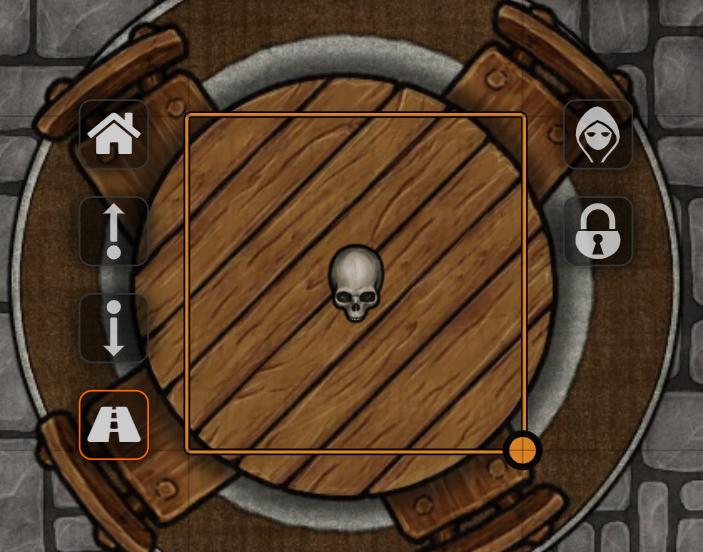
Various quick-actions are available for tiles through the Tile in the HUD, which is accessed on a single right-click on an already selected tile.
- Toggle Visibility
- Toggle the visibility state of the Tile, turning it from hidden to visible (or vice-versa).
- Toggle Locked State
- Toggle the locked state of the Tile. While locked, the Tile cannot be moved and is non-interactive.
- Bring to Front
- Bring the Tile to the front of the rendered Layer, displaying it above other nearby Tiles. If the tile is already at the front of the layer, this will increment the tile's Z-Index by 1 each time it's clicked.
- Send to Back
- Send the Tile to the back of the Tiles Layer, displaying it below other nearby Tiles. This will set the tile's Z-Index to one less than the lowest z-index tile in the scene. If the tile is already at the back of the layer, this will decrement the Z-Index of the tile by 1 each it's clicked.
API References
To interact with Tiles programmatically, consider using the following API concepts:
- The Tile Object
- The TilesLayer Canvas Layer
- The TileConfig Application