Overview
Foundry Virtual Tabletop has a powerful engine for Lighting and Fog of War which interacts with placed @Article[Walls] to define the visibility and exploration progress of a Scene. Lights can be used to influence the appearance of a scene as well as allows players to explore an environment through their character's perspective, with lights revealing areas they would normally be unable to see.
Lighting Layer
The Lighting Layer controls allow you to create and edit lights which change the appearance of scenes, as well as reset fog of war exploration that has already taken place
Light sources can be easily created on any scene by selecting the Draw Light Source tool from the control palette and using a click-and-drag workflow to set the light location and its overall radius. Lights default to splitting the overall radius drawn between bright and dim light. The radii of both levels of light can be configured after the light is created. Lights are blocked by Walls which have been configured to stop light, by default this includes all standard walls, Terrain Walls, and Ethereal Walls.
For more info on how to create and configure walls please see the Walls article.
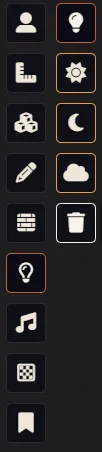
Light Control Palette
- Draw Light Source ( )
- This tool allows you to create new lights. With this tool active click and drag anywhere on a scene canvas. This will create a basic light with a radius dependent on how far you dragged the mouse. You can edit any light created in this manner by double clicking the lightbulb icon at the center of the radius.
- Transition to Daylight ( )
- This button will smoothly transition your scene to a Darkness level of 0 (fully bright). If your scene is already at Darkness 0, this button will do nothing. This effect is synchronized for all connected Users.
- Transition to Darkness ( )
- This button will smoothly transition your scene to a Darkness level of 1 (fully dark). Similar to the Transition to Daylight button, this effect is synchronized for all connected Users.
- Reset Fog of War ( )
- This button resets the recorded Fog of War exploration for that scene for all Users. This includes any that are not currently connected.
- Clear Lights ( )
- This button deletes all lights presently placed on the canvas for this Scene.
Editing Light Sources
After a light has been placed, it can be moved at any time by clicking and dragging the light source icon. By default the light source will snap to the map grid, but this behavior can be disabled by holding Shift while dragging the light source to a new location.
Lights can also be toggled on and off with a right click on the light source itself.
It is also possible to quickly rotate a light by hovering the mouse cursor over the light source icon, holding Shift and rolling the mouse wheel up or down. Alternatively, holding Control uses smaller increments of rotation than the Shift key, allowing for finer adjustments. To edit an existing light, double click the light source icon, this will being up the light configuration panel.
Lighting Configuration
The lighting configuration panel is separated into three tabs which contain the various light settings. These tabs are Basic Configuration, Light Animation, and Advanced Options. The settings in these tabs are detailed below.
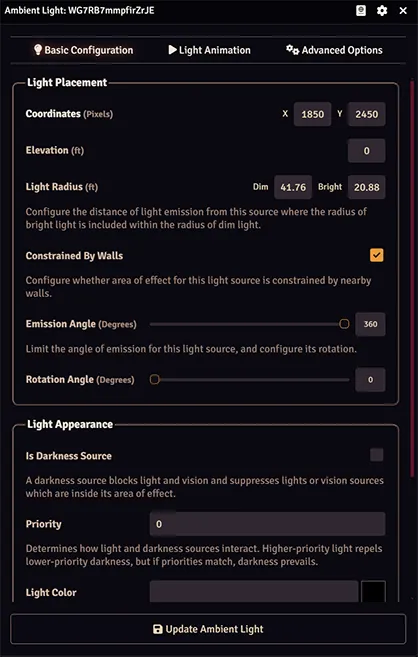
Basic configuration contains the most commonly used features of lights. These settings allow you to manipulate the basic size and appearance of the light.
- Coordinates (Pixels, X & Y)
- This displays the current x/y coordinates of the Light Source in the Scene. All newly created lights using the Draw Light Source tool have these fields automatically filled in based on where in the scene the light was created. Repositioning the light in the scene also changes these values automatically. These can be changed to reposition the light manually, and to make precise modifications.
- Light Radius (Grid Units, Dim and Bright)
- The distance in map grid units that both dim and bright light extends from the light source at the center. All newly created lights have these fields automatically filled in based on the overall radius size drawn, splitting the radius evenly between bright and dim. These can be changed to fine-tune how large the bright and dim portions of the light are. Both fields can be reduced to 0, which effectively disables that light level, allowing for the creation of only bright or only dim lights.
- Emission Angle (Degrees)
- This determines the maximum angle of the light's emission. All newly created lights begin with a default of 360 degrees, allowing for a fully circular light radius. By reducing the emission angle a light can be constrained to a smaller area. This is good for tailoring lights to specific areas and walls, or to simulate things like flash lights, head lights, lanterns and other other similarly directed light beams.
- Rotation Angle (Degrees)
- The rotation of the light, in degrees. This field can be directly edited to set a specific degrees of rotation. Rotating a light using Shift or Control + Mouse wheel automatically updates this field. Rotation can be applied to lights at any time, but it will only be obvious if the light's emission angle is less than 360 degrees.
- Light Color (Hex #000000)
- This determines the color of a light. All newly created lights start with this field blank. Directly editing this field allows for the use of hex color codes to set a specific color. Alternatively, clicking the color box next to the text field opens an RGB based color picker. This panel's appearance and features are based on the default for your Operating System or Browser. Changing the color of the light also updates the color indicator next to it automatically. This field can be cleared to remove the light's color it has been given one.
- Color Intensity
- This setting determines how strongly the light's color affects the appearance of the light itself. All newly created lights begin with a default setting of 0.5, which is 50% strength. Lights with an intensity of 0 are treated as having no color at all.
- Darkness Activation Range
- This setting determines the range in which the light will be active. All newly created lights begin with a range of 0/1, making them active at all times. By adjusting the minimum and maximum darkness range the light can be fine-tuned to turn on or off at specific darkness levels. This is useful for creating lights such as lanterns, street lights and candles which would only be lit at night.
- Is Darkness Source
- If this box is checked, the "light" instead emits darkness that actively blocks light and vision. The area of the darkness source is unilluminated mechanically as well as being visually "dim" on the map. Tokens have no vision within a darkness source's area, and tokens typically cannot see past an area of Darkness. The edges of a Darkness source's area block vision, much like a Wall.
- Priority (V13 only)
- Priority matters when the areas of a light source and a darkness source overlap. The source with the higher priority "wins" and emits its light or darkness in the conflicting areas. When conflicting sources have the same priority, the tie goes to the darkness source.
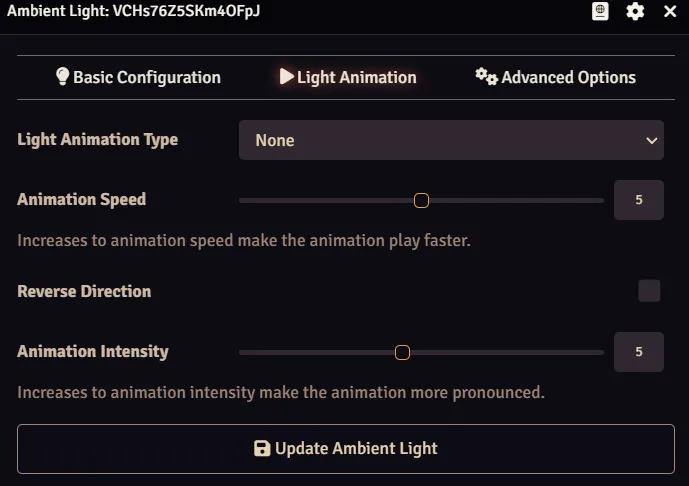
This panel contains the options necessary to select and customize the lighting animations that can be applied to lights.
- Light Animation Type
- This dropdown list contains all of the currently available animation shaders available in the software. Selecting one of the options automatically applies it to the light. Some shaders work best with a light color, and may not automatically appear when selected until one is set.
- Animation Speed
- This setting determines how quickly the animation cycles. A higher setting makes the animations move faster, while a lower setting makes the animation slower. An animation speed of 0 will cause the animation to pause, but still be applied to the light.
- Reverse Direction
- When toggled, this setting will reverse the direction of the animation.
- Animation Intensity
- This setting modifies the intensity of an animation, generally determining how large aspects of the animation are.
Light Animation Types
Bewitching Wave: This animation effect creates concentric circles of bright light that move out from the center of the light source much like Pulsing Wave, but introduces ripples and warping effects into these rings. Animation speed governs how quickly the rings of light move, and animation intensity governs the size and frequency at which new rings are created and how pronounced the warping effect on the ripples is.
Black Hole: This animation effect creates a series of dark swirls to emanate from the bright radius of the light which move to the edge of the light radius, and is meant to be sued with negative brightness light sources. Animation speed determines how quickly the swirls of darkness move to the edge of the light radius, while animation intensity determines the shape of the swirls, with a low intensity creating almost concentric swirls, and a high intensity creating pronounced zig-zag ripples.
This lighting animations can be used with positive light settings, but the effect is meant to be used with negative lights which create artificial darkness in a scene. The color of the light has no bearing on the appearance of this effect when using negative light radii.
Chroma: The Chroma animation effect offers a way to provide a light source which shifts between colors. Animation speed determines how quickly the light moves through color transitions, and animation intensity determines how strongly it color shifts. A low intensity limits the light to choosing colors along the same hue, while a high intensity allows the light to select colors across all spectrums.
Energy Field: This animation effect creates a spherical dome of creeping, seething energy webs over the light's bright and dim radii. Animation speed determines how quick and pronounced the ripples and warping effects on the energy field are, while animation intensity determines how tight the energy web is, with a low intensity being very large, transparent strands of energy.
Fairy Light: This animation effect is a mixture of radial rainbow and ghostly light, creating a swirling water-like ripple of color changing light. Animation speed governs how fast the shader effect ripples and animation intensity governs how visible the ripples are, how strongly lit they are, and how pronounced the color swirl is within them.
Flickering Light: This light pulses at semi-regular intervals, expanding and contracting to provide the appearance of an unreliable light that is fluctuating in intensity.
Ghostly Light: This animation effect creates a rippling water-like effect with layers that flow over overtop each other and the light below it. Animation speed determines how quickly the ripples move, while animation intensity determines how visible the ripples are, and how strongly lit they are.
Hexa Dome: This animation effect creates a rotating spherical barrier of hexagons with pulsing interiors, while also maintaining the bright and dim light radius around the light source. Animation speed determines how quickly the shield rotates, and how quickly the light in the hex cells pulse. Animation intensity determines how big the hex cells are, with a lower intensity creating larger hexes, and a high intensity creating smaller hexes.
Light Dome: This animation effect creates a spherical barrier of rippling light while maintaining the bright and dim radius of the light itself. Animation speed determines how quickly the ripples of energy move, while intensity determines the size of the ripples. A lower intensity creates larger ripples, while a higher intensity creates a smaller, more dense layer of energy.
Mysterious Emanation: This animation effect creates a semi-random spiraling swirl of energy. Animation speed determines how often the swirling tendrils of light change direction, while animation intensity determines how many tendrils there are.
Pulse: The Pulse animation effect create a light source that grows and fades on a steady rhythm. Animation speed determines how quickly the pulses reach their maximum intensity and then fade out. Lighting intensity determines how much the bright radius of the light fades out during a pulse, with 0 being only a slight reduction and 1 being a full reduction of the bright radius to nothing before it reappears.
Pulsing Wave: The Pulsing Wave animation effect creates concentric circles of bright light that move out from the center of the light source. Animation speed governs how quickly the rings of light move, and animation intensity governs the size and frequency at which new rings are created.
Radial Rainbow: This animation effect creates concentric circles of color shifting light that move out from the center of the light source much like Pulsing Wave. Animation speed governs how quickly the rings of light move, and animation intensity governs a mixture of ring size and frequency along with the intensity of color change on the rings as they move.
Roiling Mass: This animation effect creates a dark, rippling effect around the edges of the bright light radius. Animation speed determines how quickly the inner blob of darkness shifts and ripples, while animation intensity increases a darkening effect present on the dim light radius.
This lighting animations can be used with positive light settings, but the effect is meant to be used with negative lights which create artificial darkness in a scene. The color of the light has no bearing on the appearance of this effect when using negative light radii.
Sunburst: This animation effect creates a rotating halo of light with bright beams emanating from the center of the light source. Animation speed determines how quickly the light beams rotate around the source, and how rapidly the inner core of light pulses. Animation intensity determines how large the inner glow of the light is, with maximum intensity creating a glow about the size of the light's bright radius, and a low intensity giving the light almost no glow at all,enhancing the appearance of the light rays.
Swirling Fog: The Swirling Fog animation effect creates a random field of smoke or hazy that moves around the area of the light. Animation speed governs how quickly the fog cloud moves, dies out, and is reformed, with a low speed creating a slow, lingering fog. Animation intensity determines how thick or opaque the fog is.
Swirling Rainbow: This animation effect creates a swirling spiral around the light source which undergoes color shifting like the chroma animations shader. Animation speed governs how quickly the vortex rotates around the light source, and animation intensity governs how vibrant the color shifting effect is.
Torch: The Torch animation effect provides a semi-randomized flickering quality to the light source, intended to simulate light provided by fire. Animation speed determines how quickly the light flickers, and intensity determines how large and powerful the flickers are.
Vortex: This animation effect creates a swirling tornado texture on the light source which rotates around the center. Animation speed governs how quickly the vortex rotates, and animation intensity governs how tightly the vortex coils around the center of the light radius.
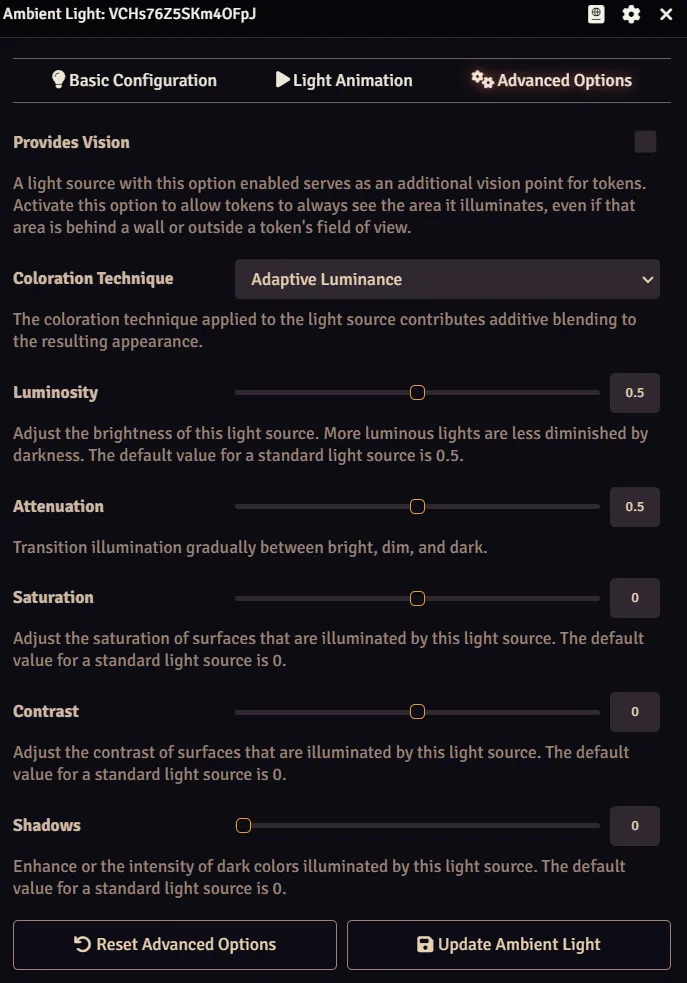
This panel allows for specific manipulation of various advanced lighting features that can drastically change the appearance of the light and how it affects the rest of the scene.
- Constrained by Walls
- This setting determines where the light is affected by nearby walls. All newly created lights have this setting toggled on by default. Toggling it off will cause the light to shine through walls even if they would normally block light.
- Provides Vision
- This setting determines whether a light provides vision to all tokens in the scene. When toggled on controlled tokens will be able to see anything in the light's radius as an extension of their own sight.
- Coloration Technique
- This dropdown list provides a selection of available coloration methods for lights and how it blends with other lights. All newly created lights default to Adaptive Luminance. The specific lighting options are explained below in greater detail.
- Luminosity
-
This setting determines the brightness of the light source in the scene. All newly created lights begin with a Luminosity of 0.5, which can be manually changed. A luminosity setting of 0 makes the light appear no brighter than its surroundings, though it will still impart some color and animation effects on the scene.
Luminosity must be at least zero. To make an area darker, you can instead place a Darkness source or use a Scene Region with the "Adjust Darkness Level" Behavior.
- Gradual Illumination
- This setting determines if the light's bright and dark radii should be blended, becoming more diffused the close they get to their outer edges. All newly created lights have this setting turned on by default. Toggling it off will give lights a more sharply defined line between dark and light zones, and where the light's overall radius ends.
- Background Saturation
- This setting determines how much the light increase the saturation of its own color and any colors within its radius, including the scene background. All newly created lights begin with this setting at 0. Setting background saturation to a negative value will remove color from the textures under the light's radius with a setting of -1 turning all colors to grayscale black and white.
- Background Contrast
- This setting determines how much contrast the light provides to the underlying image inside of its radius. All newly created lights begin with this setting at 0. Setting this to negative values will reduce contrast in the light radius, while increasing the value beyond 1 will increase the contrast.
- Background Shadows
- This determines who much (if at all) the light will enhance the intensity of dark colors inside the light's radius. All newly created lights begin with this setting at 0. Increasing this value will darken all textures inside of the light's radius, targeting the darkest parts of the image first. Without a light color or positive luminosity value this will produce a significantly stronger effect then normal.
Color Blending Techniques
- Legacy Coloration: The setting mimics the original lighting style that was the default prior to the release of Version 9.
- Adaptive Luminance: This is the default blending method for all newly created lights. This blending mode was introduced in Version 9 and utilizes proper RGB color blending which preserves visibility of the underlying scene background while imparting strong color on the scene.
- Internal Halo: This blending mode produces a more pronounced flare of light inside of the bright radius. The dim light radius functions as a normal per adaptive luminance. This blending mode requires a light color to produce any visible effect, with bright colors having a more pronounced effect
- External Halo: This blending mode produces a pronounced flare of light inside the dim radius while allowing the bright radius to function as a normal per adaptive luminance. This creates a distinct ring of very bright light. This blending mode requires a light color to produce any visible effect, with bright colors having a more pronounced effect.
- Color Burn: This blending mode darkens all colors in the light radius and increases their contrasts, creating dramatic, creating sharp, glowing outlines on tokens, tiles, and background art.
- Internal Color Burn: This blending mode works like the Internal Halo mode combined with the Color Burn mode, creating an inner ring of color burn light and an outer ring of adaptive light.
- External Color Burn: This blending mode works like the External Halo mode combined with the Color Burn mode, creating an inner ring of adaptive light and an outer ring of color burn light.
- Low Absorption: This blending mode causes the darker colors in the underlying scene texture to absorb more of the light, while lighter areas absorb less, taking on a distinct glow that can make surfaces appear shiny or raised.
- High Absorption: This blending mode works similarly to Low Absorption, but increases how much light is absorbed by darker colors of the underlying textures, creating a more pronounced effect.
- Invert Absorption: This blending mode works as an inversion of Low Absorption, causing lighter colors in the light radius to absorb less color while making darker areas be affected more strongly.
- Natural Light: This blending simulates the loss of white light in an environment, causing the color of lights to become stronger as a scene's darkness level increases, while leaving lights to function as normal in high brightness scenes.
API References
To interact with AmbientLights programmatically, consider using the following API concepts: