Overview
Foundry VTT uses walls to create various virtual boundaries in-game. Together with fog of war and lighting, a Gamemaster can create immersive scenes and allow their players to explore an environment through their characters' eyes, seeing only what their tokens can see.
This article uses "walls" to refer to any boundary that prevents vision or movement through it. Walls themselves are typically not visible to players, but impose restrictions on a token's movement, line-of-sight, and sound depending on how each wall is configured. With the Wall Controls toolbar, you can view the Walls layer while viewing a scene.
Wall Controls

The Wall Controls panel can be opened by clicking the building icon ( ) on the left-hand side of the user interface. This opens the tool palette and displays all existing walls on the current scene (if there are any), allowing you to draw new walls or manipulate existing wall segments.
Note: For detailed information on how the individual wall types work see the "Wall Types" section later in this article.
- Select Walls ( )
- This tool allows you to select walls by clicking and dragging to create a rectangular shape on the canvas. Groups of selected walls can be edited together.
- Draw Wall ( )
- The default wall type. Restricts vision, movement, light, and sound.
- Draw Terrain Wall ( )
- Terrain walls block movement but allow vision, light, and sound to partially pass through.
- Draw Invisible Wall ( )
- Invisible walls block movement but do not affect vision, light, or sound.
- Draw Ethereal Wall ( )
- Ethereal walls block vision and light but do not block movement or sound.
- Draw Door ( )
- Doors function like default walls when they are closed but can be opened. When open, they allow movement, vision, light, and sound to pass through them.
- Draw Secret Door ( )
- Secret doors function as doors, but their interaction button is hidden from non-gamemaster users.
- Draw Window Wall ( )
- Window Walls replicate windows by blocking movement but allowing vision for tokens that are very close to them.
- Clone Wall ( )
- Cloning walls draws walls with the same configuration settings as the last wall that was edited or created.
- Force Snap to Grid ( )
- This toggle forces walls to snap to the scene's grid lines if the scene uses a square or hex grid type.
- Close All Doors ( )
- This button closes all doors on the currently viewed scene.
- Clear Walls ( )
- This button clears all existing walls on the scene.
Creating Walls
To create a new wall, select a wall type from the Wall Controls palette, then left click and drag from the point where you want the wall segment to start to the point where you want to wall to end.
Chaining Walls
Connected wall segments can easily be created by holding Ctrl (or command, if you are using MacOS) while placing a wall, which creates a new wall from your cursor to the last-placed wall segment, and will continue creating chained walls from all future points created. You can cancel the placement of a wall segment by right-clicking before you place the second point of the wall.
A wall can be selected by left-clicking it. Holding the Alt key when selecting a wall also selects all walls directly connected to one of that wall's endpoints. This allows you to move, delete or modify entire structures at once.
Wall Snapping
By default, the wall tool attempts to snap to an invisible sub-grid on the canvas in order to assist users in linking wall segments together without a gap wherever possible. The precision of this grid is partially adaptive, changing based on the size of the grid in use for the scene:
- 50px grids have 1/4 precision (5 snap points per grid unit)
- 100px grids have 1/8 precision (9 snap points per grid unit)
- 200px grids have 1/16 precision (17 snap points per grid unit)
If the "Force Grid Snapping" toggle is enabled, wall endpoints are instead forced to snap to the nearest corner of the grid.
Cloning Walls
This button in the Walls tool palette ( ) can be used to easily duplicate walls. After clicking the Clone Walls button, drawing new walls creates wall segments that have identical properties and restrictions as the last wall that was created or modified in the scene.
For example, if you just configured a wall segment with a custom set of restrictions to be a one-way secret door that doesn't block movement and plays a particular sound when opened, you can use the Clone Walls button to quickly place more identical custom secret doors.
Copying and Pasting Walls
Alternately, instead of using the Clone Walls tool, you can clone a wall using the copy and past function. Just select any existing wall, copy it (using Ctrl-c or Cmd-C), move the mouse to the destination location, and paste a copy of it (using Ctrl-V or Cmd-V).
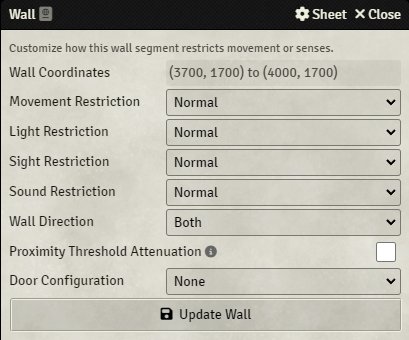
Wall segments can be further configured after they have been placed. Simply double-click a wall to edit it. Both points of the wall will enlarge to indicate which wall segment will be selected. You can double click multiple selected wall segments to edit all of them at once.
Movement Restriction
Movement restrictions determine whether tokens can move through those walls. Tokens being moved by a gamemaster user ignore movement restrictions if moved via mouse-based movement (dragging and dropping token on a new location).
- None: Tokens can move freely through the wall segment.
- Normal: Tokens cannot move past the wall segment.
Light, Sight & Sound Restriction
Walls can have multiple independent perception restrictions set which affect how light, sight (vision), and sound are blocked. These restrictions have identical restriction options:
- None: Light, vision and sound pass through the wall unimpeded.
- Normal: Light, vision and sound do not pass through the wall segment.
- Limited: Light, vision and sound pass through this wall segment, but not past any "Limited" or "Normal" wall segments after it.
- Proximity: Light, vision and sound pass through this wall segment, but only if the source or viewing token is within the defined threshold distance of the wall.
- Reverse Proximity: Light, vision and sound pass through this wall segment, but only if the source or viewing token is outside the defined threshold distance of the wall.
Proximity Threshold Attenuation
This checkbox only applies to walls with Proximity or Reverse Proximity restrictions, such as Window Walls.
- If unchecked: Walls with Proximity and Reverse Proximity restrictions either fully block vision/light or they apply no restrictions at all, depending on distance.
- If checked: Light and vision may be permitted to pass the wall only for a short distance, depending on the source's distance to the wall.
If attenuation is enabled for a proximity wall and a source of light or vision is barely within the threshold distance of it, the light or vision penetrates only a small distance through the wall because it is mostly "attenuated" by the distance. The closer the source gets to the wall, the light or vision gradually penetrates further through the wall. When the source is directly next to the wall, the source's usual maximum distance is allowed to pass through.
Attenuation and Reverse ProximityAttenuation works similarly with Reverse Proximity, but on the other side of the threshold distance. If attenuation is enabled and the source is barely further away from the wall than the defined threshold distance, partial vision or light is permitted to pass a short distance through the wall. This partial penetration distance gradually increases as the source moves further away from the reverse proximity wall.
Attenuation and SoundAttenuation does not apply to sound because a sound's volume is always determined by how far away the listening token is from the source of the sound. Based on the distance between the sound source and the proximity wall, either the sound is allowed to play through the wall using the normal volume calculation, or the wall blocks the sound fully.
Wall Direction
Wall direction determines which side of the wall applies the configured restrictions. By default, walls apply their restrictions to both sides. When a direction is applied to a wall it will have an arrow icon placed on it which shows the direction that is potentially restricted for sight, sound, and/or movement.
- Both: Movement and Perception restrictions apply equally to both sides of the wall.
- Left or Right: Restrictions only apply when sight, movement, or sound hits the wall from the selected side.
Is Door?
This setting determines whether the configured wall segment functions as a door and whether or not it is a secret door. By changing this setting, a Gamemaster can convert any existing wall segment into a door, or can turn a door into a normal wall segment.
- None: The wall segment is not a door and cannot be opened/closed.
- Door: The segment is a door. If it is unlocked, it can be opened or closed by any user with the Open and Close Doors permission.
- Secret: The segment is a door with no icon visible to Players and Trusted Players. To most users, it looks just like a normal wall until it is opened by a Gamemaster.
Door State
If the wall functions as a door, this setting determines its state (open, closed, or locked). All newly created doors start closed and can be locked if a Gamemaster right-clicks the interaction icon.
- Closed: Any wall restrictions to sight, movement, and sound are active. The door can be opened by clicking its icon, removing these restrictions.
- Open: Tokens can move, look, and listen through the wall freely. The door can be closed by clicking its icon.
- Locked: Any wall restrictions to sight, movement, and sound are active. Additionally, the door cannot be opened until it is unlocked by a gamemaster.
Door Animations
Walls configured as doors also provide the option for several pre-configured animations, allowing a GM user to add special animation effects to the opening and closing of doors on their scenes. Assigning an animation also allows for doors to be configured with a graphical asset that the animation will use. While Foundry VTT provides a variety of assets for free thanks to our friends at Forgotten Adventures , GMs may also use their own custom asset files instead.
- Door Texture
- This file path points to the graphical asset you wish to include for your door to use. The door assets Foundry VTT includes are in the Core Data tab, in the
canvas/doors/directory. 1
- Flip Door Texture
- If the graphical asset for the door doesn't quite line up correctly with your existing scene or looks a little odd when animated, flipping the door texture will mirror it so that it can be found easily.
- Double Door
- This toggle allows you to indicate if your door is intended to be a double door, for example, one that opens at the center point rather than at an edge.
- Animation Duration
- How quickly or slowly the door animation takes to complete in miliseconds(ms). Default: 500.
- Open Direction
- By default, the door will hinge on the first wall point placed when drawing the wall, if it opens the wrong direction, you can simply set this to reversed Whether the door opens the default direction or
- Animation Strength
- The 'forcefullness' with which the animation hits and how far the door opens, if set to a lower value it will open more slowly and less drastically, a higher value will throw the door open with more of an impact and, if the door is set to swing, a wider arc.
Animated doors can be configured with one of a variety of different animation effects including:
When the Wall Controls toolbar is enabled, a gamemaster can view or modify the existing walls in scenes and create new walls. This toolbar also provides quick buttons to easily create wall segments of a number of common, predefined wall types:
Normal Walls
The default wall type restricts vision, movement, and sound. These walls are colored yellow on the Walls layer.
Terrain Walls
Terrain walls prevent token movement, but allow limited vision. Specifically, a token with vision can see past one terrain wall segment, but not two. These walls are ideal for roofed buildings, large rocks, or other terrain features that can be easily seen but obscure objects behind them. Terrain walls are colored green.
Invisible Walls
These walls only block token movement. They do not impede vision, light, or sound. Walls of this type are ideal for glass walls, force fields, or any other largely transparent but solid obstacle. They are colored cyan on the Walls layer.
Ethereal Walls
Almost the exact opposite to invisible walls, ethereal walls block vision and light, but tokens and sounds freely pass through them. These walls may be useful for dark veils, curtains, or thin fake walls. They are colored light magenta on the Walls layer.
Doors
Doors are wall segments that users can interact with to open or close. When a wall segment that is a door is closed, it imposes any restrictions it normally would (typically blocking movement, vision, and sound in both directions). While a wall segment that is a door is open, it provides no restrictions at all.
Using the Permission Configuration window, the GM can control which user roles are allowed to open unlocked doors.
Door Sounds
Optionally, doors can be configured so that a sound plays when they open. A standard set of sounds are included in Foundry so that an appropriate sound can be chosen for each door.
Animation Type
Doors can be configured to include an animation which allows assigning a graphical asset, providing the ability to add a variety of special effects that occur when the door state changes to open from closed.
Locked Doors
A Gamemaster can lock any door by right-clicking it. When a non-GM user attempts to open a locked door, a "locked" sound plays and the door remains closed. The Gamemaster can unlock a door by right-clicking the door's icon again.
Door Color Key
When A GM views the Walls layer, wall segments that are doors are color coded according to their properties:
- Closed doors are colored purple
- Opened doors are light green
- Locked doors are red
- Secret doors (see Secret Doors below) are dark magenta
- Locked Secret Doors are red, just like normal doors
Secret Doors
Secret Doors are just like normal doors except they have a different door icon which is deliberately hidden from most users, causing Secret Doors to to look like any other part of the wall. When a player somehow discovers a secret door, the Gamemaster can open it for them or change the Secret Door to a normal door.
Window Walls
Window walls (sometimes called Proximity Walls) are unique because the amount of vision they permit depends on how close the viewer is to the wall.
The closer the viewer is to the Window wall, the better they can see through it. If someone is immediately next to a Window Wall, they can see through it easily, but it may be harder or impossible to see through at further distances. The primary use for this wall is to allow GMs to have realistic "windows" while preserving a bit of the mystery about a room's contents.
API References
To interact with Walls programmatically, consider using the following API concepts: