Overview
One of the most fundamental documents within Foundry Virtual Tabletop is the Actor, as they are the protagonists, allies, monsters, antagonists, and persons within the World that you create.
The game System being used has control to define the exact types of actors which are relevant for its gameplay, but for most tabletop roleplaying systems these actors will represent the characters which the player Users impersonate and the foes they encounter.
This article will detail the features of actors, how to create them, and configure them.
The Actor Directory
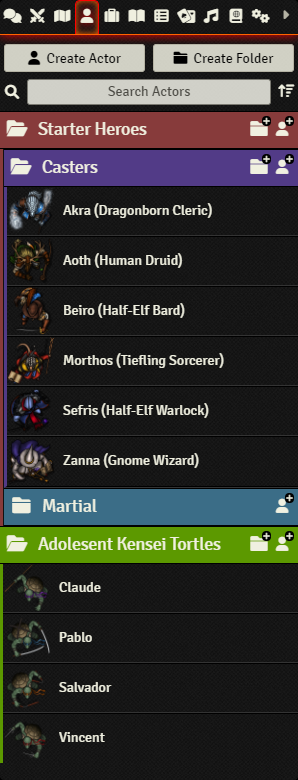
Actors in Foundry can be viewed, created, and managed in the Actors Directory sidebar. Like the Scenes, Items, and Journal Entries directories, this directory can contain folders to organize your world's actors. Only a Gamemaster or Assistant-level user can change or move folders, but any players with at least Limited permissions on an actor can see the actor and the folder(s) containing it in the Directory. The specifics of this sheet depends on the system being used.
Sidebar Elements
- Create Actor ( )
- This button creates a new actor with the name given. If you do not name the actor it will be automatically named "New Actor" with a number appended to it.
- Create Folder ( )
- This creates a new folder. For details on how to create and use them please see the Folders article.
- Search Items ( )
- This searches for and lists any actors whose names match the given string of text entered into the search bar.
- Collapse All Folders ( )
- This collapses all folders, showing only the top-level folders and any actors not sorted into a folder.
Creating and Editing Actors
To create a new Actor, click the Create Actor button, this will create a dialog box prompting you to name your item. Depending on the system you are using, it may also give you the option to determine the type of actor you are creating, such as a player character, NPC or Vehicle. Once you have named your item and selected its type (if necessary), click Create New Actor.
This will add your actor to the directory sidebar, and open its sheet for you to edit and fill out. The options you have available on this actor sheet depends entirely on the game system you are using. Once you are done editing your actor you can close the window, the changes will be automatically saved.
Default Sheet Configuration
The Actor Sheet button ( ) allows you to set which sheet template you want to use for the current actor, or all actors of the same type. Actor sheets can change how the actor's data is displayed and what can be edited.
Most systems will include one sheet template for all actors of a single type (characters, npcs, vehicles, etc.) but some may add extra versions. Add-on modules may provide additional options as well.
Prototype Token Configuration
The Prototype Token button ( ) controls the basic token configuration options which all actors have. These settings create a template for that Token when it is placed into a scene. Once a Token is actually placed it becomes an independent copy which can be configured differently from the Actor's prototype, though placed actors can be linked back to their original through an option found in this configuration panel.
For more information on configuring Tokens, please refer to the Tokens article.
When a new World is first created, the Actors Directory will initially be empty. Though actors can be created fairly quickly from scratch, it may be desirable to import actors from pre-configured sources. This can be done in one of two ways: by importing actors from a compendium pack, or by importing actor data directly from an external JSON file.
Importing from Compendium
An actor can be imported from a compendium by either dragging the actor from the compendium into the Actors Directory, or by right-clicking the actor in the compendium and selecting "Import". For more information on compendia and how to use them, see the Compendium Packs article.
Importing from JSON files
If you have exported actors that you would like to bring into a game world you can do so by loading the actor info directly from a JSON file. This can be accomplished by right-clicking an actor in the Directory and selecting "Import Data." This will open a file browser that allows you to select the desired JSON file to import. Once selected the JSON file's data overwrite the existing actor you imported the data into.
You can export an actor's data by right-clicking an actor in the Directory and selecting the "Export Data" option. This will prompt you to save a JSON file with the actor data in it.
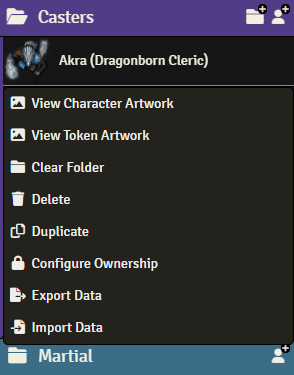
All actors in the Actor Directory can be right-clicked to open up a context menu which allows for additional actions used to manipulate actors.
- View Actor Artwork ( )
- Views the actor's artwork in new window. This is the unique art for the character shown on their character sheet and in the sidebar.
- View Token Artwork ( )
- Views the actor's token artwork in new window. This is the unique artwork shown when the actor is present on the game canvas.
- Clear Folder ( )
- Removes the actor from all folders, placing it at the top level of the actor directory.
- Delete ( )
- Deletes the actor, after accepting a confirmation prompt.
- Duplicate ( )
- Creates a copy of the actor in the directory.
- Configure Permission ( )
- Configure the permission levels of the actor, allowing players of your choice to view or modify the actor in the directory.
- Export Data ( )
- Exports the actor's data as a JSON file on your computer.
- Import Data ( )
- Imports data into the right-clicked actor from a JSON file on your computer.
Each Actor can have permissions configured at an individual User level. Actor permissions control which User or Users may see or edit that Actor, or impersonate its Token. To modify the permissions configured for an Actor, right-click on the Actor entry in the sidebar and select the Permissions option.
A single permission level may be assigned to all users at once, or individually user-by-user. A permission given to a specific User will override the level of permission given to all Users.
- None. The User is not able to see the Actor in the sidebar, open its sheet, or control its Token. This is the default permission level.
- Limited. The User is able to see the Actor entry in the sidebar, and observe limited (but not full) details regarding that Actor. Users with limited permission cannot control the Actor's token.
- Observer. The User is able to see the Actor's entry in the sidebar directory and open its character sheet. The User is also able to see through the Token's perspective on the active Scene, but not control that Token.
- Owner. The User has full control over the actor and can open and edit their Actor sheet as well as control and see from the perspective of their Token.
API References
To interact with Actors programmatically, consider using the following API concepts:
- The Actor Document
- The Actors Collection
- The Actor Sheet (V2)