Most interesting battlemaps aren't just featureless grids. Perhaps part of your Scene is a set of stairs, a dark cave, a magical portal to another realm, or even a dastardly trap.
Scene Regions allow you to define these interesting parts of your map so that they do remarkable things or behave in certain ways. With Scene Regions, you could:
- Set up “stairways”
-
Scene Regions allow you to define automatic teleportation zones which your players can easily use themselves without GM intervention.
These zones can be used to replicate stairs, elevators, magical portals, or similar concepts within Foundry. This teleportation can be set up between different Scene Regions as needed, even if one is on a different Scene.
- Give “indoor” areas the properties you expect
-
You can make a building or a cave keep out the things it should, like weather and or daylight.
- Perform actions when the Region detects certain changes
-
As an example, when a Token enters a Scene Region, that Region can automatically pause the game or even execute a custom Macro. Combined with Foundry's powerful API, this adds the potential for nearly limitless functionality, such as powering intricate puzzles or devious traps.
Teleport Token Scene Region Behavior.Scene Region Terminology Guide
Understanding Scene Regions begins with learning a few important concepts:
- Region
-
A Region, often called a “Scene Region”, represents one or more parts of a Scene that you would like to behave in a certain way.
Each Region may contain many Shapes (which all share the same Behaviors). Without at least one Shape and Behavior, a Region doesn't actually do anything.
- Shape
-
The geometry of a Scene Region is made out of Shapes that cover an area in the canvas, much like Drawings.
Each Shape can be rectangular, elliptical, or polygonal, and the part of the canvas that is considered to be within the Region is determined by the combination of all its Shapes. Some of these Shapes may be “holes,” which actually remove areas from the Region.
A single elevation range may be assigned to every Shape in the Scene Region. This means it is possible to go “under” or “over” a Scene Region's Shapes without traveling through them.
- Hole
-
A hole is a Shape, but it is considered a "negative Shape" that removes geometry from the Region instead of adding it.
- Behavior
-
Behaviors are the functionality that a Scene Region can perform. Each Region can have multiple Behaviors.
- Event
-
An Event is a change that is related to a Region, such as a Token entering or leaving one of its Shapes.
Behaviors can “subscribe” to Events, allowing them to "trigger" when the Region detects that Event.
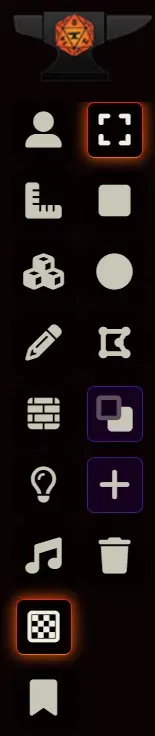
Scene Region Controls
The Scene Regions Layer's Tool pallette can opened by clicking the chessboard icon ( ) on the left-hand side of the user interface. When you click this menu button, a Scene Region Legend also displays to help manage Regions in the Scene.
The following tools are available in the Scene Regions Layer Menu:
- Select Regions ( )
- This tool allows you to select Regions by clicking or drag-selecting their Shapes in the canvas so that you can configure or delete them. Use SHIFT to select more than one Scene Region at a time.
- Draw Rectangle ( )
- Used for drawing rectangular Shapes. Holding ALT while drawing creates a perfect square.
- If an existing Scene Region is already selected, this new Shape will be added to that existing Scene Region. Otherwise, a new Scene Region is automatically created and this Shape is added to it.
- Draw Ellipse ( )
- Used for drawing elliptical Shapes. Holding ALT while drawing creates a perfect circle.
- If an existing Scene Region is already selected, this new Shape will be added to that existing Scene Region. Otherwise, a new Scene Region is created and this Shape is automatically added to it.
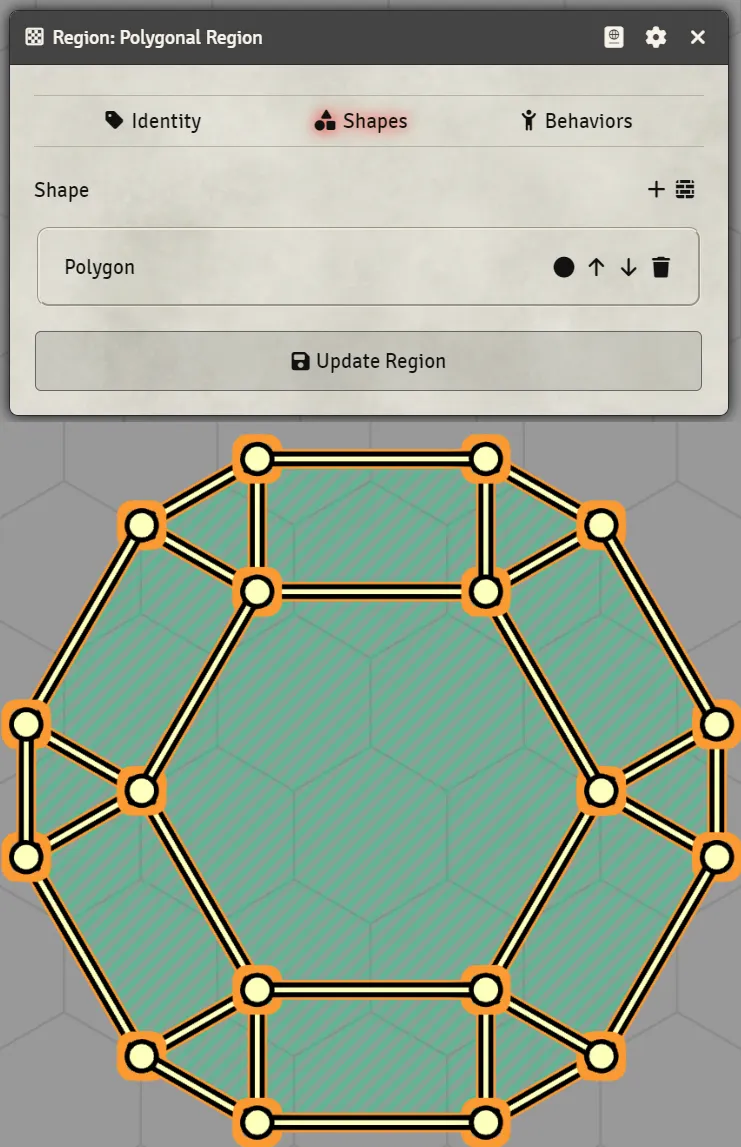
- Draw Polygon ( )
- Left-click with this tool to create polygonal Shapes from a sequence of straight lines. Right-click to remove the last point drawn or double-click to finish.
- If an existing Scene Region is already selected, this new Shape will be added to that existing Scene Region. Otherwise, a new Scene Region is created and this Shape is automatically added to it.
- Create Holes ( )
- This option is a toggle that stays enabled or disabled. When it is enabled, it glows visually and any new Shapes that are drawn are created as holes. For more information, see holes.
- Force Snap to Grid Vertices ( )
- This option is a toggle that stays enabled or disabled. When it is enabled, it glows visually and any new Shapes that are drawn automatically snap to the grid.
- Clear Regions ( )
- After a confirmation prompt, this button clears all existing Regions that you own in the Scene.
The Scene Regions Legend offers a unique way to view and manage your Scene Regions. You can use this tool to create a blank new Scene Region or to view, select, or configure any Region in the currently viewed scene.
Creating a Blank Scene Region Using the Legend
Click the "Create Region" button (the icon in the upper-right corner) to create a blank new Scene Region. For more information about configuring a Scene Regions, see Configuring Scene Regions below.
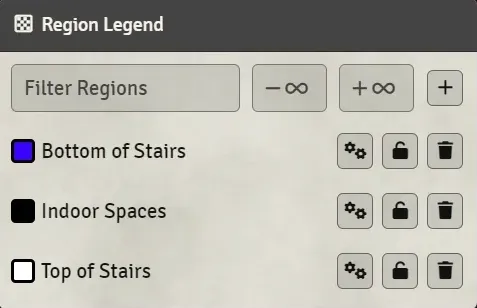
The Scene Region Legend Interface
When you hover over a region in the Scene Region Legend, it is visually highlighted in the canvas and the Legend. If you click a Scene Region's row, you can select or deselect it. You can also select more than one Scene Region at a time using the SHIFT key.
The row for each Scene Region has the following features:
- Elevation Range Label (not always present)
- If an elevation range is specified for this Scene Region, this elevation range displays in the Region's row in the format
[bottom,top]. If no elevation range is specified, the Scene Region applies to all elevations. - Configure Region ( )
- Opens the Scene Region's configuration dialog, just like double-clicking it in the canvas.
- Lock Region ( )
- Locks the region, preventing it deleting the Scene Region, adding Shapes to it, or removing any of its Shapes.
- Delete Region ( )
- If the Region is locked, this icon is disabled. If the Region is not locked, clicking this button prompts the user whether they want to delete the entire Scene Region.
Creating Scene Regions
There are two ways to create Scene Regions:
-
The Scene Region Legend
You can use the Scene Region Legend's "Create Region" button (the icon in the upper-right corner) to create a new, empty Scene Region. Because this Scene Region has no Shapes or Behaviors, it is just a placeholder until you configure it (see below).
-
Drawing new Shapes
If you have no Scene Region currently selected, using one of the Region Layer's tools that draw a new Shape ("Draw Rectangle", "Draw Ellipse", or "Draw Polygon") automatically creates a new Region to contain that Shape.
Note: If a Scene Region is already selected when you draw a Shape, that Shape is automatically added to the selected Scene Region instead of creating a new one.
You can deselect Scene Regions using either the Scene Region Legend or the canvas. Please note that if you do not have the "Left Click to Deselect Objects" Game Setting enabled, you may need to draw an empty selection to deselect Scene Regions.
Configuring Scene Regions
After creating a Scene Region, use the Scene Region Configuration dialog to edit its properties. You can open this dialog using the Scene Region Legend or by double-clicking it in the canvas.
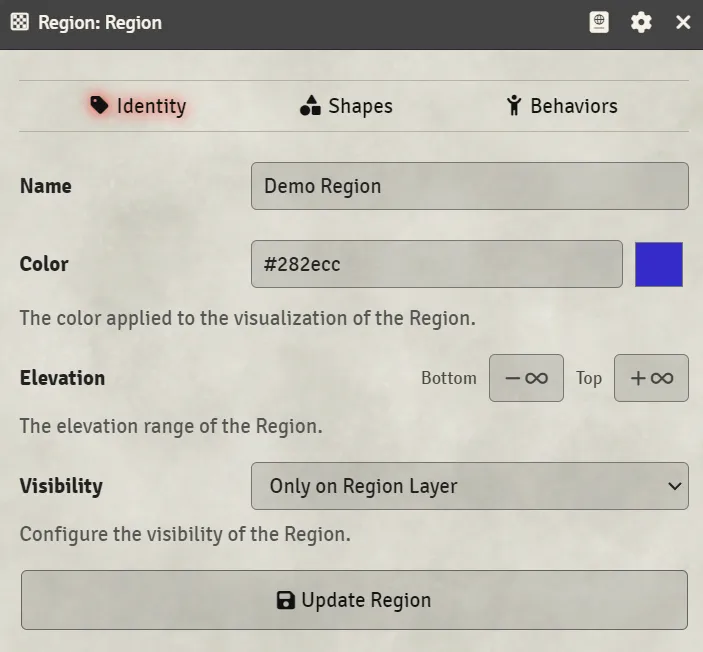
The available fields in the Identity tab allow you to control how the Scene Region is identified and displayed.
- Name
A name used to identify this Scene Region which is used to label it in the Scene Region legend.
- Color
The color that is used to identify this Scene Region in both the canvas and the Scene Region Legend.
- Elevation
-
These two fields define the top and the bottom of range of elevations that the Scene Region applies to, potentially allowing Tokens to avoid it by passing "under" or "over" it. By default, a Scene Region exists at all elevations.
If an elevation is specified, it also displays in the Scene Region Legend.
- Visibility
-
This field provides options to control when this Scene Region should be displayed in the canvas:
-
Only on Regions Layer
The default visibility option. With this option selected, Scene Regions are only visible when you are viewing the Scene Regions Layer of the canvas, just like Lights or Walls.
-
Always for Gamemaster
If this option is chosen, users with Assistant GM or Gamemaster permissions can always see this scene region, regardless of the current canvas layer. For example, you might choose this option to indicate a region that is functioning as a trap.
-
Always for Everyone
With this option selected, all users can always see this scene region, regardless of the current canvas layer. For example, you might choose this option to indicate the region of a trap region that has been discovered by the party.
-
Because Shapes define the geometry of the Scene Region, the fields in this tab control how the Scene Region exists in the canvas.
There are two ways to add new Shapes to this Scene Region so that they display in this tab:
-
Draw a new Shape
Ensure this Scene Region is selected, then use this layer's "Draw Rectangle", "Draw Circle", or "Draw Polygon" tools to add the new Shape to it.
-
Add a new Shape using Walls
Adding New Shapes Using Walls
Often, you have already used Walls to trace out the exact geometry that you want to add as a Shape, such as when you want to add a Scene Region for an entire building. The "Create Shape from Controlled Walls" button ( ) in the upper-right of this tab allows you to easily create a Shape using that existing Wall geometry.
Please Note: The controlled walls must form a complete loop.
To add a Shape using Walls:
-
Click the "Create Shape from Controlled Walls" button
Foundry automatically switches to the Walls layer and selects the Select Walls tool.
-
Select the loop of outermost walls that trace out your future Shape
Select ("control") the walls that contain the area that you want to add as a Shape.
You may consider adding a wall or two temporarily to form a loop. If your walls look like they close but don't, you may have small gaps in your Walls. If necessary, make sure that you are not holding the SHIFT key, then adjust wall endpoints to allow grid snapping to connect them perfectly.
-
Click the "Create Shape from Controlled Walls" button again
If your wall selection is valid, a Shape is created and added to your Scene Region. If your Wall selection is not valid, please see the previous step for tips on how to correct the issue.
After adding a Shape in this way, Foundry remains on the Walls layer. You can either continue adding additional Shapes from Walls, or return to the Scene Regions layer to continue working with Regions.
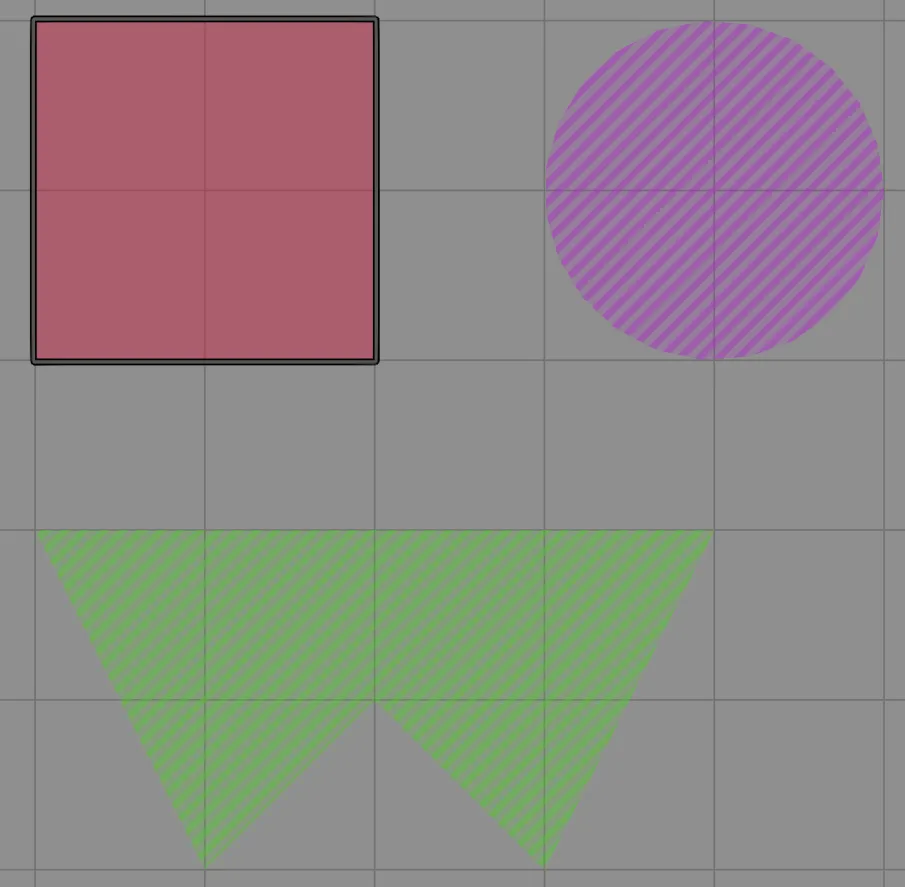
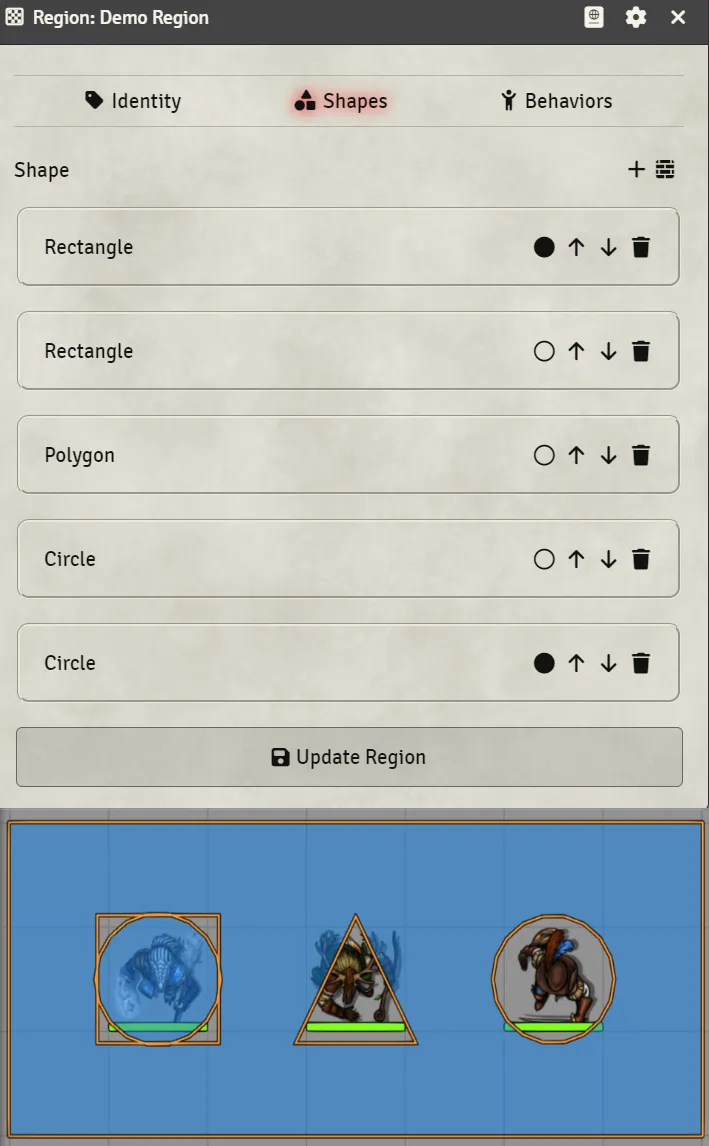
Configuring Existing Shapes
Each existing Shape of the Scene Region is listed as a row in the Shapes tab. When you hover the rows in this tab, that Shape is outlined in dashes in the canvas (even if it is a hole).
If at least one Shape is a hole, then the order of the Shapes matter. A Shape that is a hole only "punches through" the Shapes that are above it in the list of Shapes, as shown by the bottom Circle shape in the previous figure.
Several buttons are available to control the existing Shapes in this tab.
- Make Hole ( or )
-
Clicking this button toggles whether the Shape is considered a hole or not.
-
A filled circle ( )indicates that the Shape is not currently considered a hole.
-
An empty circle ( ) indicates that this Shape is a hole.
-
- Move Shape Up and Move Shape Down ( and )
-
These two buttons change the relative order of Shapes in this list, which is mostly important for determining how holes are applied to the Scene Region's geometry.
- Delete Shape ( )
-
After a confirmation prompt, this button deletes the Shape from the Scene Region.
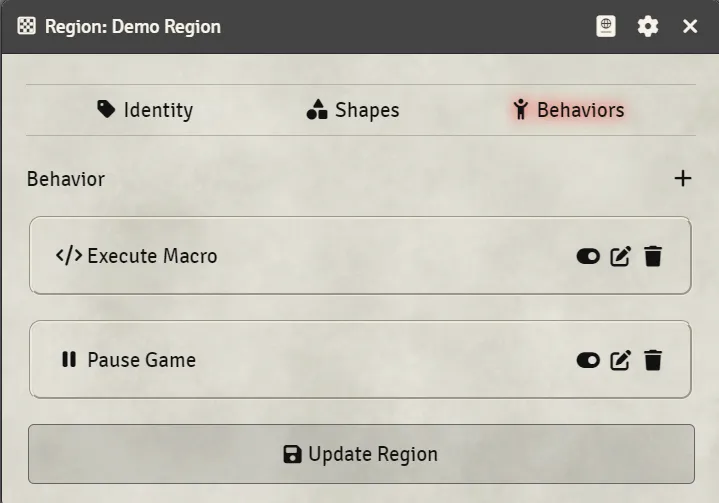
Behaviors are the functionality that a Scene Region can perform, and each Scene Region can support many Behaviors. This tab allows you tc create and manage these behaviors. Each Behavior of the Scene Region appears in a row in this tab, sorted alphabetically by name.
When a new Scene Region is created, no Behaviors are present. At least one Behavior must be added for the Scene Region to have any functionality. You can create a new behavior by clicking the "Create Behavior" button ( ).
Several buttons are available in each Behavior's row:
- The Enable / Disable slider ( or )
- A Behavior is only functional if this slider is enabled ( ) . When a Behavior is disabled ( ), it does not affect its Scene Region in any way.
- Edit Behavior ( )
- Clicking this button opens its "Configure Behavior" dialog. For more information on how to configure each type of Behavior, see the "Scene Region Behaviors" section below.
- Delete Behavior ( )
-
After a confirmation prompt, this button deletes the Behavior from the Scene Region.
Scene Region Behaviors
Behaviors are what a Scene Region actually does. Each Region can support multiple Behaviors, and every Shape within that region shares the same set of Behaviors.
The available built-in Behaviors can be leveraged to accomplish a variety of goals. Some Behaviors require Events, while others have a continuous effect on their Region.
UUIDs and Behaviors
Some Behavior types, notably the Teleport Token and Execute Macro Behaviors, need to identify a different thing that they work with. The Teleport Token behavior needs to specify which Scene Region it teleports into, and the Execute Macro button needs to specify which Macro it executes. In both cases, this is performed by providing the behavior with the UUID ("Universally Unique IDentifier") of the thing that it links to.
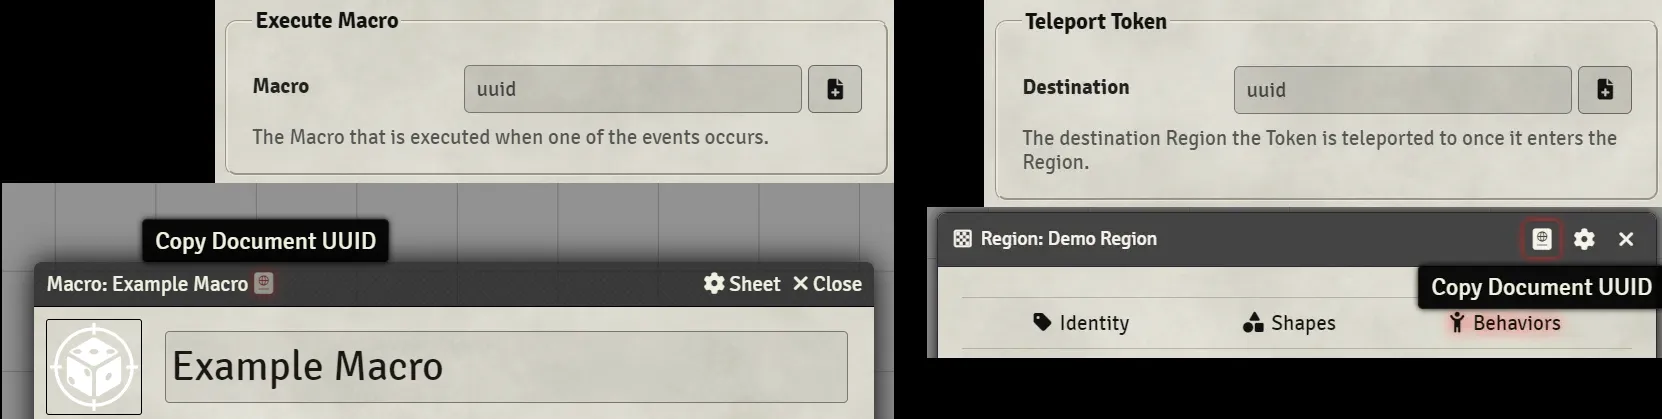
Looking up the UUID of any object in Foundry is the same. Simply open its Configuration Dialog and left-click the "Copy ID" button in its header to copy the UUID to the clipboard. Once you have the UUID that you want to use with your Behavior, paste it into the Behavior's configuration dialog as needed. Make sure to press the "Add Document" button ( )!
Note: Remember to double-check that you clicked the "Add Document" button before closing the dialog!
Continuous Behaviors
These behaviors do not require a subscribed Event. If these Behaviors are enabled, they always have their effect on their Region.
- Adjust Darkness Level
- Have you ever wanted to exclude part of a scene from Global Illumination, so that the light level outside was different from the light level inside? This Behavior delivers that ability and more.
- If the result of this Behavior makes the region dark enough, the area is no longer considered lit, even if Global Illumination is enabled on the Scene. This means that Tokens will need a source of light or a special vision mode to be able to see in this darkened area. This works exactly the same way that Global Illumination can be automatically disabled "at night": the level of darkness is checked against the Scene's Global Illumination Threshold. For more information, see the Scenes article.
- Suppress Weather
- Foundry VTT allows the prevention of weather effects through the use of Tiles (much like a roof would), but you may not have a convenient tile to place. Additionally, it might not make much sense to place a tile over an area such as a magically protected zone. Adding this behavior to a Region will stop rendering weather effects inside the Region without requiring a tile.
- Modify Movement Cost
- Many games have rules about certain types of terrain that are faster or slower to move through compared to standard terrain. This might be an area of magic that increases or decreases movement speed, a tangle of brambles or mud pit that requires slowing down to safely navigate, or many other possible causes. The Modify Movement Cost behavior can be used to set a multiplier (from 0 to 5 in increments of 0.25) on the "cost" of movement through a scene region, artificially increasing or decreasing the distance part of the grid represents.
Suppress Weather behavior.Event-based Behaviors
The Region only performs this type of Behavior if it is enabled and a subscribed Event is detected for that Region.
- Display Scrolling Text
- This behavior can be used to display on-screen colored text in an animation when its event is triggered. The text can have its color configured, visibility limited to gamemasters or observers, and optionally may be configured to only show the first time it is triggered.
- Execute Macro
- For those Macro-hoarding GMs who already have all manner of pre-coded scripts ready to go for certain actions and just want them to trigger automatically, the Execute Macro behavior does what it says on the label: when you assign it the UUID of a given Macro (which can be gotten by right-clicking the ID button in the Macro's header), it will trigger that Macro when its Scene Region detects that one of its subscribed events occurs.
-
If you want to write your own Macros to use, the Scene Region passes in several important values to help you:
-
behaviorThe
Execute Macrobehavior itself. -
eventThe Event that triggered the execution of the macro. Using
event.data.tokenis particularly useful, since it recontains the Token that triggered the Event (ornullif there isn't one). -
regionThe Region that triggered the Macro.
-
sceneThe Scene that contains the Region that called the Macro.
For more information about writing and using Macros, see the Macros article.
-
- Execute Script
- This Behavior functions exactly like the
Execute Macrobehavior but it executes a script file instead of a Macro. It provides the same values to any Script that is called as theExecute Macrobehavior does also. - Pause Game
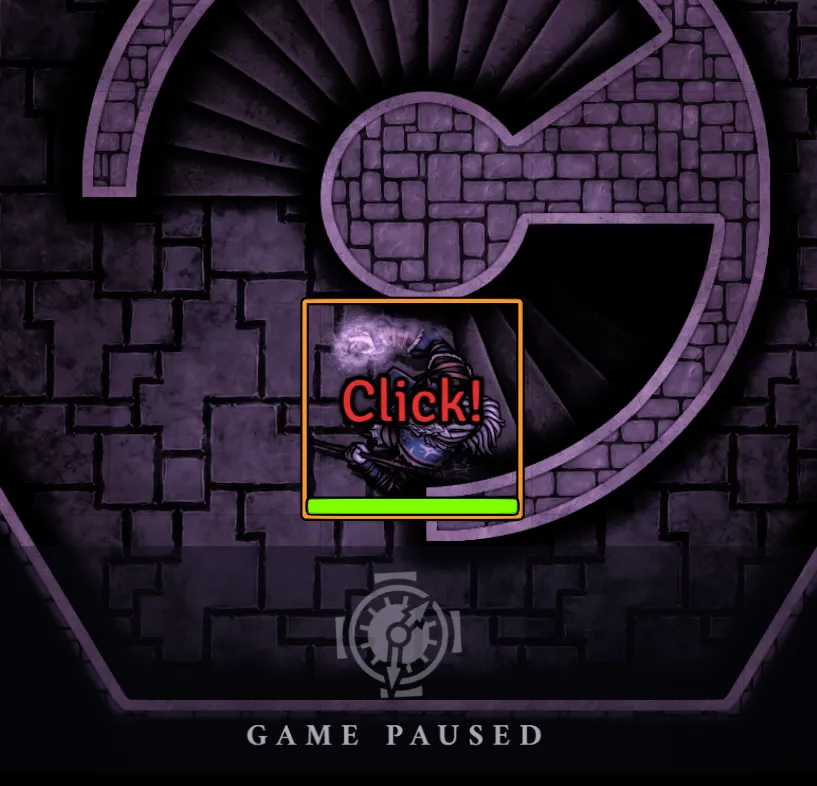
-
This Behavior only happens when the user controlling the token is not a GM. This means testing this Region requires you to log in as a player.
- Sick of your players running off like a shot and skipping past your carefully planned traps, having to move them back and clear the fog of war? Just draw a scene region that will pause the game whenever a token enters the region. For convenience, you can also toggle the "Once" option so it doesn't do it every single time a token passes by.
- Teleport Token
- Perhaps one of the most desired features, the Teleport Token behavior allows you to instantaneously transport a token that enters the region from one region to another. Similar to Execute Macro, this behavior requires the UUID of another Scene Region to serve as a destination. The destination region can even be in a different scene!
- Toggle Behavior
- Have a particular behavior you only want to activate after a certain condition has been met, such as a trap that is only active after a token has stepped on its pressure plate? Toggle behavior allows you to link to the UUID of a different Behavior, enabling or disabling the linked behavior when a certain triggering event occurs.
- In the hands of even a novice coder, Scene Regions can be leveraged to create truly powerful automations.
Note: Modules or Game Systems may provide additional Behaviors. Please consult their documentation for more information about them.
Scene Region Events
Behaviors can check for Events to determine if they need to perform certain Behaviors, like Pause Game or Execute Script. You can add an Event to a Behavior to have it "subscribe" to that Event, causing it to regularly check whether that Event occurred within its geometry.
By default, the following Events are available:
- Region Boundary Changed
- This Event occurs if the Scene Region's geometry changed in any way, such as by adding a Shape, removing it, or changing whether that Shape is a hole. It also fires if the order of the Shapes are changed, but it does not fire if the entire Region is deleted.
- Behavior Status Changed
- Occurs if the Behavior that is subscribed to this Event is enabled or disabled. It does not occur if other Behaviors in the same Region (or different Regions) are enabled or disabled.
- Token Enters
- This Event fires if a Token enters the Region by any method, including the token being created there as a result of a Copy or drag-and-drop operation. It does not fire if the Token is already in the region when the Scene is loaded.
- Region Boundary Changed
- This event occurs when the shapes contained within the Region, or the bottom/top elevation of the Region, are changed.
- Behavior Activated
- This event occurs when the Region Behavior becomes active, i.e. is enabled or created without being disabled. This event is triggered only for the Region Behavior that subscribes to this event.
- Behavior Deactivated
- The inverse of Behavior Activated, this event is triggered when the Region Behavior becomes inactive, i.e. is disabled or deleted without being disabled. This event is triggered only for the Region Behavior that subscribes to this event.
- Behavior Viewed
- This event occurs when the Region Behavior is being viewed or the Scene containing its Region becomes active. This event trigger is more likely to be used by developers or content creators for the purposes of handling special animations and effects on the canvas, to activate those effects only when that portion of the scene is being viewed.
- Behavior Unviewed
- This event occurs when the Region becomes inactive or the Scene of its Region is no longer being viewed. This event trigger is more likely to be used by developers or content creators for the purposes of handling special animations and effects on the canvas, to deactivate those effects once that portion of the scene is no longer being viewed.
- Token Enters
- This event occurs whenever a token enters a region, whether it is created in the region, moves into it by way of drag or measured movement, the boundary of the region changes to encompass the token, or the region behavior is activated while tokens are within the shape.
- Token Exits
- This event occurs if a Token leaves the Region by any method, including the token being deleted, moving out of the region by way of a drag or measured movement, the boundary of the region changes so it no longer encompasses the token, or the region behavior becomes inactive while tokens are within the shape.
- Token Moves In
- This event occurs when a Token begins a movement that has a destination inside a Region and the Token was not inside that Region's boundaries before the movement began.
- Token Moves Out
- This event occurs when a Token begins a movement that has a destination outside a Region and the Token was inside that Region's boundaries before the movement began.
- Token Moves Within
- This event occurs when a Token begins a movement that has a destination within the same Region shape, but not when entering or exiting the Region.
- Token Animates In
- This event occurs if a token's movement animation would bring it into the shape of a Scene Region, but not if the token enters by other means such as creation or the changing of a region boundary. This event will only occur if the Region is being viewed while it occurs.
- Token Animates Out
- This event occurs is triggered when a token's movement animation would cause it to exit the shape of a Scene Region, but not if the token leaves by other means such as deletion or the changing of a region boundary. This event will only occur if the Region is being viewed while it occurs.
- Token Starts Turn
- This event occurs when a Token inside this region is part of a Combat Encounter and a Combat Turn begins.
- Token Ends Turn
- This event occurs when a Token inside this region is part of a Combat Encounter and a Combat Turn ends.
- Token Starts Round
- This event occurs when a Token inside this region is part of a Combat Encounter and a Combat Turn begins.
- Token Ends Round
- This event occurs when a Token inside this region is part of a Combat Encounter and a Combat Round ends.
Token Enters Event...Note: Modules or Game Systems may provide additional Events. Please consult their documentation for more information about them.
Scene Region Examples
The following common examples are provided to illustrate how Scene Regions operate and how you might want to use them.
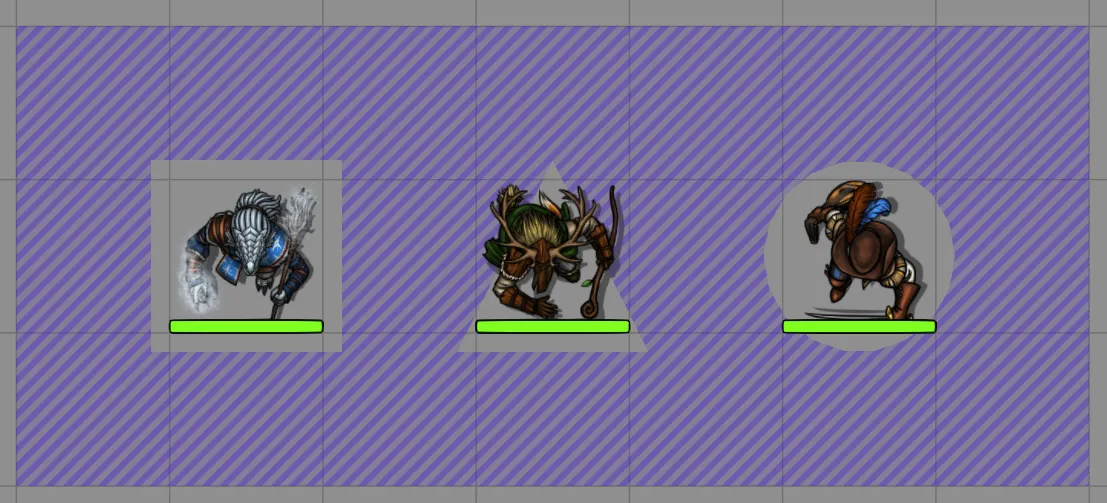
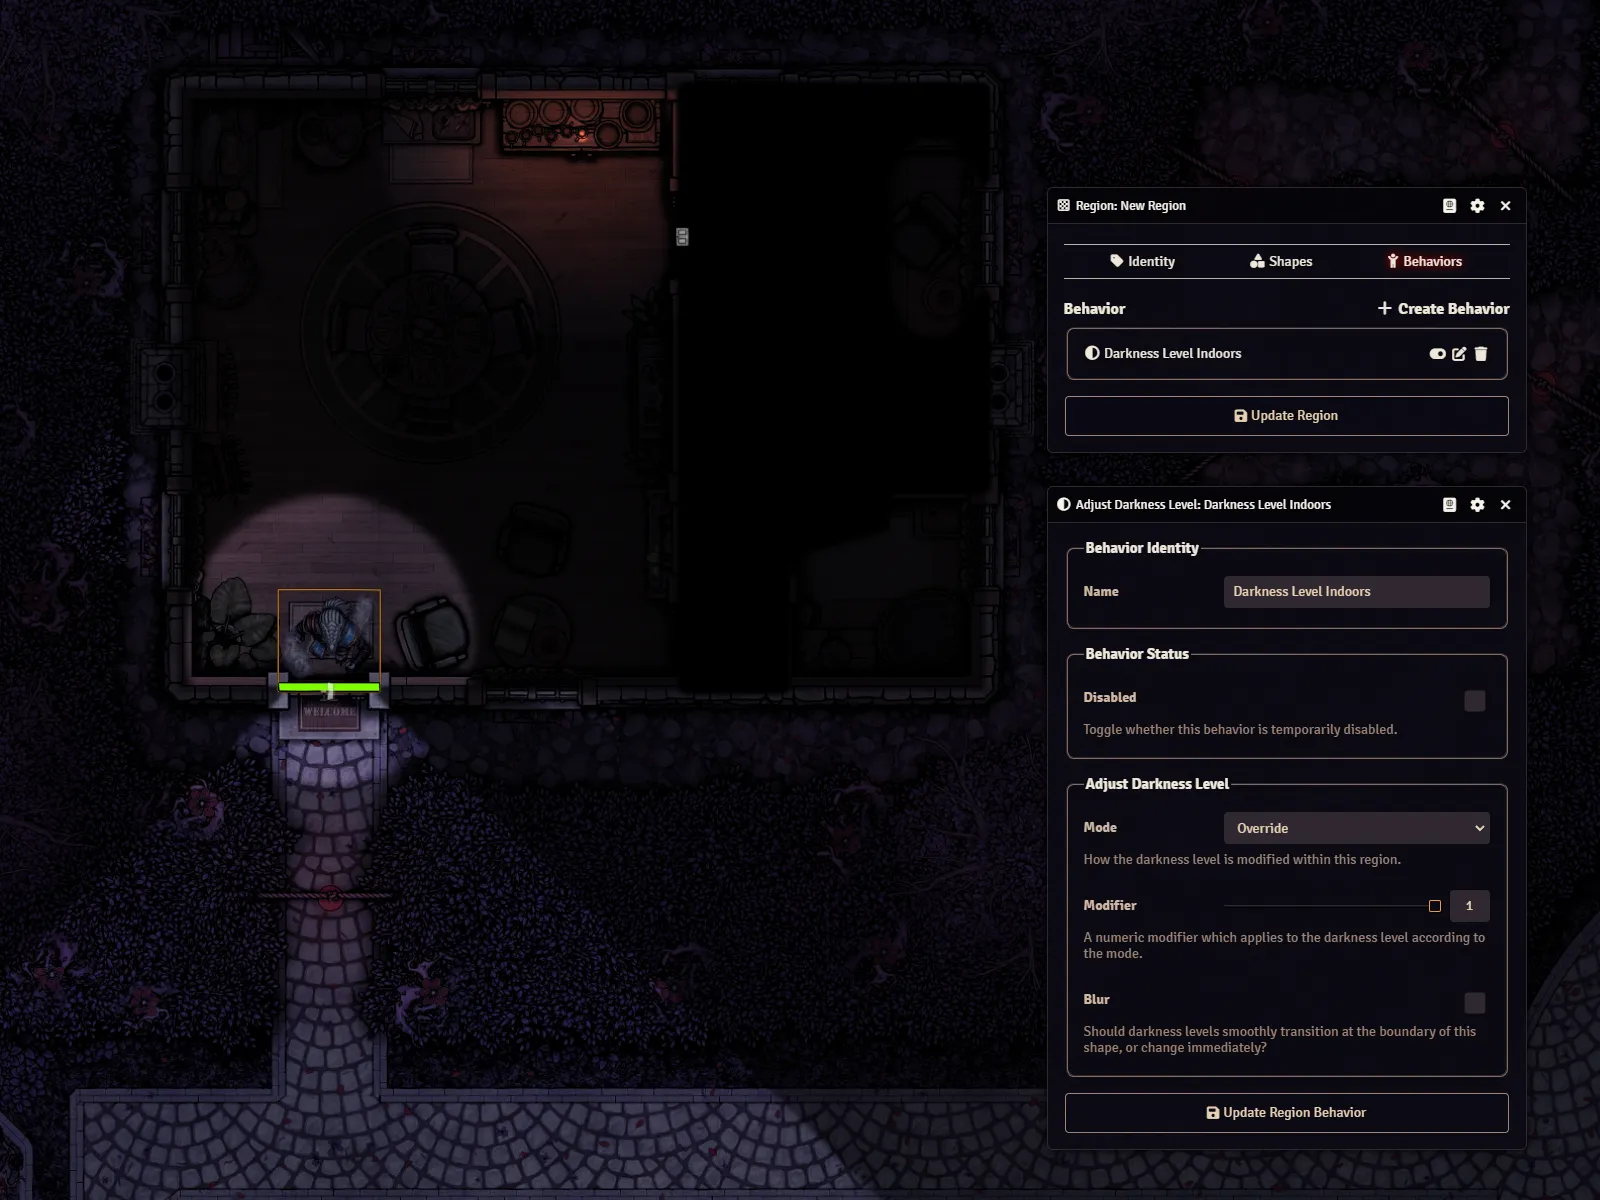
Often, a map may have some outdoor and indoor areas that call for the interior being naturally darker than exterior locations. An open field might give way to the entrance of a cavern, a well-lit forest might hide an abandoned house.
The Adjust Darkness behavior allows GMs to use a Scene Region to define areas that are either darker or lighter than the rest of the scene.
To replicate the darkening effect we use in the screenshot to the right, you would:
- Create a new scene region with a shape that matches the confines of the area you wish to darken.
- Assign that region a new behavior: "Adjust Darkness Level"
- Give that behavior the mode: "Override"
- Set the darkness level to your preferred level, typically a darkness level of 1 is used for full darkness.
- Optionally choose to blur the darkness level at its edges.
- Update your region behavior and scene region to save your changes, and anyone venturing from outside the region into it will no longer be able to see as if Global Illumination is enabled.
Many game systems have rules about moving through spaces that might be slow to navigate, typically this just adds a multiplier to the amount of movement 'cost' it takes to move through that space. Suppose you have an area of a battlefield that is strewn with deep mud, making it arduous to cross. Using the "Modify Movement Cost" region behavior, you can mark that part of your scene to specify how hard it is to move through it.
- Create a new scene region with a shape that matches the confines of the area you wish to limit.
- Assign that region a new behavior: "Modify Movement Cost"
- Set the slider to indicate how much the cost of movement should be multiplied by when passing through this region - setting it to 2 will double the cost of movement (so 5ft becomes 10ft), and will proportionally slow the animation of token movement.
- Update your region behavior and scene region to save your changes, and now any token crossing this part of your scene will be slowed down!
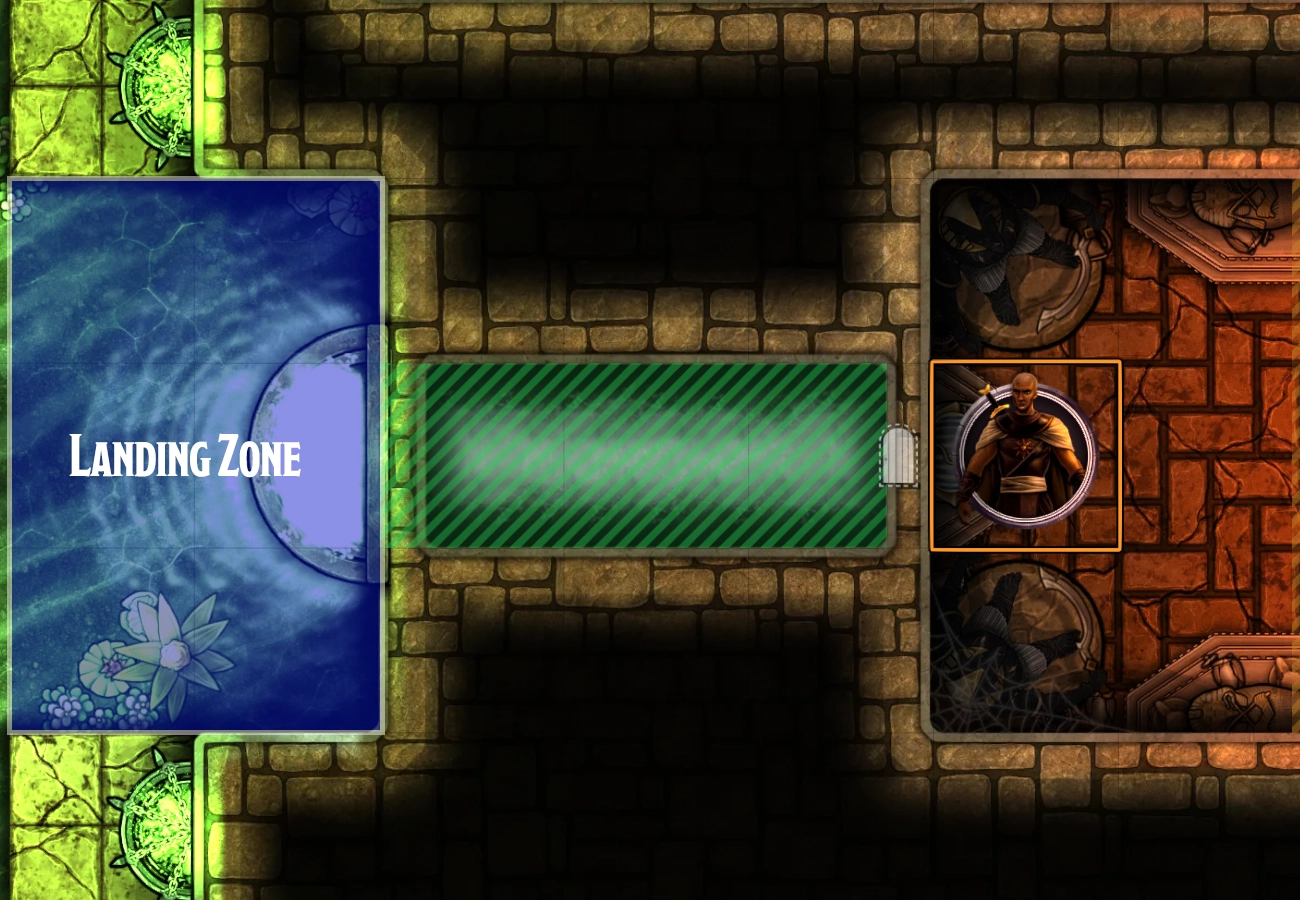
Creating a user-navigable stairway is quite possibly the simplest example of a Teleport Token behavior, allowing for players to simply step into a scene region to initiate a movement of their token either to another part of a scene, or to another scene entirely. A scene region configured with Teleport Token requires an additional region to serve as a "landing" for where the token will come out when it is teleported. Setting up a scene region for stairs is a super easy, two-stage process!
Stage 1 - Stick The Landing
Find the part of your map where tokens will land when they've been teleported, this could be the landing at the top of a flight of stairs. Always make sure to leave enough room for more than one token to emerge, and if you plan to allow 'return trips', make sure you leave space to place a future region shape to handle that return.
- Create a new region shape for your landing.
- Get the UUID for your region shape - this universal identifier is how you point your teleporter to this region. You can get it conveniently by left-clicking the Copy Document UUID button in the header of the configuration window for your scene region.
- Paste that UUID somewhere you can easily access it later.
Stage 2 - Mark the stairs
Unlike the landing for your teleporter, the entry to the teleporter only really needs to be big enough to encompass the space a token would need to enter, this could be a single grid space at the top of a narrow stair, or as wide as the top of a grandiose ramp allowing multiple tokens to enter side by side.
- Create a new region shape in the space you'd like players to enter in order to teleport to the top of the stairs.
- Configure the scene region with the behavior: Teleport Token
- In the "Destination" field, paste the UUID you copied in stage 1 and click the "Add Document" button to be sure it is committed to the configuration.
- Optionally, you may click "Allow Choice" to give users a small dialog prompt asking if they would like to teleport before the teleportation occurs when they move into the region.
- That's it, click update region behavior and you have successfully configured a stairway teleporter!
Using Scene Regions, you can easily create a simple yet flavorful and effective trap using two built-in functions:
Simply create a new Scene Region with a Shape where the trap is and add these two behaviors. For simplicity and to avoid building a custom macro or script, you can then apply damage and give your players a chance to save themselves without needing to build it into the Scene Region itself.
Just add the Toggle Pause and Display Scrolling Text behaviors and link them both to the Token Animates In event. You may want to consider setting both behaviors to only execute once also, either for convenience or to indicate that the trap has now been "set off".
If you're willing to be a bit fancier, more impressive traps are also possible.
Picture the moment your players are rustling around in some ancient tomb and they uncover a hidden doorway, beyond which a steeply sloped stone surface leads off into the darkness, water rushing over it. You want them to be able to choose to step onto the path- but once they've stepped on, you don't want them stepping off, and you certainly don't want them trying to climb back up it- this is a one-way journey.
Sure, we could use a simple teleport region with a destination at the bottom and no return, but where would the fun be in that? We want our players to show up at a random location in a patch of terrain at the bottom of the slide, and any attempt to climb back up should put them back at the bottom.
Before we can do anything else, we need to first establish an area where our players will land, which if we assume you are working with a scene using a square grid, you can do that with a few simple steps:
- Place a temporary placeholder token in the upper-left grid space where you would like a token to land.
- With the token positioned in the first landing location, double right-click to open the token configuration and view the X-Y coordinates for that token's location. Write those coordinates down somewhere, you'll need them.
- Now, since we know the coordinates for the upper leftmost corner where the token can land, we need to know how many spaces we want the tokens to land in. Count the number of spaces to the right of your token for the area you would like to have tokens land, that will determine our new X coordinates. Do the same with spaces below the token- that will determine the new Y coordinates.
- Check your Scene Configuration - in the grid tab, the grid-size in pixels determines how many pixels we need to add to our number of grid spaces.
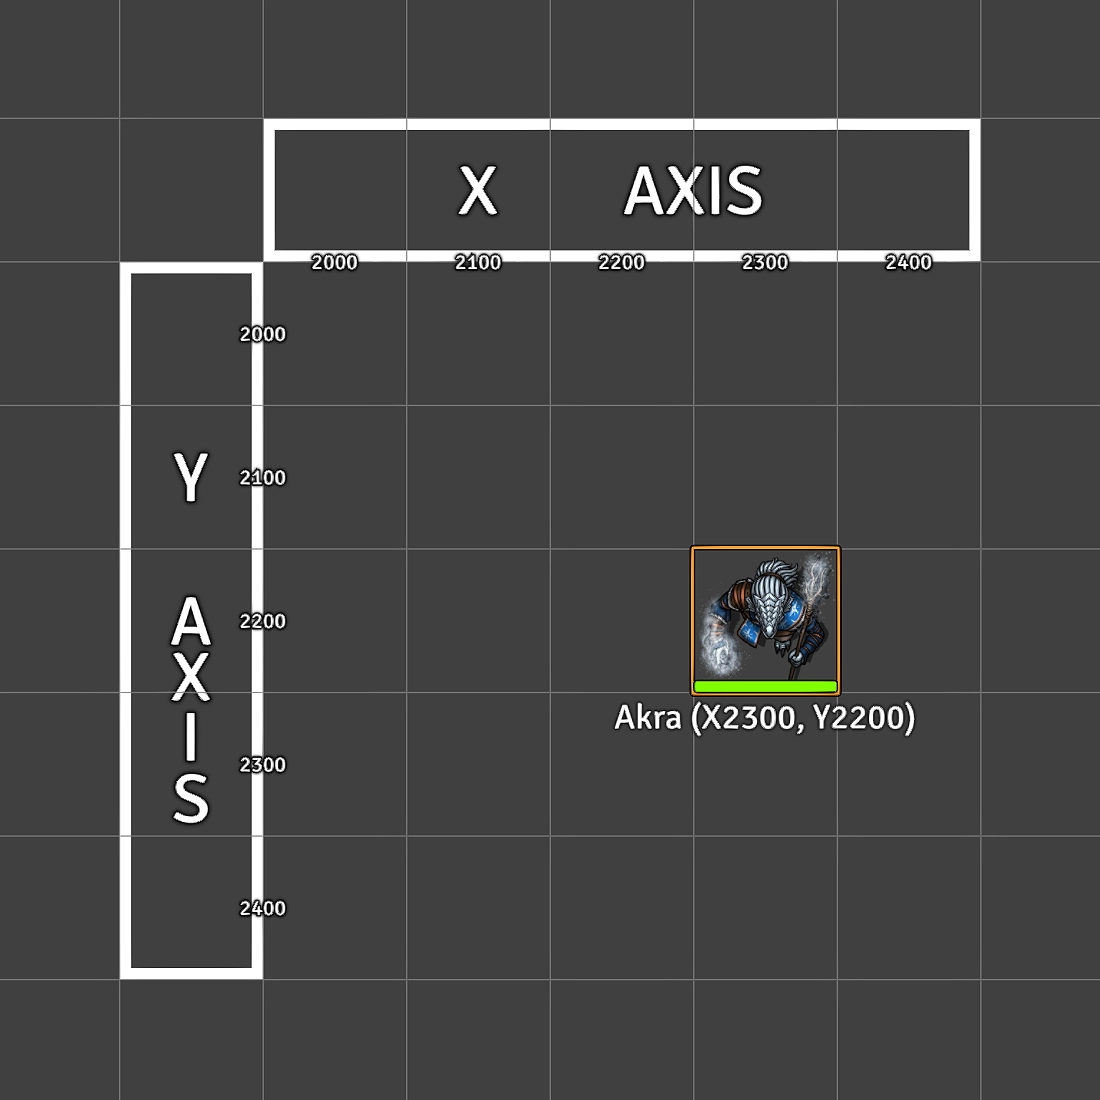
- Now, we will bring all the numbers together. Using the image to the right as an example, if Akra is located at X2300, Y2200, and we would like our possible spaces of landing to be any of the spaces to the right or bottom of the chart, we would form two lists:
- xcoord = [2300, 2400]
- ycoord = [2200, 2300, 2400]
- This means that we have two columns of grid spaces, each containing three spaces where a character may land.
- Next, we create a region on the scene, and add a shape that covers the space of our slide— but not its landing.
- Finally, we set the behavior to "execute script" with the subscribed event "Token Enters". We need to write a little bit of JavaScript to handle the slide:
- After that has been configured, clicking Update Region Behavior will save this script and, after that, any token that moves into the defined region shape will immediately be moved to one of the grid spaces you chose!
                            //your chosen x coordinates go here
const Xcoord = [2300,2400]
//your chosen y coordinates go here
const Ycoord = [2200,2300,2400]
//this randomizes the X coordinate from the available options
let randX = Math.floor(Math.random() * Xcoord.length)
//this randomizes the Y coordinate from the available options
let randY = Math.floor(Math.random() * Ycoord.length)
//this updates the coordinates of any token that enters the region shape,
//using the random coordinates you provided
await event.data.token.update({x:Xcoord[randX], y:Ycoord[randY]})
Developer Notes and API References
Scene Regions are built so that game systems and modules can easily add their own functionality. We can't wait to see what mad creations our developer community implements using this framework!
Developer Note: The name of the new Document type that stores Scene Region information is Region, and it contains BehaviorEmbedded Documents. Shapes are not embedded documents, but rather are stored in an array in the Region document.
To interact with Scene Regions programmatically, you will primarily use the following API concepts: