Overview
The Measurement Control toolbar, when enabled, provides access to tools for accessing and controlling the placement of measured templates. This tool allows you to determine the shape of a spell, or area effect, and determine what spaces will be affected. This article will go over how to lay down measurement templates, the types of shapes available, and how to modify a template once it's been placed into a scene.
Measurement Methods
There are three main ways to measure distance with Foundry VTT:
- The Distance Measurement Ruler
- When this ruler is toggled on, clicking anywhere in the map begins the measurement process.
- Token Drag Measurement
- Dragging a token automatically begins measuring the amount of movement that would be required to move the token.
- Measured Templates
- Area measurement is accomplished by overlaying templates of existing shapes onto the map. This is primarily used to calculate "area of effects."
The Distance Measurement Ruler
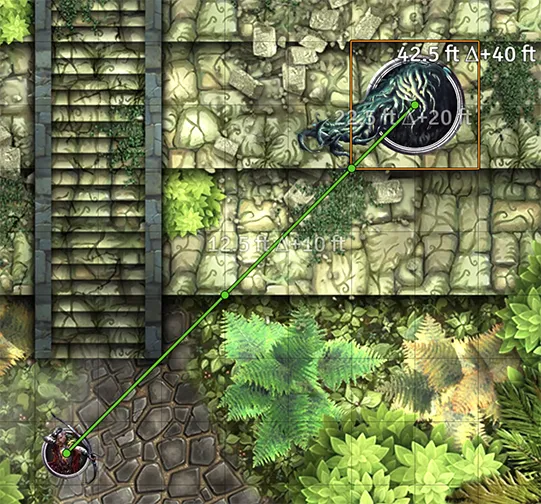
The Distance Measurement Ruler can be toggled on or off. When it is active, clicking anywhere in the map begins measuring distance from that point.
Using this tool, you can add waypoints as needed to perform complicated measurements or to account for elevation changes. If waypoints are at different elevations, the Euclidean difference between them is automatically calculated.
Token Drag Measurement and the Measure Distance Ruler
The Token Drag Measurement ruler and the existing Distance Measurement Ruler share the same controls for setting waypoints and changing elevation, but there is an important difference between them. The Measure Distance ruler measures distance, while the Token Drag Measurement ruler measures movement cost.
Typically, these calculations are the same, but if part of the area is "difficult terrain" and includes one of the new "Modify Movement Cost" Scene Region Behaviors, the two rulers will give different results.
To make way for Token drag measurement, we decided to change the Measure Distance ruler so that it is now toggled on and off using a new configurable key ( R by default) instead of CTRL. Alternatively, you can still use the "Measure Distance" button, located in the Token Controls at the top-left of your screen.
Distance Measurement Ruler Controls
You can toggle the Distance Measurement Ruler on or off using two different methods:
- Clicking a Button
You can click the Distance Measurement Ruler button to activate the Distance Measurement Ruler. You can turn it off again by selecting a different control or pressing the Distance Measurement Ruler key (see below).
Unlike most measurement-related controls, it is located in the Token controls for convenience.
- Pressing a Key
You can also quickly toggle the Distance Measurement Ruler on or off by pressing a single key, R by default. If you prefer another key, you can choose a different one using the "Configure Controls" settings.
You can add and remove waypoints using the same controls as the Token Drag Measurement process.
NOTE: In V12, distance measurement was performed with the CTRL key and tokens could move along the measured route with Spacebar.
Token Drag Measurement
When you drag a token from one location to another, in V13 measurement is now automatically performed along its route.
There are two different ways to drag a Token using waypoints. Use the process that feels more natural to you.
Using CTRL+Click
While dragging a Token and holding down the CTRL button:
- Release the left mouse button, then left-click the map to place waypoints
- Right-click anywhere to remove the last waypoint you placed
When you finish plotting your Token's path, release the CTRL button, then:
- Left-click the final destination to move the Token, or
- Right-click anywhere to cancel the entire movement
Using a Keybinding
While dragging a Token:
- Press the configured "Place Waypoint" key ( F by default) to add a waypoint at the cursor's location'
- Press ALT and the same "Place Waypoint" key to remove the last waypoint you placed ( ALT + F by default)
- Right-click anywhere to cancel the entire movement
Additional Controls
Whichever method you use, these controls are also available:
- The Ascend and Descend Keys
-
While dragging a token, you can raise the elevation of the next waypoint with one of the keys bound to "Ascend Elevation" ( Numpad+, or E by default).
Similarly, you can lower the next waypoint with one of the keys bound to "Descend Elevation" ( Numpad-, or Q by default).
- ALT
- Holding the ALT key before you begin the movement hides it from all other users. If the movement is hidden, the word
[Hidden]displays near the end of the ruler. - CTRL + Mouse Scroll Wheel
- If the CTRL button is held down, using the scroll wheel increases or decreases the elevation of the next waypoint placed.
- SHIFT
- Holding SHIFT while creating a waypoint prevents it from snapping to the grid.
- Holding SHIFT while changing elevation only changes the elevation by 10% of the usual amount.
Typically, the elevation is always changed by an amount equal to the grid size. On a map with a 5 foot grid, Tokens go up and down 5 feet at a time.
Measured Template Controls
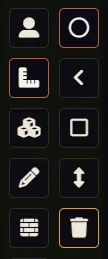
- Circle Template ( )
- Circular templates create a radius around the starting point to the distance you select.
- Cone Template ( )
- Cones create an effect in the shape of a triangle or pizza slice from the starting point. These cones default to about 53 degrees, but can be customized in the templates settings.
- Rectangle Template ( )
- A rectangle uses the origin point as one of the corners, treating the origin as being inside of the rectangle's area.
- Ray Template ( )
- A ray creates a single line that is one square in width and as long as you drag it to. Rays can have their width increased as required in its template settings.
- Clear Templates ( )
- This button clears all existing templates on the scene if you are a GM or Assistant GM.
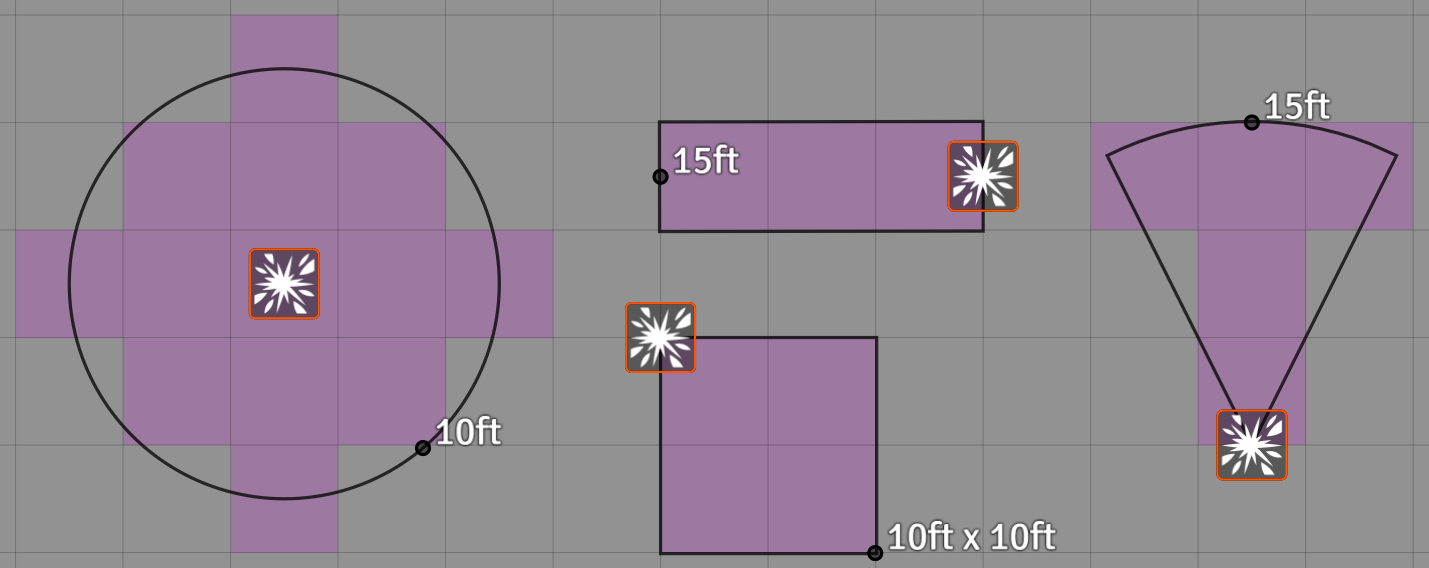
To place a measured template of any kind, select the type you want to place, then click a point in the scene, and drag out the selected measurement shape to the desired size. Once you release your mouse button the template will be created. If your scene is using the Grid or Hex grid types it also shows you all the spaces affected. Gridless maps will not show highlighted spaces, though it will still show the area of the effect.
You can hover your mouse over an existing template's origin point (appears as a starburst icon) and use Shift + your mouse scroll wheel to rotate a cone or ray template around its starting point. Control + scroll wheel allows you to make smaller adjustments to the template. To move an existing template click and drag the template by the starburst icon that represents the template's origin point. Templates will automatically snap to grids spaces and grid intersections. You can precisely place them by holding down Shift or Control while dragging them.
To delete a template, simply hover your mouse over the origin point, and press the delete key. Gamemasters can use the trash can icon to remove all measurement templates from a scene. To hide a template, simply right-click on the origin point. The icon will turn orange, indicating the template is hidden from view.
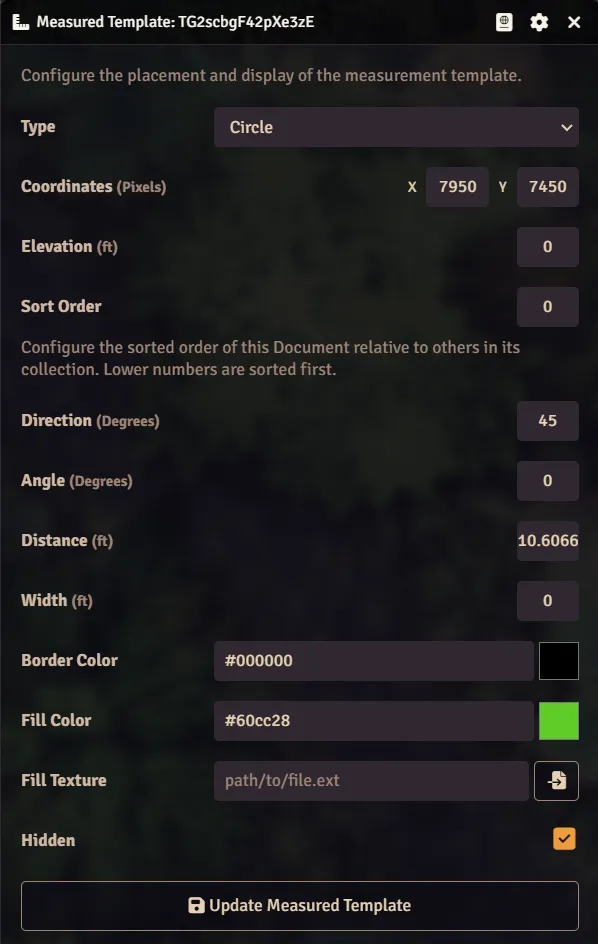
The measurement template configuration screen can be accessed by double clicking any existing template in a scene. From there you can change the type of template to any of the types noted above, and directly manipulate various qualities of the drawn template.
- Template Type
- You may alter the shape type of the Measured Template after it is placed using this dropdown field.
- X-Position
- The x-coordinate location of the Template origin. This can also be changed via drag-and-drop on the control icon.
- Y-Position
- The y-coordinate location of the Template origin. This can also be changed via drag-and-drop on the control icon.
- Direction
- The Template direction determines which angle which the template is facing. For some template types (like circle) this may not have an effect, but for templates like Cone, or Ray this configures the direction in which the template points.
- Angle
- This field only applies to conical templates and can be any value from 1 to 360 degrees.
- Width
- This field only applies to Ray type templates to configure the width of the ray or beam.
- Distance
- This configures how far the Measured Template reaches from its origin point. For a circle template, this sets the radius of the, while in all other templates it can affect the length of a ray or cone, or the width of a rectangle. Note: Once a template has been drawn in a scene, the only way to change the distance is by directly manipulating it from the configuration window.
- Border Color
- This determines the color of the template's outline, and defaults to black, but can be changed after the fact to whatever color desired.
- Fill Color
- This determines the internal color and grid highlight color when a cone is drawn. The fill color defaults to the color of the user creating the template. This color can be changed to whatever color desired from this menu.
- Template Texture
- This allows for a tiling image to be applied to the interior of the Measured Template. The texture will be repeated to fill the entirety of the shape, which looks best when a tileable, seamless texture is used. Tiling textures must be image files only and are recommended to be power-of-2 in their dimensions (i.e.. 128, 256, 512, etc...).
Cone Template Type
You can change the appearance of the end of the Cone template shape and whether it is rounded (default) or flat. This setting can be changed from the Core Settings tab found in the Game Settings menu. To lean more about this menu see the Game Settings article.

This directly affects how many squares are affected at the farthest edge of a cone. The rounded setting makes the cones taper slightly at the edge, while the flat setting makes sure the widest part of the cone and most affected squares is always the furthest point from the origin.
API References
To interact with AmbientLights programmatically, consider using the following API concepts: