A Foundry Virtual Tabletop module that turns many common Mythras combat and campaign procedures into guided dialogs, interactive chat cards, and token indicators.
The module is designed for the Foundry VTT Mythras system and supports play using the Mythras Rulebook and expanded options commonly used from the Mythras Companion. It does not replace either book: the books remain the authority for when an action, Special Effect, modifier, or optional rule is appropriate.
Highlights
- Staged Attack cards with hit-location, damage, armour, Parry, Evade, and opposed-roll support.
- A Special Effects selector filtered by weapon types, combat effects, criticals, and fumbles.
- Automation for Impale, Entangle, Sunder, Stun Location, Bleed, Grip, Disable Attack (Press Advantage, Pin Down, Overextend Opponent), Pin Weapon, Take Cover, and Damage Weapon.
- Persistent melee engagement range, equipped weapons, reload ranged weapons, ward locations, take cover, and movement state tracking.
- Compact token icons with rich tooltips for wounds, fatigue, armour, weapons, cover, engagement, impalement, entanglement, stun, bleeding, gripping, and disabled attacks.
- Utilities for Action Points, Luck Points, skill improvement, currency, armour, NPC generation, and combat cleanup.
- Tooltips for Character Status and Equipped Items.
- Optional item statistics and other campaign tools.
Requirements And Compatibility
- Foundry VTT: Version 13.
- Game system: Mythras for Foundry VTT
- Rules: A legal copy of the Mythras Rulebook is expected. The Mythras Companion is recommended when using expanded combat material from that book.
The module automates procedures and records state, but it does not decide whether a rule is valid for your campaign. The Games Master should resolve any difference between automation and the table's chosen printing, supplements, or house rules.
The imported macros are lightweight launchers. Their gameplay logic remains in the module, so future module updates can improve behavior without requiring the macros to be copied into the world again. New macros would need to be imported once, however.
List of Macros
Below is a list of all macros included within this module. See the relevant sections further in the documentation to read about their functionality.
Character Macros
- Upgrade Skill
- Manage Currency
- Restore Luck Points of all player characters
- Add Armour
- Randomize Build
- Skill Roll
- Multi-round Task
- Timed Buff/Debuff
- Lose Sanity
Combat Macros
- Combat Actions
- Attack
- Equip Weapon
- Ward Location
- Set Melee Range
- Reload
- Take Cover
- Impale
- Disable Attack
- Damage Weapon
- Pin Weapon
- Break Free
- Reduce AP
- Set Movement State
- Clean Up Combat Flags
List of Item Compendiums
Alongside the macro compendium, this module ships a set of ready-to-use Item compendiums (visible under an "Items" folder in the Compendiums sidebar within the Mythras - AngryGorilla's Custom Macros folder) that can be browsed or dragged directly onto actors, and which the Add Armour macro reads from directly:
- Tools
- Weapons
- Armour
- Clothing
- Vehicles
- Storage
- Currency
Players have Observer access to these compendiums by default, so they can view items but not modify the compendium's own contents.
Note that many of the items have custom mechanics which can be ignored (or removed if you duplicate the compendium).
Natural weapons assume a default creature SIZ of 11-20. Damage Modifier, Weapon Size, Weapon Reach, and Attached Hit Locations will need to be adjusted manually based on the actor's SIZ and available hit locations.
⚠️ Also note that all of these module's items have some encumbrance. This may be undesirable for certain GMs. There is no automated mechanism to zero the encumbrance of these items. You will have to duplicate the compendium and manually update these values.
Quick Start
- Select the token that will act.
- Target another token when the action needs a defender or recipient.
- Run the relevant macro.
- Complete the dialog, then use the resulting chat-card controls.
- At the end of a fight, run Clean Up Combat Flags to remove temporary statuses you no longer need.
Many character-changing actions require ownership of the actor. However, in many cases, a GM socket is utilized to allow players to inflict statuses on target characters. Multi-token and large scope utilities are best run by a GM, though.
Module Settings
Open Configure Settings > Module Settings > Mythras - AngryGorilla's Custom Macros.
| Setting | Default | Purpose |
|---|---|---|
| Bleeding Fatigue Progression | On | At the start of a new Combat Round, advances a bleeding combatant one step along the Mythras fatigue track and posts the change to chat. |
| Movement State Control in Combat | Off | Enables Walk, Run, Sprint, Climb, and Swim tracking, first-turn movement prompts, and the Set Movement State macro. |
| Reach Mechanics | On | Enables persistent melee engagement ranges, range-aware Attack and Parry behavior, the Set Melee Range macro, and melee engagement range indicators. |
| Armour Overlay Icons | On | Shows an armour indicator on tokens with equipped armour. Its tooltip groups armour by hit location. |
| Endurance Roll Prompts in Combat | On | Tracks combat exertion and posts Endurance prompts at intervals determined by Constitution. |
| AngryGorilla's Homebrew Rules and Content | Off | Enables the homebrew Re-roll Damage Special Effect and unlocks the non-standard Awful and Exemplary quality tiers when Quality Tracking is enabled. |
| Fitting | Off | Adds Fitting fields to item sheets: SIZ and Frame for armour, clothing, and trinkets, plus a Body Part field for armour. |
| Quality Tracking | Off | Adds a Quality field to armour, equipment, and weapon sheets. |
| Original Condition | Off | Adds original AP/HP fields to armour and weapon sheets so damaged/broken condition can be flagged as current AP/HP drops. Also adds original Value/Quality fields when Quality Tracking is enabled. |
| Show Character Status and Equipped Items on Token Hover | On | Allow all users to Ctrl+Hover on a token to see a two-tab tooltip. One tab shows a summary of the character status with icons representing individual hit locations' condition. The other tab lists all of their items that have the storage set to "Equipped". If the item is a storage item, it will only show up in this list if it is set to be Carried. This tab also provides several filters. |
| Facing Direction Tile Overlay | Off | Enables a tile overlay that shows the facing direction of characters when hovering over their tokens. This is only visible for active combatants during combat encounters. The facing rules are based on the Mythras Companion ruleset. Green for front, yellow for side, and red for back. |
| Facing Direction Tile Overlay Opacity | 0.5 | Sub-setting of the above (only relevant while it's enabled, and only shown/indented under it in this dialog while it is). Accessibility option (per-user/client, not world-wide): sets how opaque the Facing Direction Tile Overlay's coloured tiles are drawn. Range 0.1-1.0. |
| Show HP Values to Players | Off | Enables players to see the exact HP values in the Token Status Tooltip (Ctrl+Hover Token Tooltip must be enabled), the Wound Tooltip, and in the Damage Applied chat cards upon resolving Attack damage. A character's owner can always see their exact HP values regardless of this setting. |
| Tooltip Size | Normal | Accessibility option (per-user/client, not world-wide): scales the size of every hover tooltip this module adds - overlay icon tooltips, the Ctrl+Hover token popover, and chat card info tooltips. Choose Small, Normal, Large, or Extra Large. |
| Token Overlay Icons Opacity | 0.8 | Accessibility option (per-user/client, not world-wide): sets how opaque this module's token overlay icons (cover, impale, entangle, stun, ward, wound, armour, weapon, etc.) are drawn. Range 0.1-1.0. Only affects icons drawn after the change - already-drawn ones update next time their status changes or the scene/token reloads. |
| Select Active Token in Combat Encounter for GM | Off | Whenever the turn changes to a combatant that isn't any player's assigned character - even an NPC owned by a player - clears that GM's current token selection and targets and selects the new combatant's token instead. |
| Also Select Player Characters' Own Turns | Off | Sub-setting of the above (only relevant while it's enabled, and only shown/indented under it in this dialog while it is). When enabled, the automatic selection above also applies on a player's own assigned character's turn, not just NPC combatants. |
| Group Luck Points Widget | On | Shows a small movable window tracking a shared pool of Group Luck Points. The GM can set the maximum and adjust the current total; players can see the same live totals but cannot edit them. |
| Manage Timed Effect Presets | - | Opens a "Manage Presets" menu for creating, editing, and deleting reusable presets (stat changes, duration, description) used by the Timed Buff/Debuff macro. |
Status Indicators And Tooltips on Tokens
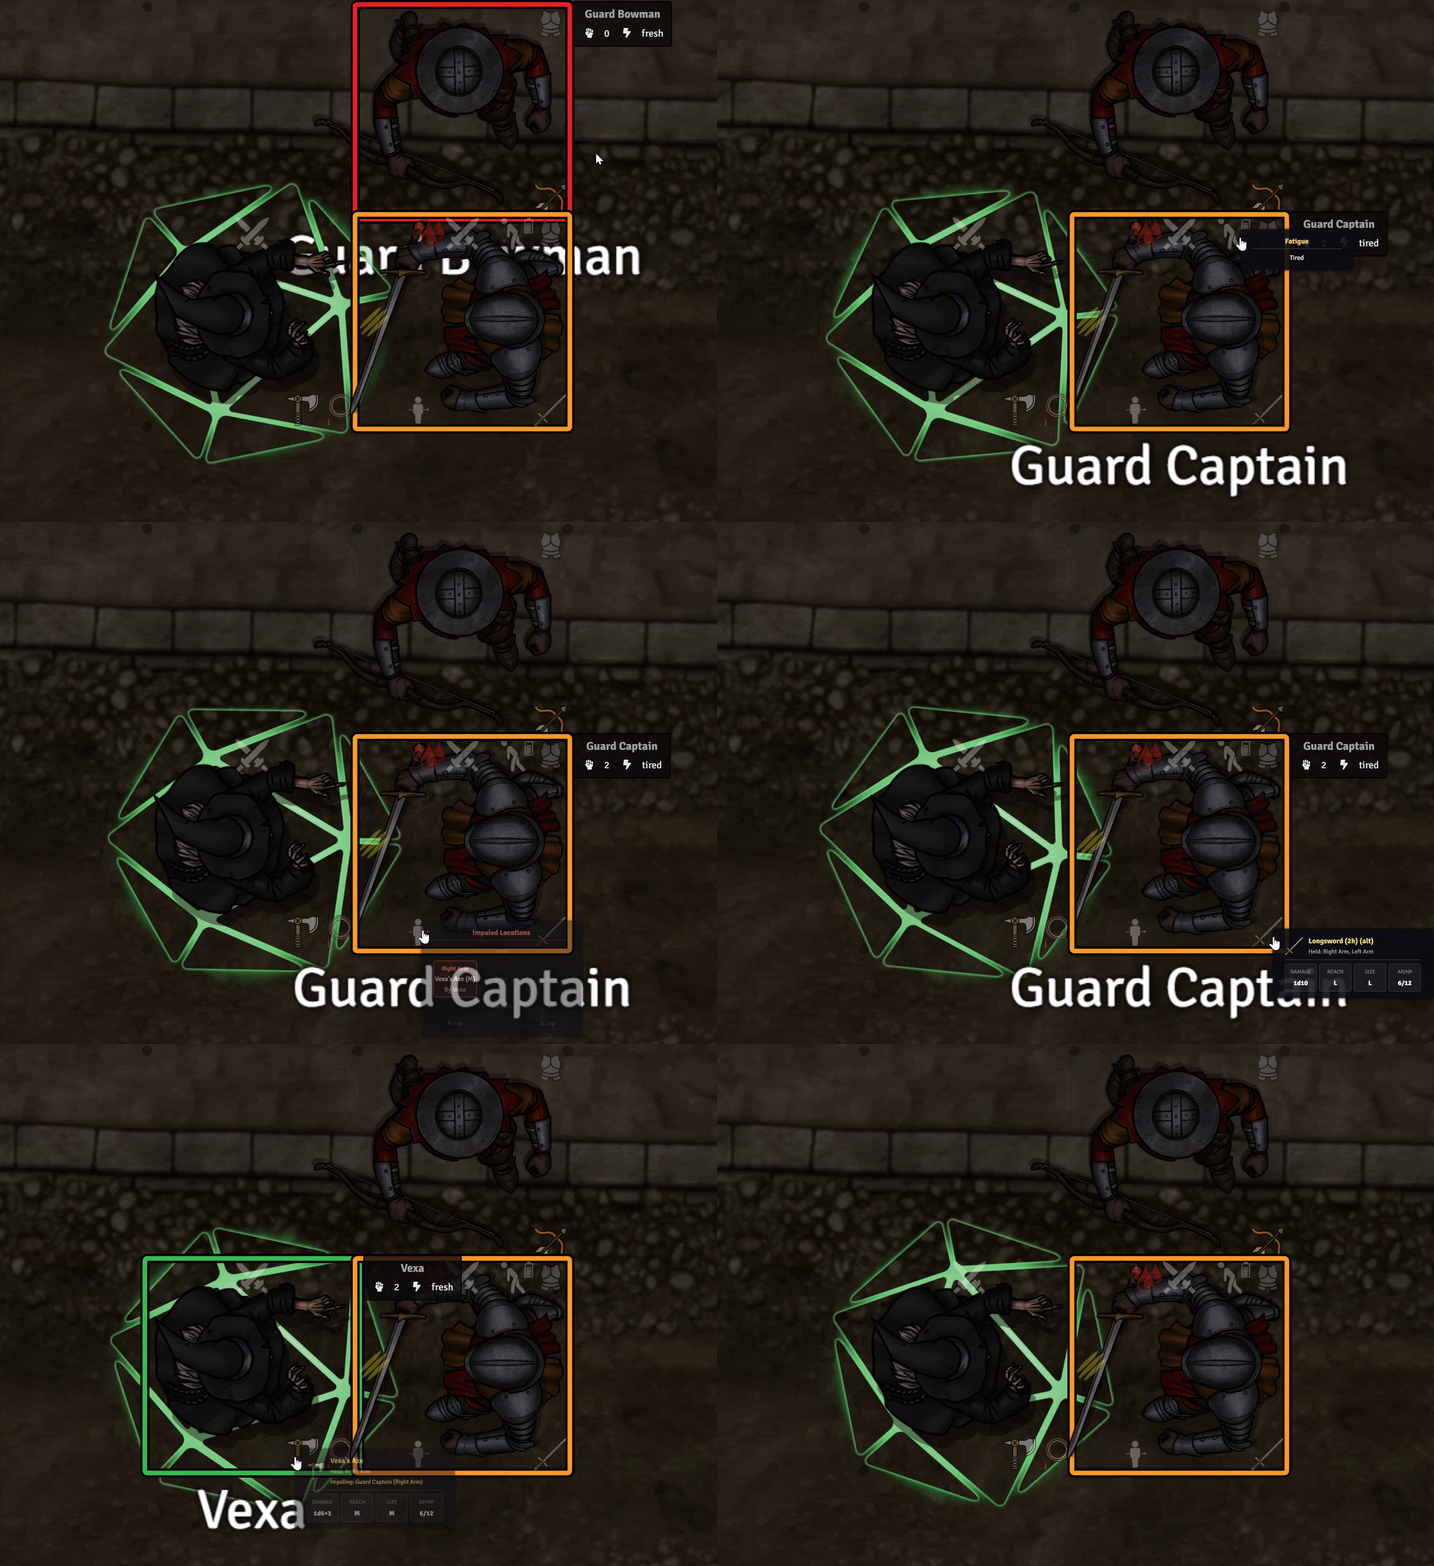
Many features throughout this module communicate information to the user through small, semi-transparent icons on the token. Hovering over these status indicators will show detailed tooltips with relevant information regarding the individual statuses.
Clean Up Combat Flags Macro
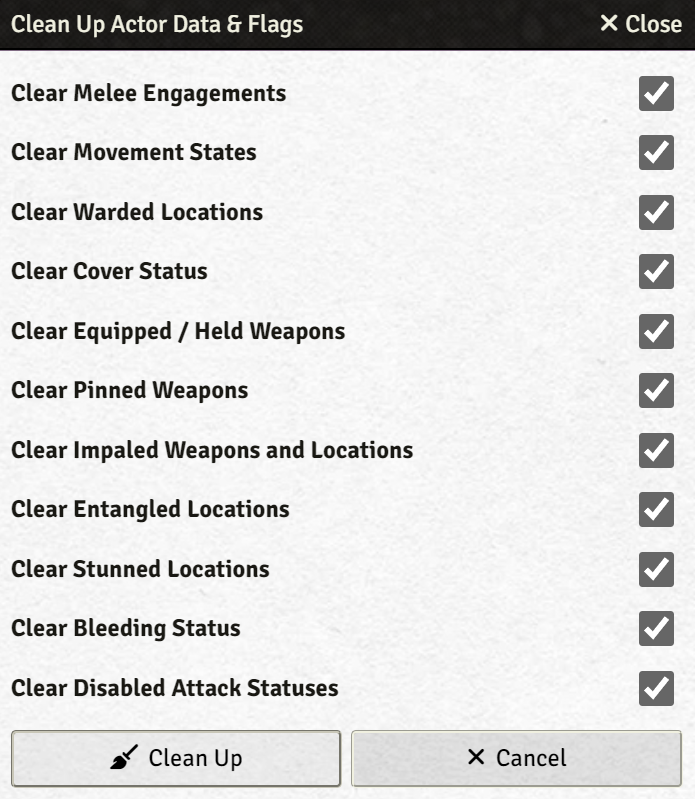
As many of the features within this module set persistent flags on characters and items to display specific combat-related statuses, this general, all-purpose macro exists to help clean up these flags after combat.
Run Clean Up Combat Flags after a battle or when testing stateful features. If tokens are selected, only the selected actors are processed; otherwise all world actors are cleaned up for the checked flags.
The dialog can independently clear melee engagements, movement states, wards, cover, held weapon assignments, reload progress, pinned or impaling weapons, impaled, entangled, stunned, bleeding, or gripped locations/characters, and Disable Attack effects. This is a broad maintenance operation and is best run by the GM.
Combat Workflow
Every combat chat card (Attack, Parry, Evade, Damage Applied, Impale/Unimpale, Disable Attack, etc.) names its two participants as clickable, colour-coded links. Single-clicking a name you own selects and pans to that token, and automatically clears your current targets and targets the other participant named on the card - a quick way to line up your next Attack/Parry/Evade against whoever that card involved. Double-clicking a name opens that actor's sheet (subject to your normal permissions).
Combat Actions Reference
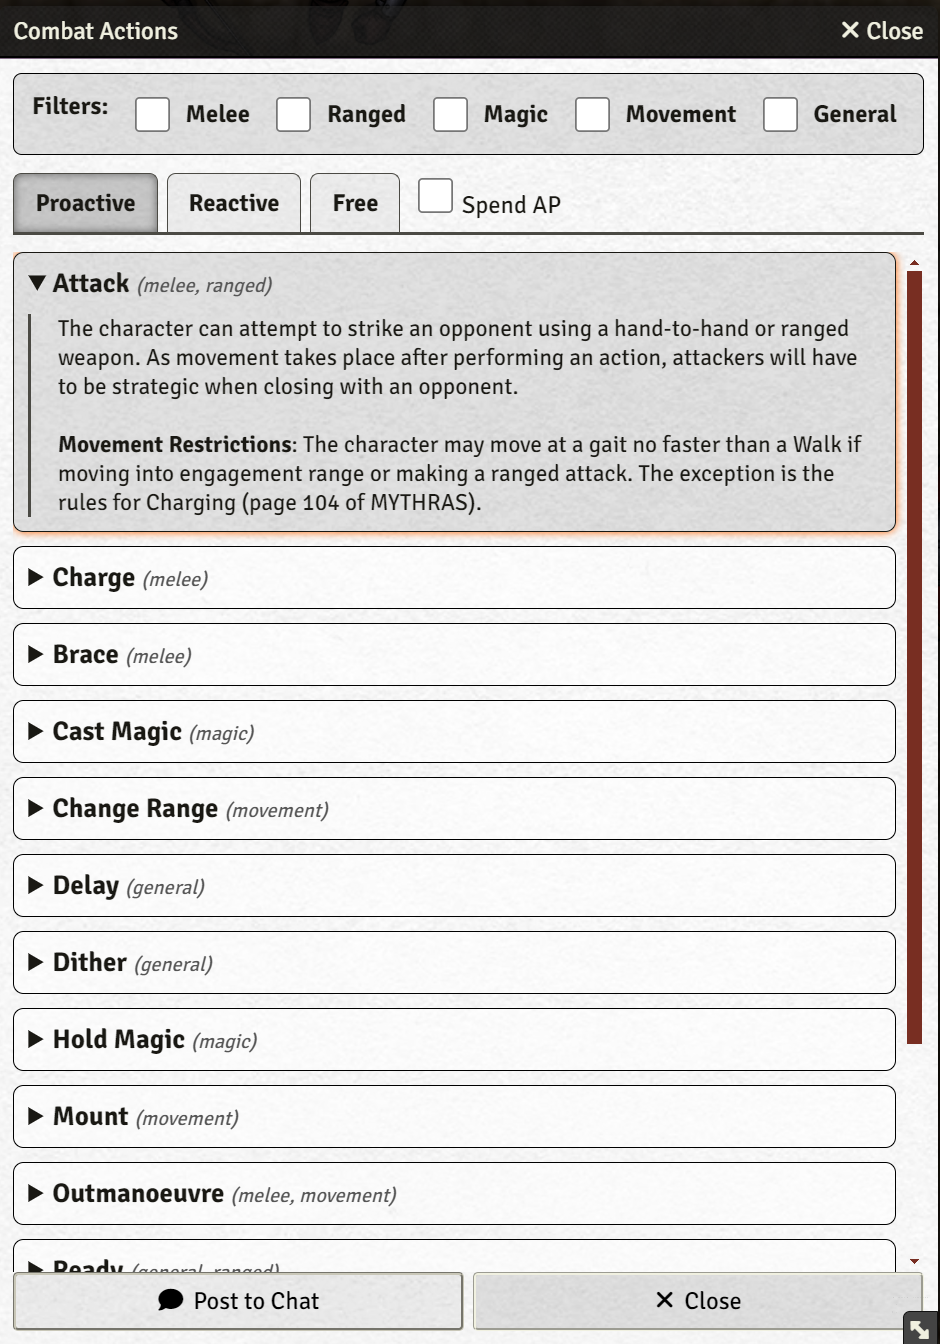
Run Combat Actions to browse proactive, reactive, and free actions. Filters narrow the list by melee, ranged, magic, movement, or general use. Selecting an action can post its description and movement restrictions to chat, with an option to spend an Action Point for non-free actions.
This is simply a reference for Rulebook actions; it does not replace the action's required rolls or the GM's ruling. Movement restrictions are only included as a reference in case the related rules from the Mythras - Companion book are being followed.
Equip Weapon
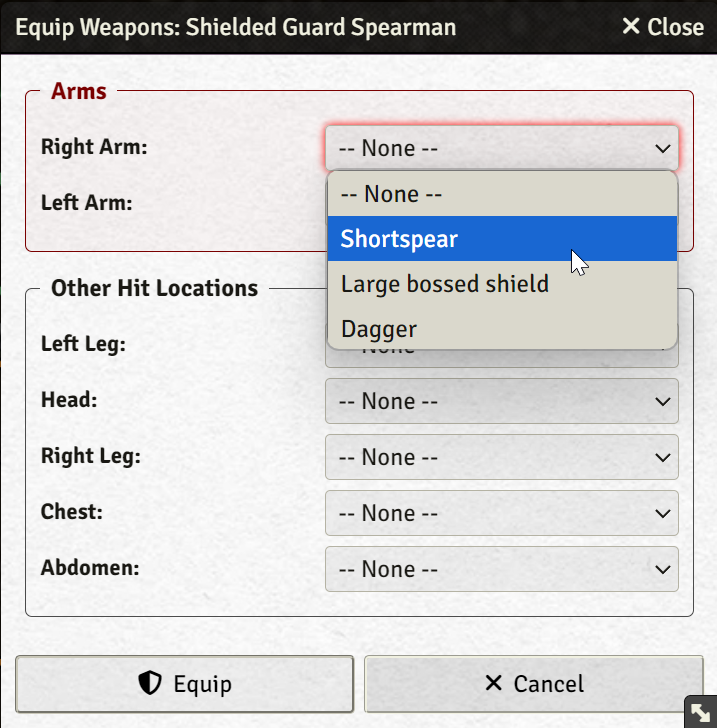
Select an owned token and run the Equip Weapon macro. Assign each weapon to the hit location or locations holding it. A weapon can be held by multiple hit locations to reflect multi-handedness. Humanoid arms are shown first, while nonstandard locations remain available below. Holding locations drive weapon indicators and determine whether Entangle or Stun prevents use.
Weapons must be equipped to a functioning hit location in order to use them in combat. Natural Weapons (see Natural Weapon under Equipment and Items) are the exception - they don't appear in this dialog at all, since they never need equipping.
Held weapons appear as icons overlayed on the token. Hover tooltips show weapon statistics and states such as damage, breakage, pinning, impalement, and reload progress.
Reload And Unload
Ranged weapons with a non-zero Load value are required to be loaded before they can be fired. Select a token with an equipped ranged weapon and run the Reload macro. Choose a held or equipped ranged weapon and enter how many Load actions are completed. Progress is stored until the weapon reaches its required Load value. The same dialog can unload it.
A ranged weapon that requires loading remains disabled in Attack until fully loaded. Firing resets its load progress.
Attack
Select the attacker, target the defender, and run Attack. The dialog provides combat style, difficulty, weapon, augmentation, AP and Luck spending, charging, ammunition, and damage-modifier controls, plus an optional Force Roll Result to bypass the dice and set an exact d100 result. Forced rolls are clearly marked in the resulting message.
Broken, pinned, impaling, entangled, stunned, out-of-reach, and unloaded weapons are unable to attack (these are clearly indicated in the weapon selection dropdown).
The Attack dialog presents several advanced options. At the very top, a Roll Modifiers hint is shown if there are any supported roll modifiers applicable. It can be hovered on to show the list of modifiers.
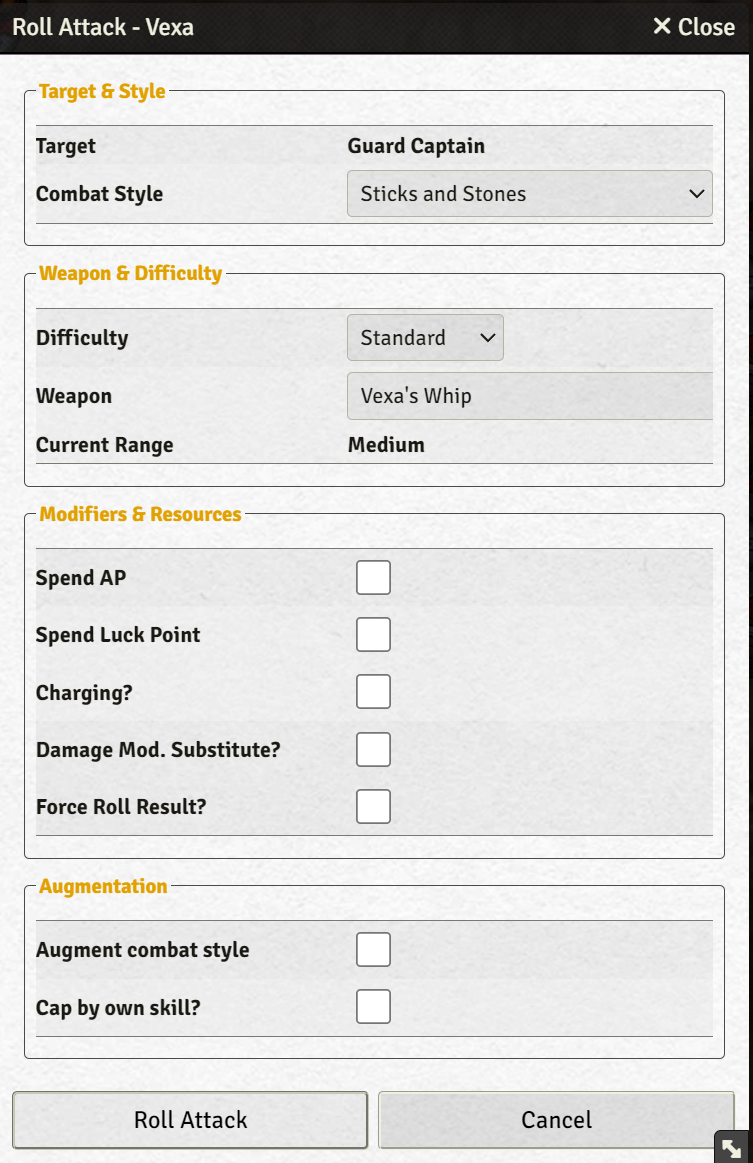
Target and Style
Target
This indicates the intended target of the attack. Currently, the Attack macro only allows attacking individual opponents, however, multiple tokens can be targeted to select between them from a dropdown. This is especially useful for augmenting (see below).
Combat Style
Any Combat Style or Unarmed can be selected here. This is the primary skill that will be rolled for the attack.
Weapon and Difficulty
Difficulty
Select the difficulty the combat style will be rolled against. Currently, there is no feature to roll all difficulties at once, and there are no plans to add such feature, as it would complicate the automation work flow drastically.
Weapon
This option allows selecting between Unarmed/Improvised Weapon and any equipped weapons that are currently useable. Any equipped weapons that are not useable due to a status (e.g. pinned, impaled, location stunned, etc.) are greyed out and cannot be selected until the disabling status is cleared.
Selecting Unarmed/Improvised Weapon provides additional options to substitute the default damage formula, weapon reach and size, and combat effects. Any combat effects added here will determine the special effects option in the rolled chat card. The combat effects must be typed as a comma-separated list with exactly matching names to be considered valid (see the Special Effects section below for the available automated combat effects).
Current Range
Setting required: Reach Mechanics. Displays the current melee engagement range between the attacker and the target. If no melee engagement exists between the two characters yet, the ideal range for the selected weapon will be selected. For Unarmed/Improvised Weapon, this preview follows the Reach you choose for it live, even before any melee engagement exists between the two characters. If the selected weapon's reach is two or more steps shorter than this range, the display turns red and reads Insufficient Reach as a live preview - the attack can still be made, but see Set Melee Engagement Range below for the damage/defaulting consequences.
Ranged Difficulty
Only shown when the selected weapon is a ranged weapon. This section is purely advisory - it suggests a Difficulty (see above) based on the situation, but never prevents choosing a different one manually.
- Situation: A list of common ranged situational modifiers (wind, obscurement, an unstable footing, a prone or moving combatant, etc.), each mapped to a suggested baseline difficulty grade. This defaults automatically to whichever of the following applies and results in the hardest difficulty, if any: the attacker being Prone, or the target being Prone, Running, or Sprinting (Prone uses Foundry's own condition; Running/Sprinting use this module's own Movement State, see Set Movement State). It can always be changed manually afterwards.
- Distance (m): The live measured distance, in metres, between the attacker and the target, using the scene's own grid units. Enter a value here to override it with a custom distance instead; clear the field to return to the automatically measured distance. Changing the targeted or selected token resets this override.
- Weapon Range Zone: Shows whether the current distance falls within the selected weapon's own Close, Effective, or Long range, or beyond it, alongside the distance in metres.
- Projected Difficulty: Combines the chosen Situation's baseline difficulty with how the target's size compares to the current distance (a larger or closer target is easier to hit; a smaller or more distant one is harder) into a single projected difficulty grade. This automatically updates the Difficulty dropdown above to match, unless the Difficulty dropdown has since been changed manually.
Modifiers and Resources
Spend AP
Automatically spends AP upon rolling. If no AP is available, no roll is made and the user is notified.
Spend Luck Point
Automatically spends a Luck Point upon rolling. If no Luck Point is available, no roll is made and the user is notified.
Charging
Enables charging mechanics for the roll with several additional options. Also automatically steps up the selected difficulty by one grade and updates the Roll Modifiers hint at the top. If Charge Type is set to "Into Contact", the attack roll will automatically engage the attacker and target in a melee with the weapon's reach. The Damage Mod Increase option allows selecting how many steps the attacker's damage modifier is increased by for the attack. Additionally, the selected weapon's effective size is automatically increased by one for the purpose of this attack.
Damage Mod Substitute
Allows substituting the attacker's damage modifier for a different value. This is only added to the weapon if the weapon has DM enabled. It is applied indiscriminately for Improvised weapons.
Force Roll Result
Allows bypassing the actual die roll and instead hard-coding the d100 roll result. The resulting attack chat card clearly marks this to prevent cheating. This feature can be used to, among other things, apply retroactive change the dice roll success (for example to apply 100%+ skill parrying retroactively).
Augmentation
Augment Combat Style
Enables augmenting using one of the options below.
Augment Character
The selected character and all targeted characters will appear in this dropdown. Select the character whose skill needs to be used to augment the roll.
Augment with
Allows selecting the skill/passion to augment the roll with.
Custom Augment Value
Allows augmenting using a custom augment value. Negative numbers can be entered as well, which can be especially useful along with the Force Roll Result to retroactively apply 100%+ contested skill rolls.
Cap by skill
Allows choosing a skill - from the acting character or any currently targeted character - to cap the combat style with.
Roll Result Tooltip
Hovering over any Attack/Parry/Evade roll's result pill shows the usual skill/difficulty/augment breakdown, plus an All Difficulties section listing what target% and result the SAME raw roll would have produced against every other difficulty grade, colour-coded to match the difficulty and result colours used elsewhere on the card.
Roll Resolution Rules
Every Attack, Parry, Evade, and Endurance roll (and any post-hoc recompute of one, such as a difficulty change) resolves a d100 result against its target% using the same rules, regardless of skill or difficulty:
- 01-05 is always a Success.
- 96-00 is always a Failure.
- The bottom 1/10th of the target% (rounded up) is always a Critical.
- 00 is always a Fumble, and 99 is also a Fumble - unless the roll's raw skill (before difficulty and before any of the over-100% adjustments below) is itself over 100%, in which case only 00 fumbles.
- Otherwise, rolling at or under the target% is a Success and rolling over it is a Failure.
Skills Over 100%
Per the Rulebook's rules for Opposed and Differential Rolls, a skill over 100% no longer just adds to its own target% - the excess above 100 is instead subtracted from every other participant's skill in the contest, including the high-skilled character's own (which is why its own target% caps at 100% rather than exceeding it).
- Attack: if the attacking Combat Style is over 100%, a notice on the dialog shows the excess. The attack's own target caps at 100%, and that same excess is subtracted from whatever Parry, Evade, or Contest the defender rolls against it.
- Parry/Evade/Contest: the defender's (or contester's) own target is first reduced by any excess the roll they're facing carried in (per above). If their own skill is also over 100%, a checkbox appears (only once relevant) letting the GM apply that excess as well - capping their own target at 100% and, per the Rulebook's guidance that this should generally be agreed before the other side rolls, retroactively re-checking the already-resolved roll being faced against the reduced target (updating its result and notice if it flips, e.g. from a hit to a miss). This applies equally whether the roll being faced is an Attack, a standalone Skill Roll, or another Contest.
- Endurance: is a single, unopposed roll, so it is unaffected by this rule - only the Fumble exception above applies to a skill over 100%.
Changing a roll's difficulty afterward (see below) always re-derives these adjustments against the new target instead of reusing the ones baked in at roll time.
Changing a Roll's Difficulty After the Fact
The (Difficulty) badge next to an Attack/Parry/Evade/Skill Roll/Contest roll's result is clickable and opens a small picker to change that roll to a different difficulty grade. This fully recomputes the roll's result and everything that depends on it - hit/miss, Critical/Fumble, the Winner line and Special Effects count (or Levels of Success, for a Contest), Bypass Armour and Maximise Damage options, and Damage Negated - without re-rolling the dice.
Changing an Attack's difficulty cascades into whatever Parry, Evade, or Contest already resolved against it (recomputing the opposed result from that side), and changing a Parry, Evade, Skill Roll, or Contest's difficulty likewise re-reads the current result of whatever it's being compared against. This cascades down an entire chain of Contests, not just one level. A badge that has been changed shows a small clock icon; hovering it names the difficulty the roll was originally made at.
This is locked once the Attack's damage has actually been applied to the target (HP deducted), since that step can't be safely undone and redone automatically.
Roll Attack
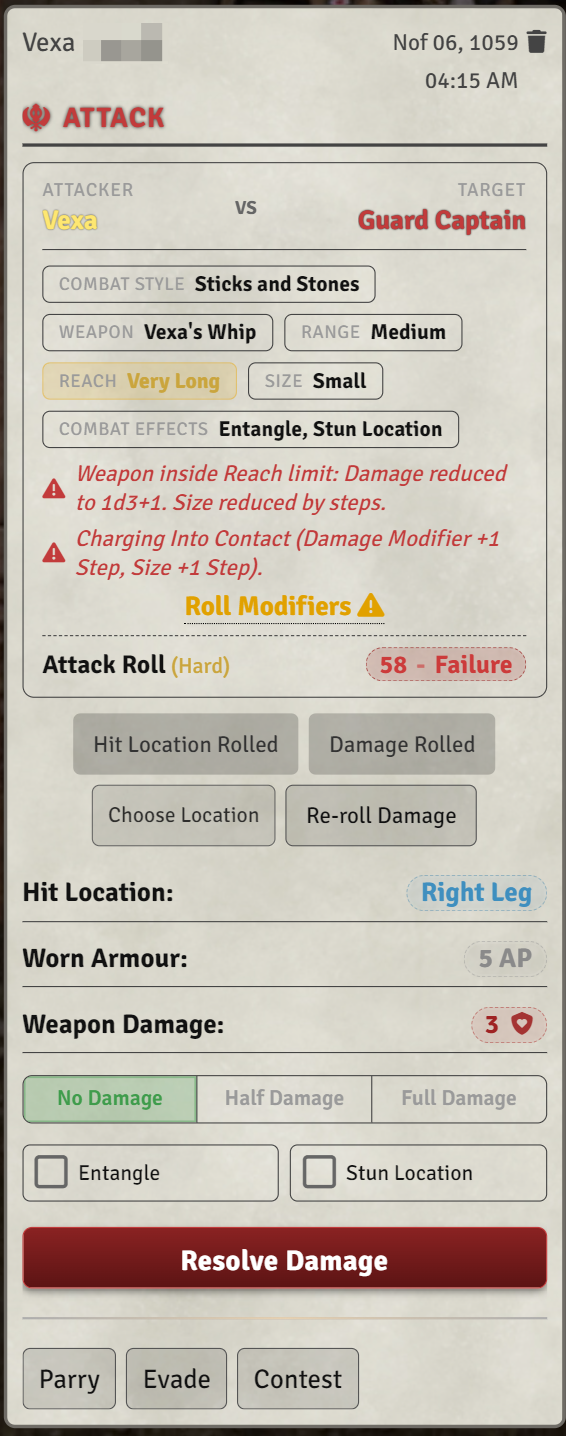
After rolling, a card is posted in the chat that allows automating several mechanics. The following steps show a sample scenario of how these features can be used.
- Roll or choose the hit location.
- Roll weapon damage or maximise if the attack roll was a critical success. If the Homebrew setting is enabled, an option to re-roll damage is also provided. Maximise Damage stays usable after Rolling Damage - changing its selection re-rolls and overrides the previously rolled total, instead of permanently locking the choice in.
- Choose damage mode (none, half, full). This will be the damage done (assuming the attack was a success). Armour is mitigated from the damage.
- Choose between several automated Special Effects. The special effect options are based on the attacking weapon's Combat Effects list (must be comma-separated with spellings matching the special effect names exactly). Choosing these special effects will automatically inflict statuses upon the target if the damage meets the requirements for the individual status effects.
- Choose bypass armour, if applicable. Worn and natural armour can be bypassed individually. These options only appear if the attack was a critical success.
- The defender may respond with Parry, Evade, or an opposed Contest from the corresponding prompts.
- Once the defence sequence is resolved, click Resolve Damage. The selected options will be used to resolve the results.
Resolve Damage stays locked until the hit location is rolled/chosen, damage is rolled, and a Parry or Evade has been rolled against this attack (a Do Not Parry response still counts, since the defender has made their choice either way) - opposed Contest rolls are a separate mechanic and don't satisfy this. Hovering the button shows a checklist of which of these are still outstanding.
The final damage message records detailed information about the specific attack.
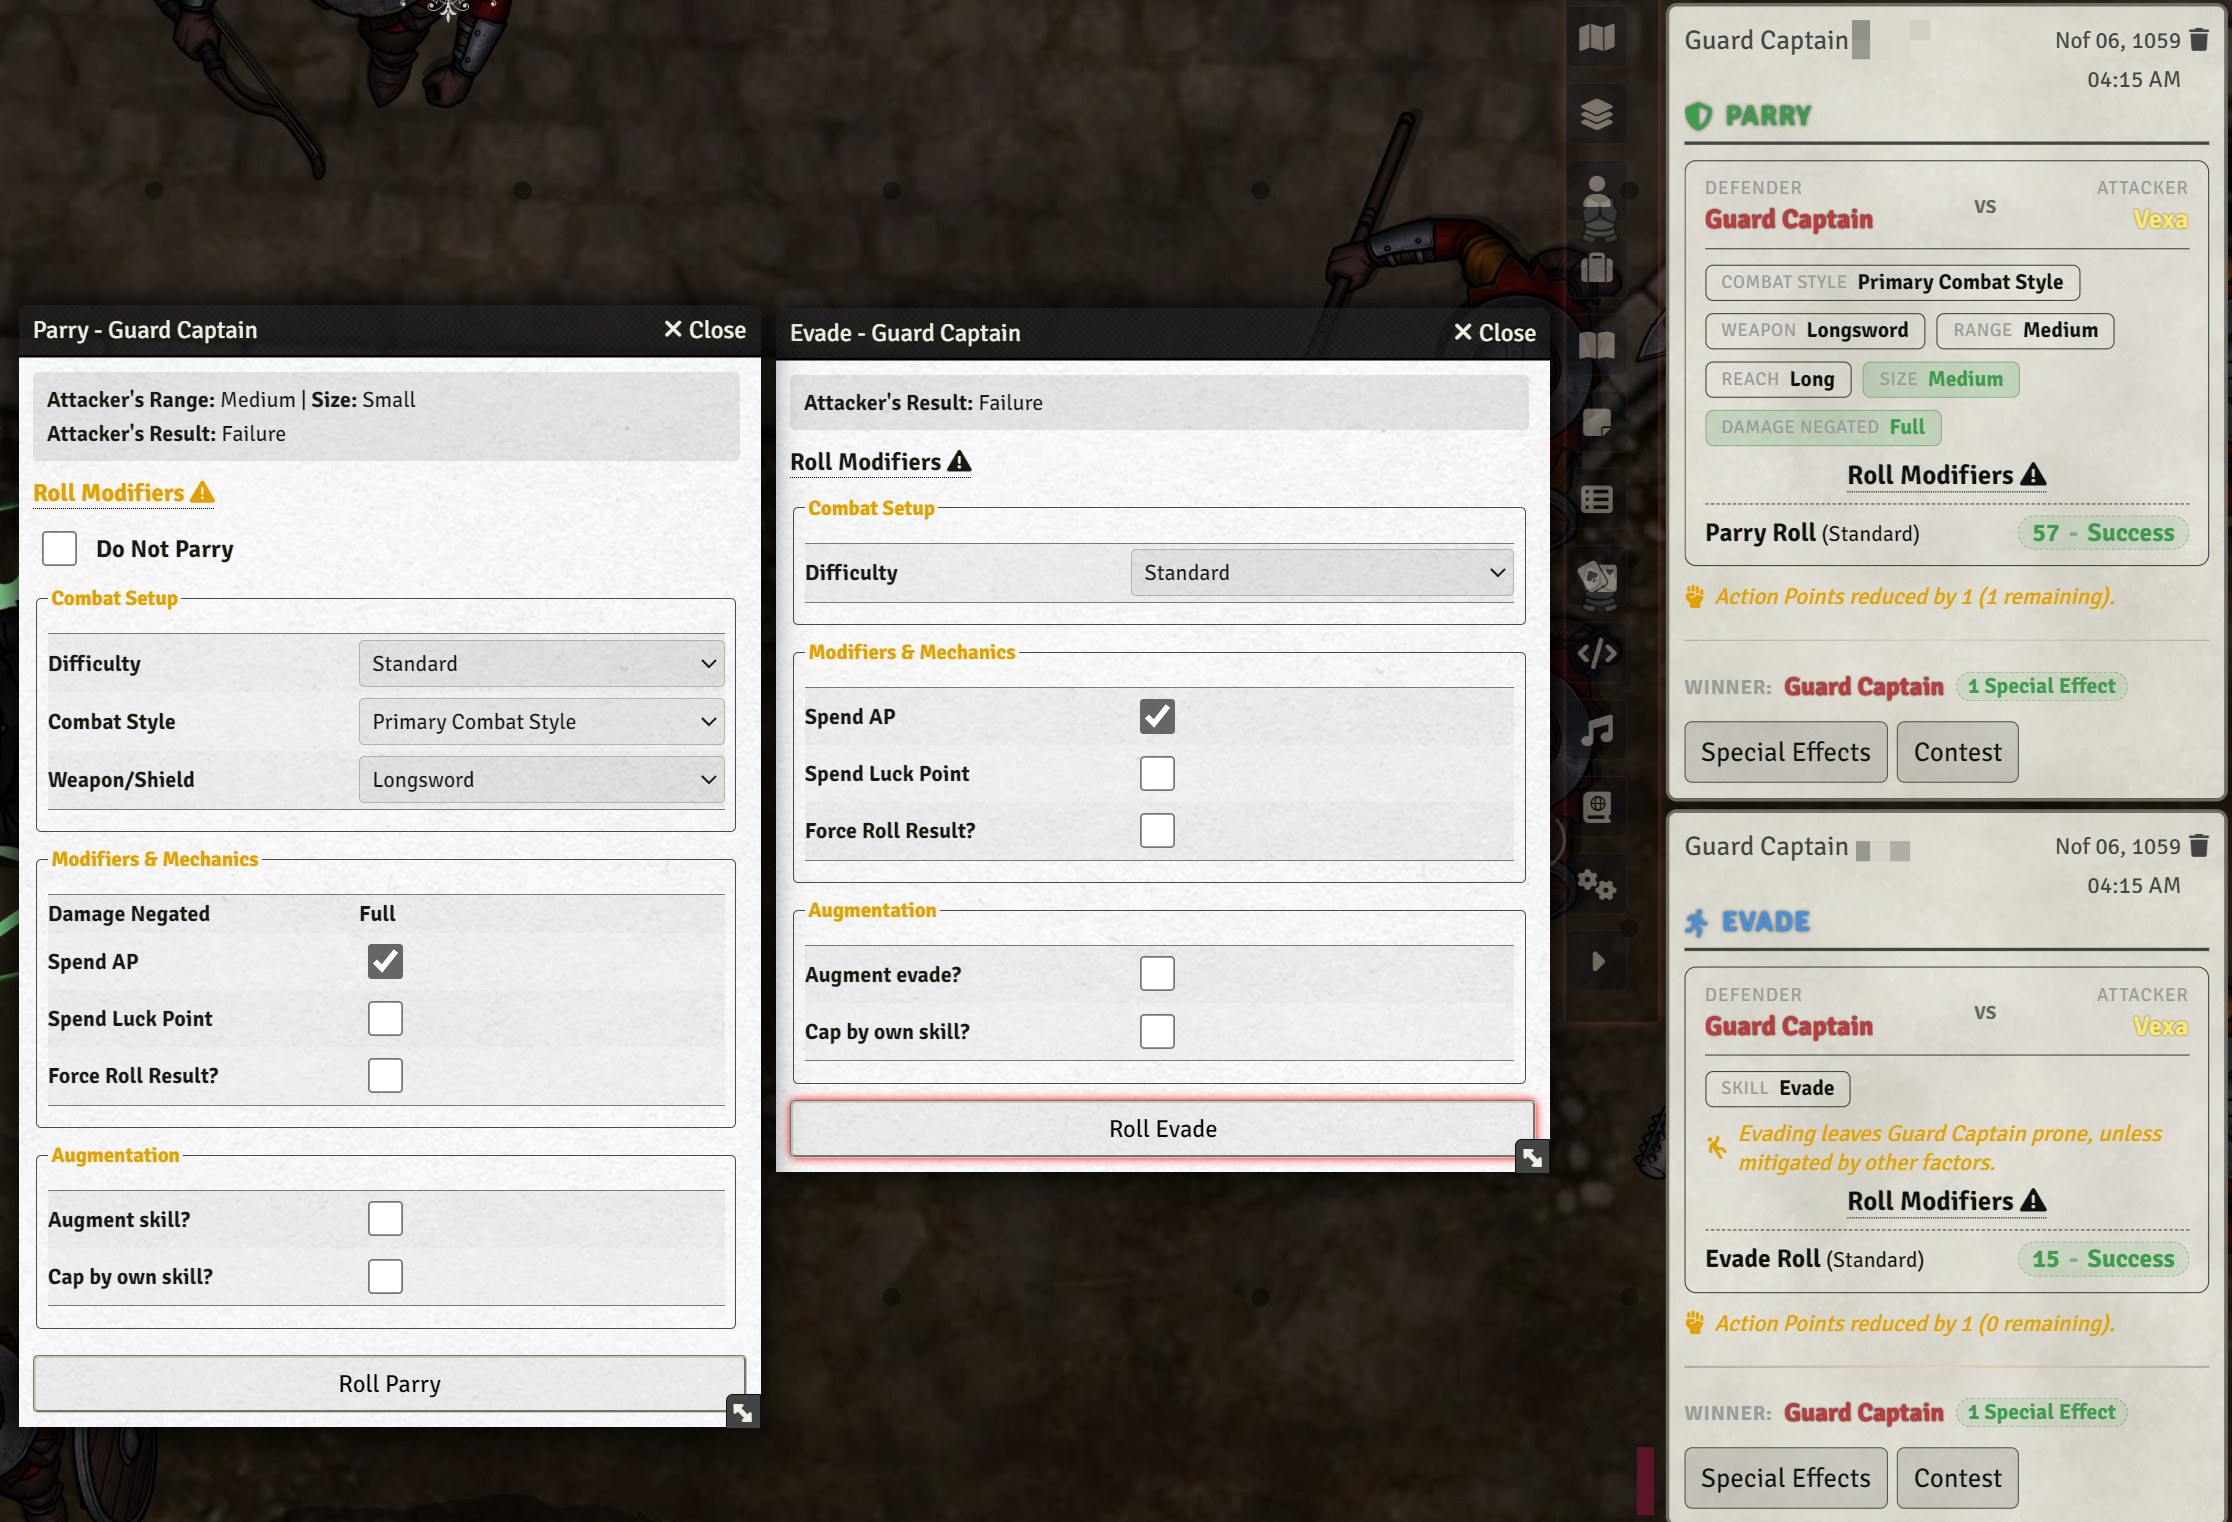
Parry And Evade
Attack chat cards expose Parry and Evade controls to the defender. These dialogs account for the original attack result and pass the attacker's relevant weapon type, combat effects, combat style traits, weapon size, weapon reach, and current range into the opposed result.
Parrying weapons are unavailable if they are broken, pinned, currently impaling another target, held by an entangled arm, or held by a stunned location. The comparison reports the winner and number of Special Effects earned. Both dialogs also offer a Force Roll Result option; a forced roll is clearly marked with an icon on the roll pill and noted in its tooltip.
The Parry dialog's Do Not Parry option is automatically pre-checked (and Spend AP pre-unchecked to match) whenever parrying would be pointless, impossible, or unwieldy: the defender has no AP left, the attack is ranged and the defender has no usable weapon with the Ranged Parry combat effect (or their only one is currently warding a location instead), the hit location already rolled/chosen for this attack is already warded or behind cover, or the defender's selected Weapon/Shield (or Improvised reach) is two or more reach steps longer than the attacker's current range - in which case the Attacker's Range display also turns red with an explanatory tooltip. This is only a starting suggestion- it can always be changed manually before rolling.
Options within the Parry Dialog function very similarly to the options within the Attack Dialog.
Take Cover
Select a token and run the Take Cover macro. Humanoids receive a body-layout dialog; other creatures receive a location list. Mark every location protected by available cover, or use Exit Cover to clear them all.
The macro records protected locations and displays a cover status indicator on the token. The GM must manually determine whether the cover's Armour Points and whether an attack can reach it, using the Rulebook's guidance. The Attack Chat Card will provide status indicators if the rolled hit location is behind cover.
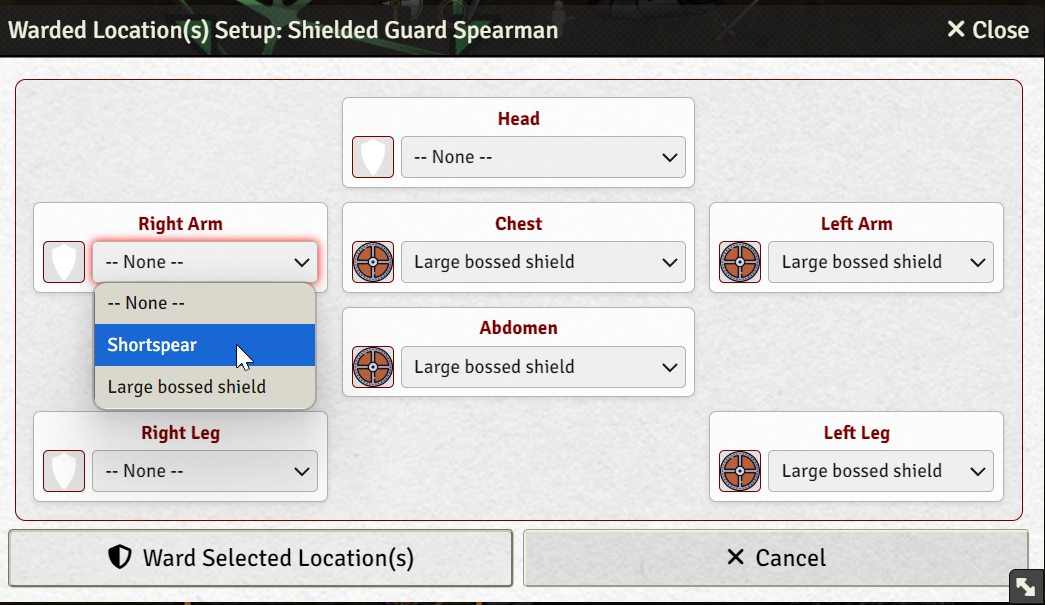
Ward Location
Select a token and run the Ward Location macro. This will open a dialog to allow assigning a held melee weapon to one or more passively guarded locations. The token status indicator tooltip shows the warded locations and warding weapon. The dialog records the declaration; apply the Passive Blocking rules from your chosen Mythras material when resolving a hit. The Attack Chat Card will provide status indicators if the rolled hit location is being passively blocked.
Set Melee Engagement Range
Setting required: Reach Mechanics.
Select a token, target one or more opponents, and run the Set Melee Range macro. Choose Touch, Short, Medium, Long, or Very Long, or clear the engagement. Range is stored on both actors and appears in a token tooltip.
Attack and Parry use this state to compare weapon Reach. The Attack dialog can establish an engagement automatically, while charging through contact avoids creating a lasting engagement.
Attacking at a range two or more steps shorter than the weapon's reach will reduce the weapon damage to 1d3+1 as per RAW. Attacking at a range two or more steps longer than the weapon's reach (the weapon can't physically reach the target) is still allowed, but the dialog and resulting chat card both flag it in red as Insufficient Reach, and damage defaults to No Damage (this default, like any other, can still be changed manually).
This macro is used to implement the Change Range action and the Open Range and Close Range special effects.
A gripped character (see Grip under Special Effects) cannot use this macro until they break free.
Reduce AP
A very simple macro that allows reducing the first selected token's AP by one. Also posts a message in the chat notifying the AP reduction and the remaining AP. Sends a warning notification instead if the token does not have enough AP.
Movement, Fatigue, And Endurance
Set Movement State
Setting required: Movement State Control in Combat.
This feature helps implement the movement state rules provided in the Mythras - Companion book.
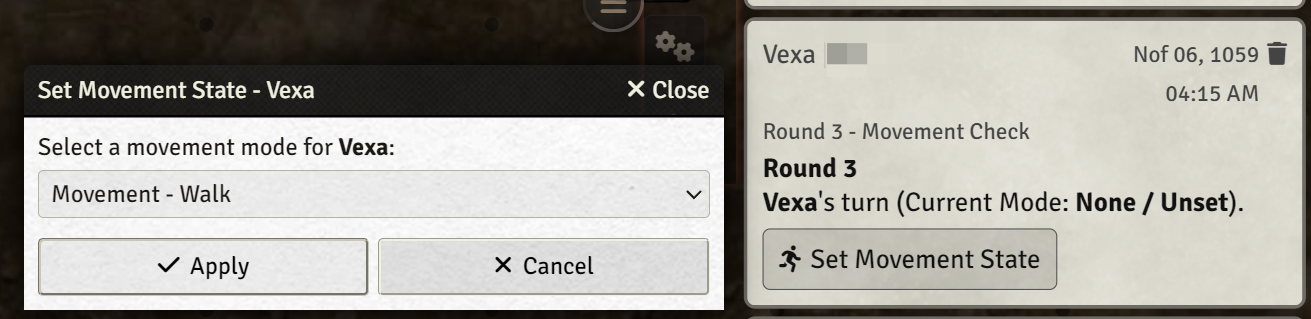
Select a token, or assign a default character to your user, and run Set Movement State. Choose Walk, Run, Sprint, Climb, Swim, or clear the state. It is represented by an Active Effect with its own icon. There is no state added for "Hold Ground". A lack of movement state can be interpreted as holding ground.
During combat, a movement prompt is posted in the chat automatically for each combatant on their first turn of each round. Use the Rulebook's gait, action, and movement restrictions when choosing a state.
Bleeding Fatigue Progression During Combat
Setting required: Bleeding Fatigue Progression.
At the start of a Combat Round, a bleeding combatant (see Bleed under Special Effects) advances one step along the fatigue track: Fresh, Winded, Tired, Wearied, Exhausted, Debilitated, Incapacitated, Semi-conscious, Comatose, and Dead. A chat message is posted each time the fatigue progresses due to bleeding. The bleeding status must be cleared using Clean Up Combat Flags. It does not progress outside of combat, but the status indicator will remain until cleared.
Endurance Prompts During Combat
Setting required: Endurance Roll Prompts in Combat.
The module tracks completed rounds and uses Constitution to determine when the current combatant receives an Endurance prompt as per RAW. The chat button rolls the actor's Endurance skill and reports the result. Fatigue is not changed automatically, however. This simply provides a useful automated reminder to make these rolls.
Fatigue Indicator
Any fatigue state other than Fresh displays a status indicator on the token. Hovering on it shows the current fatigue level. It updates whenever fatigue changes, including changes caused by Bleeding progression.
Fatigue Change Announcements
Whenever a character's fatigue level is changed directly (e.g. the GM editing the character sheet) rather than through Bleeding Fatigue Progression, the module posts a chat message noting the change and how long it would take the character to recover back to Fresh. This message is skipped when the change was caused by Bleeding progression, since that feature posts its own message.
Wounds
Hit-location HP automatically produces Minor, Serious, or Major Wound indicators on the token. They can be hovered on for additional detailed information regarding the wound's severity and location.
Serious/Major Wounds Prompts
Whenever a hit location's damage newly crosses into the Serious Wound (0 HP or below) or Major Wound (negative HP equal to or beyond its maximum) threshold, the module automatically posts a chat message describing the wound's effects (Limbs and Torso/Head hit locations have distinct prompt descriptions as per the rulebook).
For the purposes of this prompt, hit location strings with the words limb, arm, leg, tail, fin, or wing are treated as limbs, while head, chest, abdomen, torso, thorax, length, body, or quarters are treated as torso.
A Serious Wound (only) also offers a Stun Location button, which - after a confirmation prompt - applies the same Stun Location status and token icon/tooltip as the Stun Location special effect (see Stun Location under Special Effects), attributed to whoever last damaged that location. The only difference is duration: this one has no turn counter and instead clears itself automatically (with its own chat notification) once the location heals back to a Minor Wound, without disturbing the turn-based countdown of any other Stun Location in effect. Clean Up Combat Flags' Stunned Locations option clears this variant too.
Other Token Status Indicators
Impale, Entangle, Stun, Bleed, Grip, Disable Attack (e.g. Overextend opponent, Press Advantage, Pin Down, etc.), Fatigue, Cover, Ward, and Engagement each have dedicated indicators. Their tooltips display affected locations, sources, remaining duration, relevant equipment, or opponents as appropriate.
Special Effects
Special Effects Selector
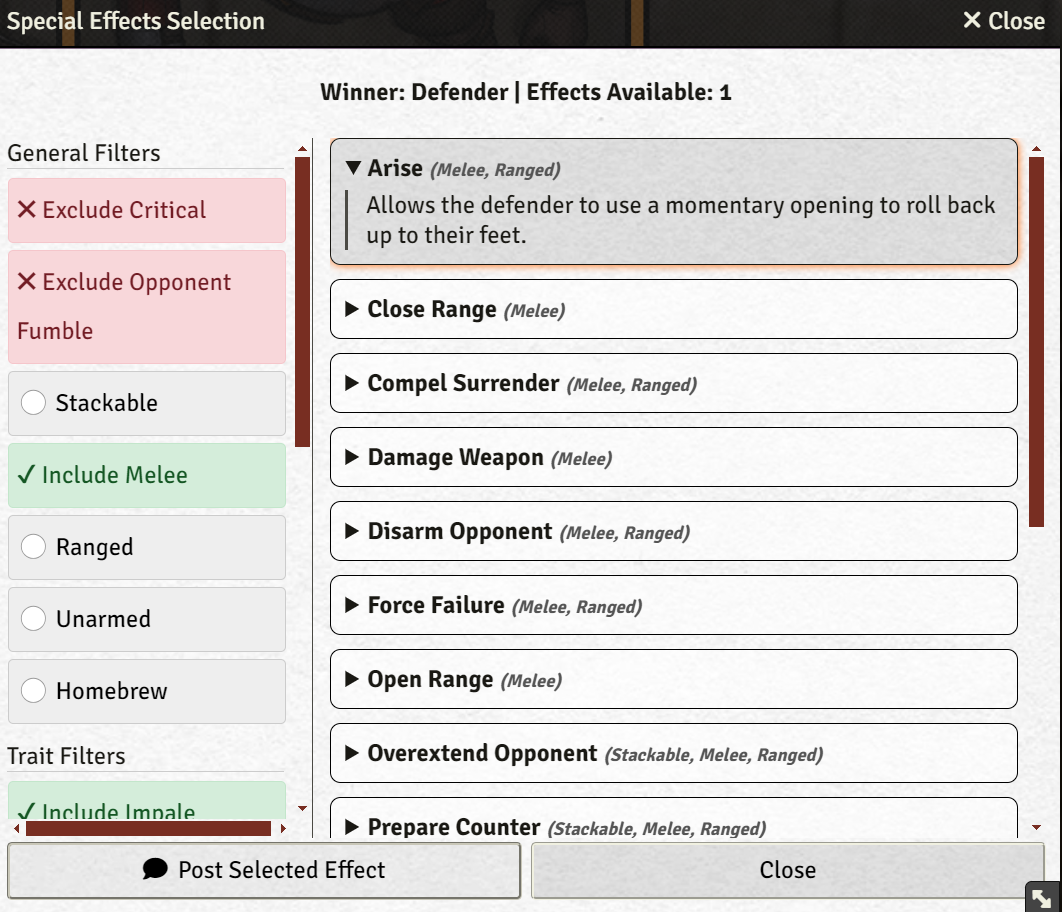
When an opposed result awards Special Effects, clicking the Special Effects button on the Parry/Evade chat card opens a selector containing offensive or defensive effects. It automatically filters for melee, ranged, or unarmed use; criticals; opponent fumbles; and weapon or Combat Effects.
This selector is mainly meant to be used as a convenient catalog to browse relevant special effects for an attack/parry/evade sequence. It does not provide any automation currently. For automatic various Special Effects, see below.
The Re-roll Damage effect is explicitly homebrew and only appears when AngryGorilla's Homebrew Rules and Content is enabled.
A few effects (Bleed, Drop Foe, Spoil Spell, and Stun Location) are only offered by the Parry/Evade "Winner" line's automatic Special Effects list once the rolled damage on the source Attack card is known to actually overcome the target's armour and deal Hit Point damage (accounting for the selected Damage Mode). Until that's known - for example, if damage hasn't been rolled yet - they're shown as usual.
Impale And Unimpale
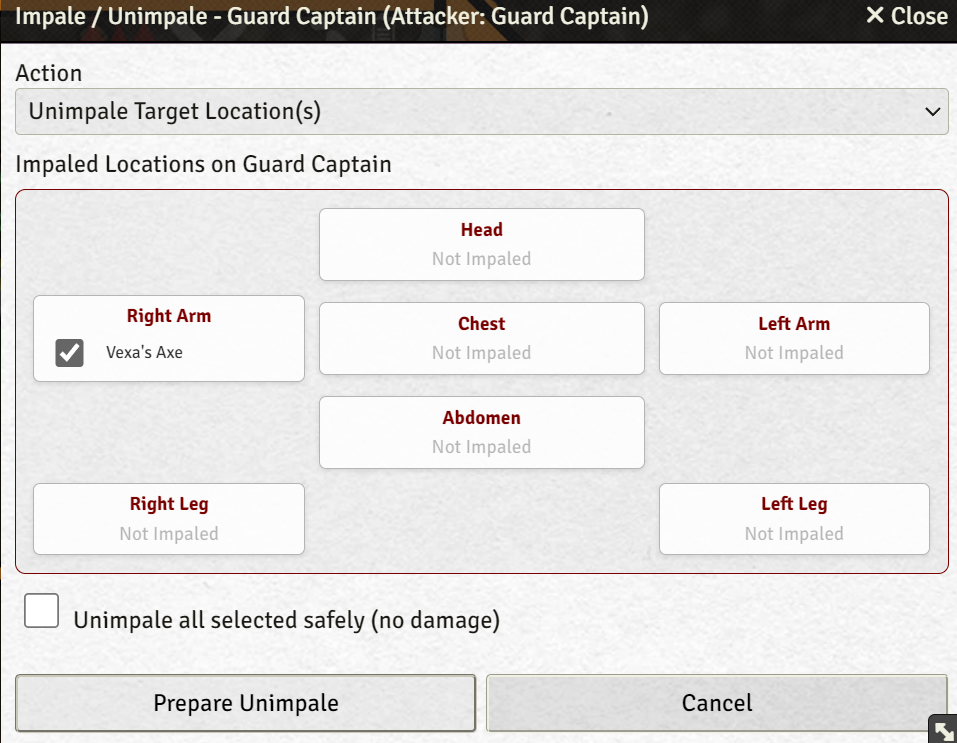
If an attacking weapon has the Impale combat effect, a checkbox will appear on the Attack chat card. Checking it on will automatically impale the attacking weapon into the targeted hit location when resolving damage if the damage overcomes armour and reduces hit points.
The impale status is indicated via a status indicator on the token. If the impaling weapon is a melee weapon, it cannot be used to make further attacks or parries until the Impale macro is used to unimpale it. Running the Impale macro to unimpale a weapon will post a prompt in the chat to apply half damage. If the weapon has the Barbed combat effect, it will apply full damage. The Impale macro can also be used to safely remove impaling weapons without dealing damage.
Additionally, the Impale macro can be used to manually impale hit locations as well.
Ranged weapons with the Impale special effect can also impale targets, however the status icon will indicate that the impaling weapon is a "projectile". Ranged weapons can be used even while they're impaling an individual (there is currently no discrimination between thrown weapons and fire weapons, so thrown weapons can still be used even if they're impaling someone). The impaled victim also receives an injected roll modifier based on the largest impaling weapon and the victim's SIZ.
Entangle And Unentangle
The Attack card can mark the struck location as Entangled. Entangled does not need to overcome armour or deal HP damage to take effect. Entangled arms prevent use of held weapons; entangled legs prevent setting a new melee engagement range; other entangled locations inject a penalty into the Roll Modifiers tooltip.
Select the affected token and run the Break Free macro to clear one or more entangled locations. The dialog shows the source weapon and attacker for each location.
Stun Location
An eligible Attack can apply Stun Location automatically if the damage penetrates armour. The struck location remains incapacitated for a number of turns equal to the (armour-mitigated) damage dealt to the hit location. Head and torso results retain their distinct narrative consequences from the Mythras effect:
- Head: The character is knocked senseless and cannot act at all while stunned there.
- Chest/Torso/Abdomen: The character can only defend (Parry/Evade) while stunned there; the Attack macro will refuse to open for them until it clears.
- Arms/Legs: Only the weapon held in that specific location is disabled for Attack or Parry; the character can otherwise still act normally.
Stun is displayed as a token icon. Its tooltip lists each stunned location, remaining character turns, and the weapon and character responsible.
The turn counter only counts the stunned character's own turns - it decrements by exactly 1 each time that character's own turn ends (not once per every combatant's turn in the encounter, and not when their turn begins). When a location's counter reaches zero, the stun clears automatically.
Bleed
An eligible Attack can automatically apply Bleed whenever damage actually penetrates armour (armour-mitigated HP damage greater than 0). Bleed must be cleared via Clean Up Combat Flags.
Bleed is displayed as a token icon. Its tooltip shows how many rounds (while in active combat) the character has been bleeding, and the weapon and character responsible. Re-applying Bleed (e.g. a fresh wound) resets the round counter to the newest source.
While the Bleeding Fatigue Progression setting is enabled, a bleeding character automatically degrades one fatigue step at the start of each Combat Round (see Bleeding Fatigue Progression section).
Grip And Break Free
Unlike the other automated Special Effects, the Grip checkbox always appears on the Attack chat card regardless of the weapon's Combat Effects - it's up to the GM to decide whether gripping is contextually appropriate for a given attack. Checking it applies Grip to the target when damage is resolved, with no requirement that the blow overcome armour or deal HP damage.
Grip applies to the whole character rather than a specific hit location, and multiple attackers can be gripping the same character at once - each is tracked and can be released independently. A gripped character cannot use the Set Melee Range macro until they break free.
Grip is displayed as a token icon. Its tooltip lists every character currently gripping the token. Select the gripped token and run the Break Free macro to choose which grip(s) to release - it defaults to breaking free from all of them at once.
Break Free also handles Entangled locations (see Entangle And Unentangle above) - if the selected token is both gripped and entangled, the dialog shows a tab for each, defaulting to the Entangled tab. If only one of the two statuses is present, only that section is shown.
Sunder
Select Sunder on an eligible Attack card to automatically apply damage to armour. Damage reduces worn armour first based on RAW, then natural armour; any remaining damage carries into the hit location. The final message itemizes each reduction. If the Original Condition and Armour Overlay Icons module settings are enabled, you can see the damaged status of armour by hovering over the corresponding token icon.
Damage Weapon
Target the weapon's owner and run the Damage Weapon macro. Choose an equipped weapon and enter the damage amount. The weapon's Armour Points resist damage; surplus reduces the weapon's Hit Points, and a weapon at 0 HP is marked broken and automatically unavailable to be used for attacks and parries.
Pin Weapon
Select your token, target a token, and run the Pin Weapon macro. Choose Pin a Weapon to make one of the target's equipped weapons unusable, or Unpin Weapon(s) to select one or more of the target's currently pinned weapons and free them. Resolving the opposed action needed to pin or free a weapon remains a table decision; this macro is simply used to implement the result.
Disable Attack (Press Advantage, Pin Down, Overextend Opponent, Reeling from Serious Wound)
Select your token, target a token, and run the Disable Attack macro. Choose which Special Effect is being applied - Press Advantage, Pin Down, Overextend Opponent, or Reeling from Serious Wound (for manually disabling attacks per the rulebook's Serious Wound stun-from-pain effect, independent of the automated Stun Location button described below) - and how many of the target's turns it lasts (defaults to 1). The chat message names both the character causing the effect and the character affected, worded for the chosen effect.
The target displays a Cannot Attack status icon on the token. Its tooltip names the specific effect, how many of the victim's turns remain, and who caused the effect. As with Stun Location, the counter only decrements when the affected character's own turn ends and clears automatically at zero. While affected, the Attack macro refuses to open for that character, just like a torso or head Stun Location.
Character Facing Direction Tile Overlay
Setting required: Facing Direction Tile Overlay
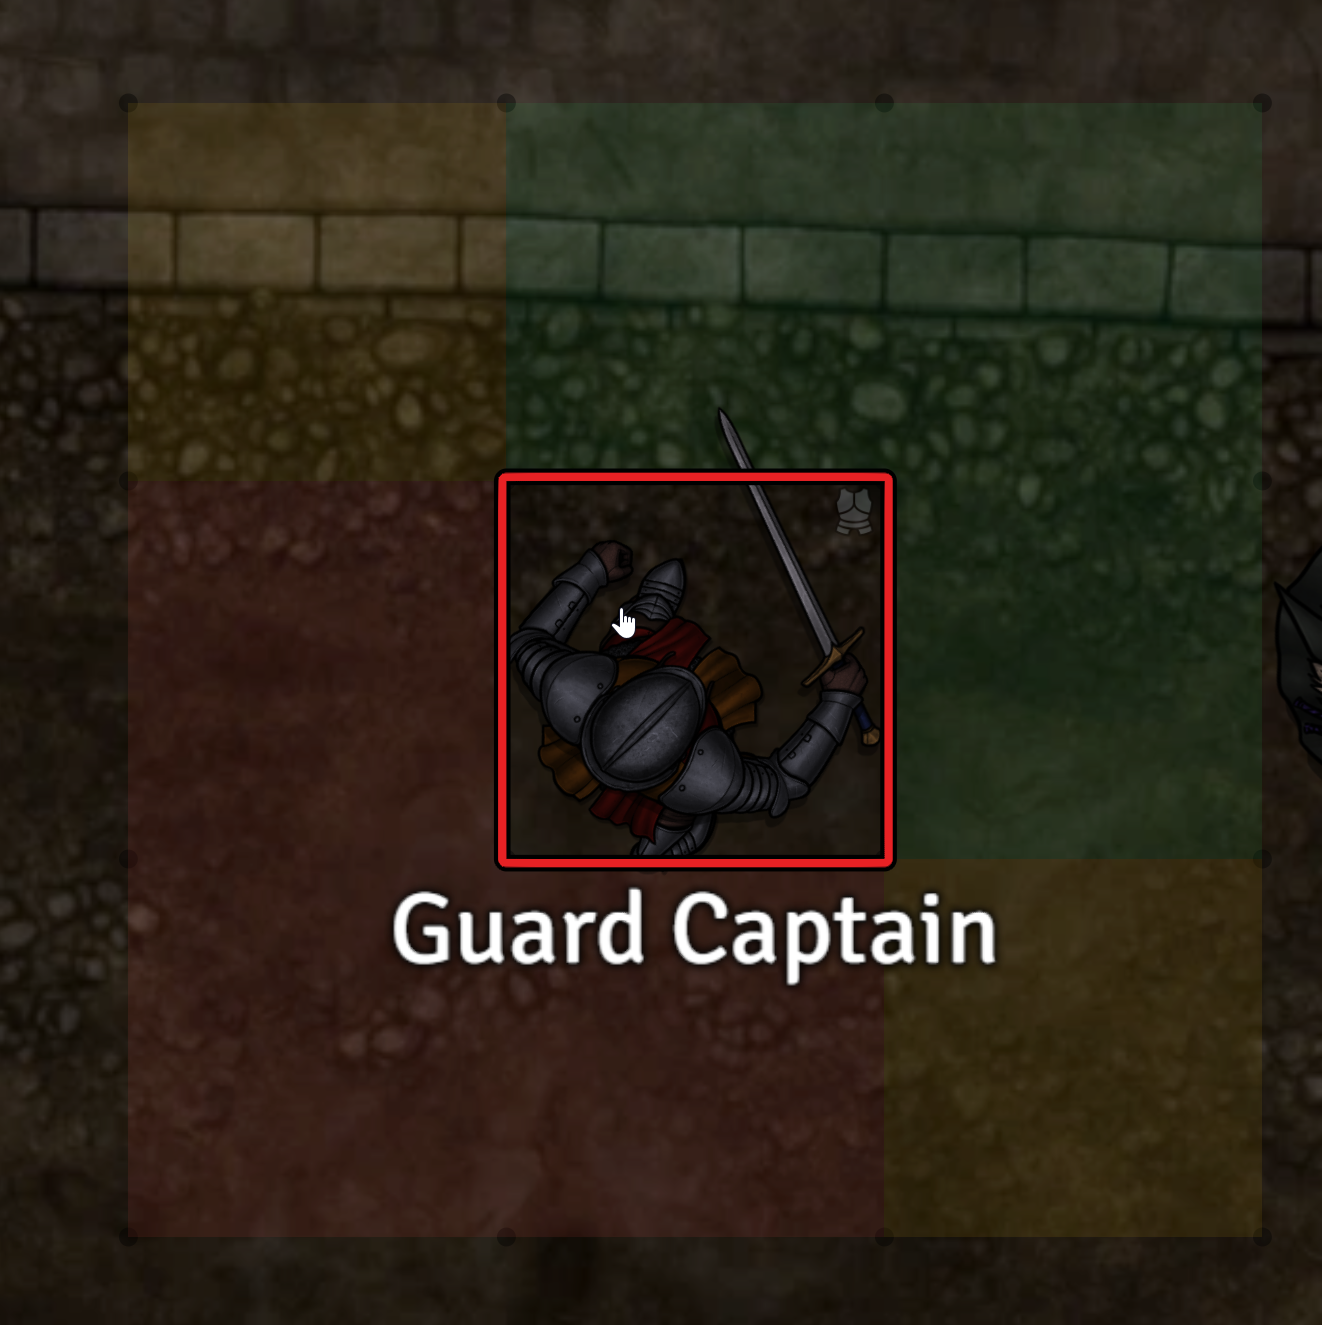
A tile overlay that shows the facing direction of characters when hovering over their tokens. This is only visible for active combatants during combat encounters. The facing rules are based on the Mythras Companion ruleset. Green for front, yellow for side, and red for back.
Equipment and Items
Weapon Grip
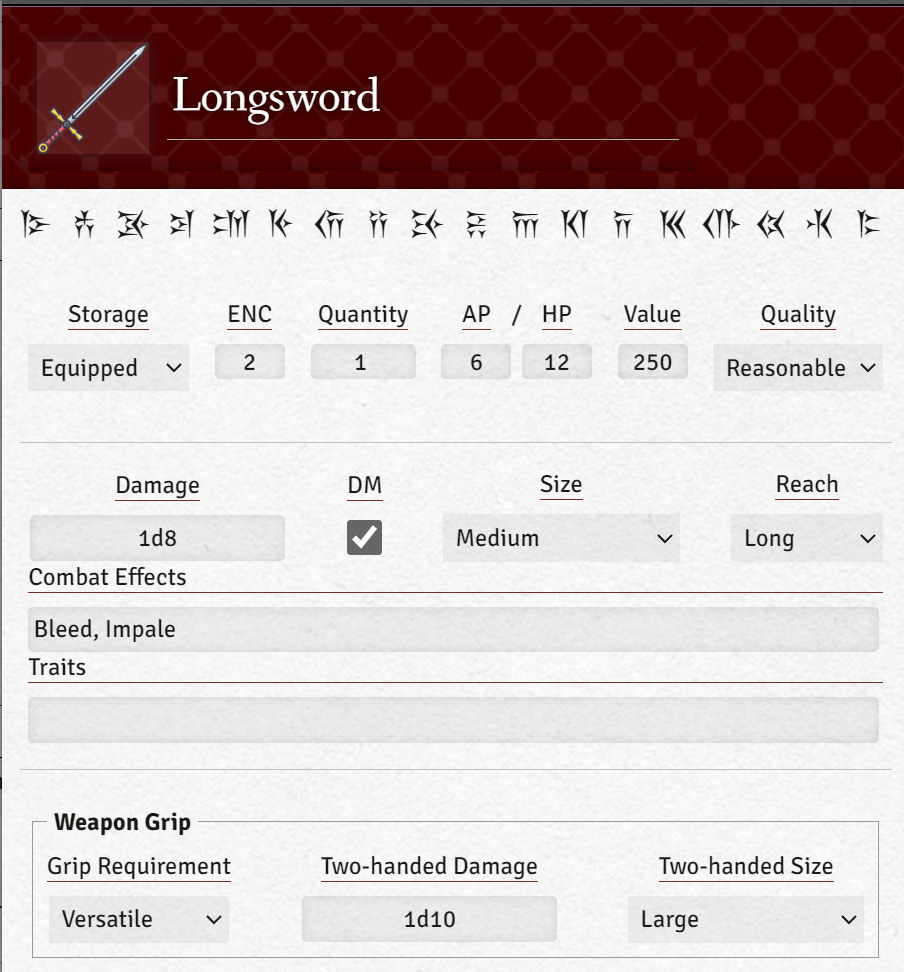
All weapons now have a Weapon Grip section with a Grip Requirement dropdown. For weapons that are one-handed (or where the number of hit locations gripping it is irrelevant), select One-Handed. For weapons that require at least two hit locations to grip it to use, select Two-Handed. For weapons that have alternate damage and/or size depending the grip, select Versatile. Selecting Versatile additionally allows you to set the two-handed damage and two-handed size. This damage and size is automatically used if the weapon is equipped in more than one hit location when attacking or parrying. Otherwise, one-handed damage is used. Additionally, weapons that have a Two-handed grip requirement are blocked from use when attacking or parrying. The fourth option, Natural Weapon, is covered below.
Natural Weapon
A weapon (claws, bite, horns, and so on) can be marked as a Natural Weapon by selecting it as the Grip Requirement on its item sheet, since a normal grip requirement is meaningless for it anyway. Selecting it reveals an "Attached Hit Locations" picker for choosing which of the actor's hit locations the natural weapon is attached to.
A Natural Weapon works almost exactly like a normal weapon, with one key difference: it never needs to be equipped (via Equip Weapon) to be used for attacking or parrying. It's also excluded from Equip Weapon's per-location picker and from the Ctrl+Hover popover's Equipped Items tab, since equipping it is meaningless.
The Stun Location interaction is adjusted accordingly: a natural weapon is only disabled by Stun if every hit location it's attached to is currently stunned, rather than any single one - so, for example, a set of claws attached to both arms remains usable as long as at least one arm isn't stunned.
Item Statistics
Settings required: Fitting, Quality Tracking, and/or Original Condition (independent toggles).
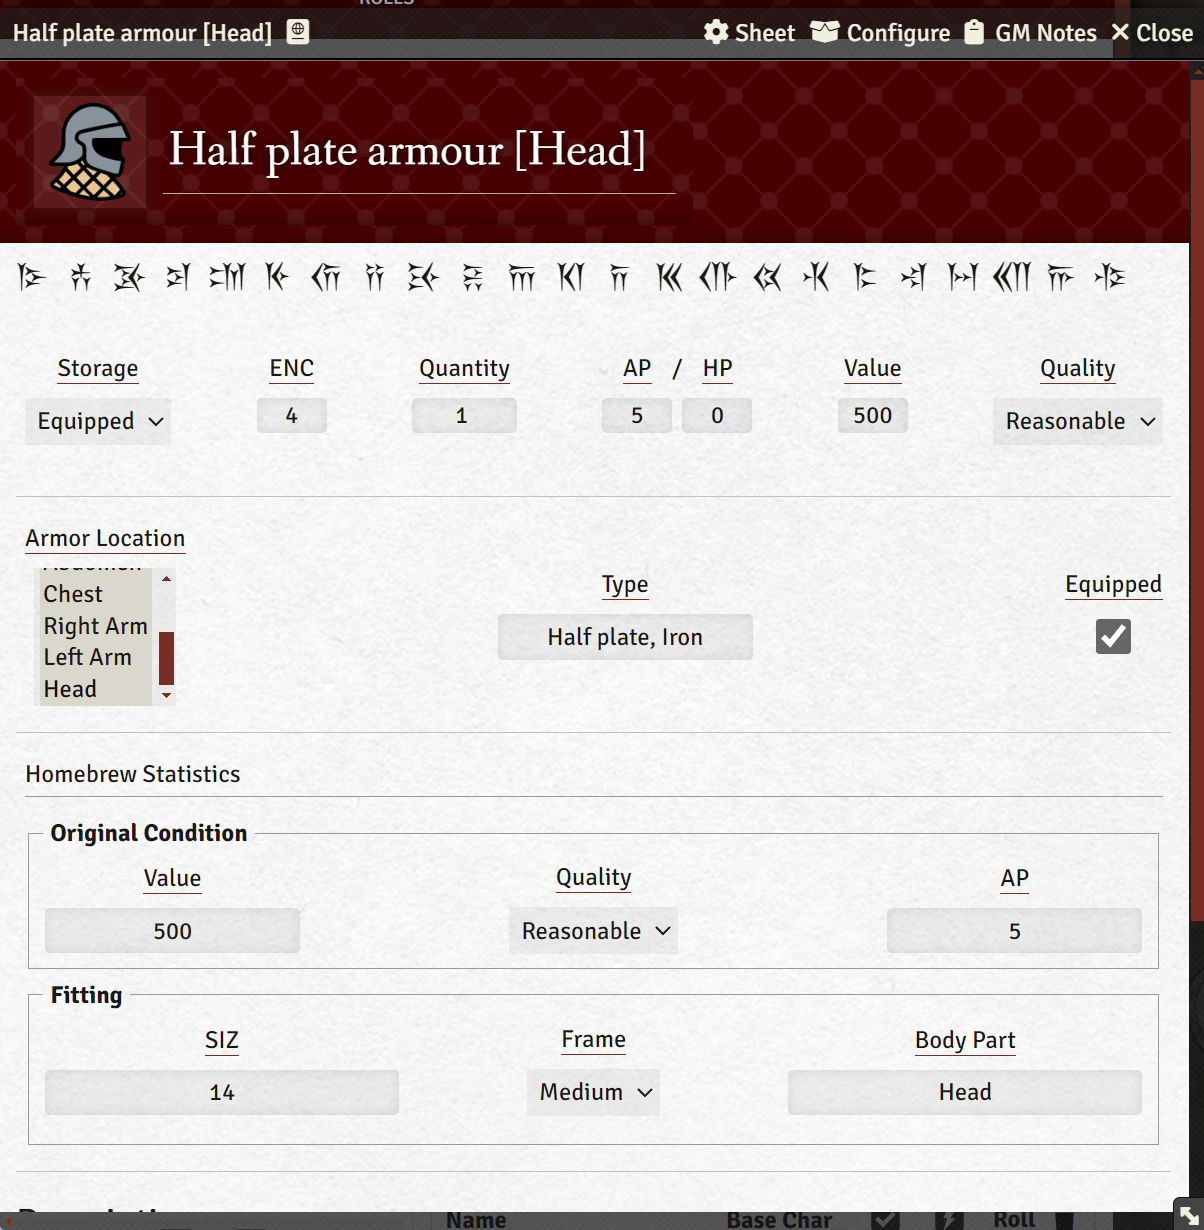
Supported equipment sheets gain custom fields depending on which of these settings are enabled.
Quality Tracking
Adds a current Quality field to armour, equipment, and weapon sheets. Enabling AngryGorilla's Homebrew Rules and Content alongside it also unlocks the non-standard Exemplary quality tier.
Original Condition
Adds original AP/HP fields to armour and weapon sheets. When present, the module compares current condition against these to show damaged and broken badges in token equipment tooltips. If Quality Tracking is also enabled, original Value and Quality fields are added alongside them for additional bookkeeping. Note that the values for Original Condition must be set up manually for every item.
Fitting
Adds SIZ and Frame fields to armour, clothing, and trinkets, plus a Body Part field for armour. These are purely informational text fields and don't have any automated impact.
Equipped Armour Icons on Token
Setting required: Armour Overlay Icons.
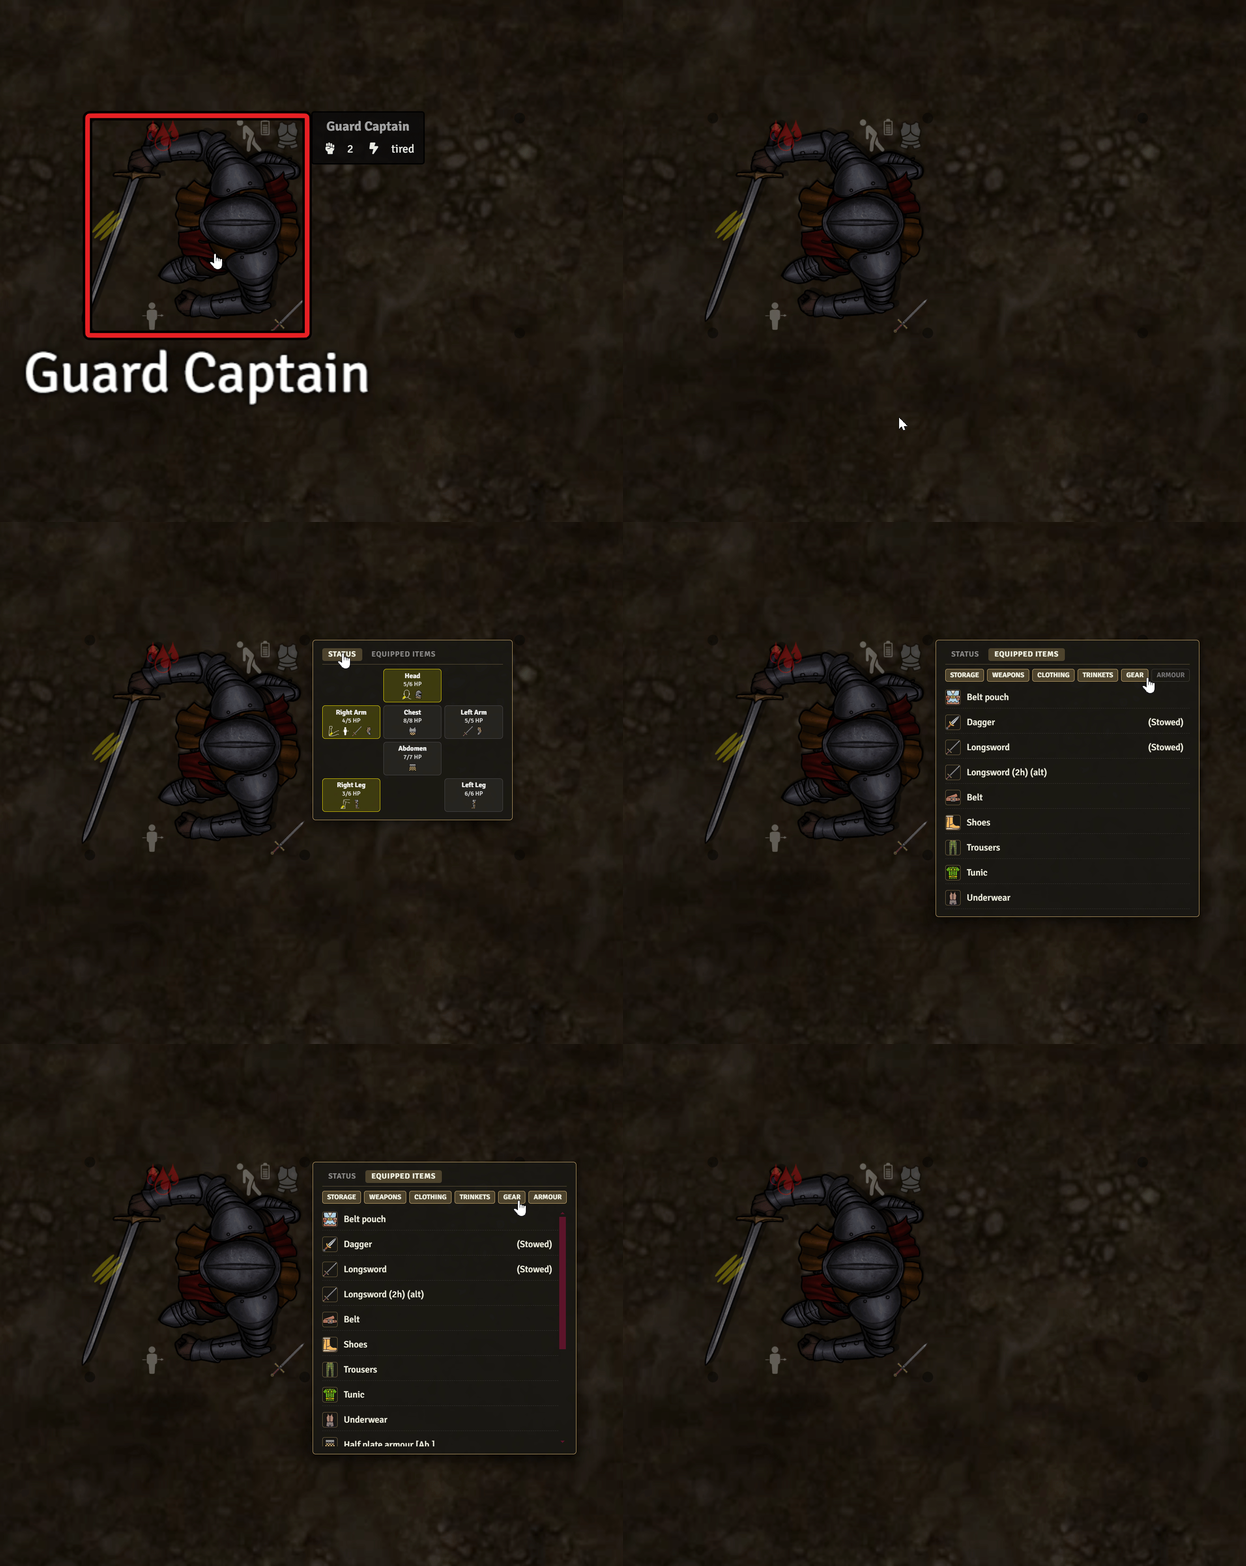
Tokens with equipped armour receive a hoverable indicator. Its tooltip groups armour by hit location and shows damaged/broken condition badges when Original Condition is enabled and the item's original AP is recorded.
Ctrl+Hover - Character Status / Equipped Items Tooltip
Setting required: Show Character Status and Equipped Items on Token Hover.
Hold Ctrl while hovering a token to open a two-tab tooltip. The Status tab lists every hit location with its current/max HP and every tracked status at a glance - wounds, impale, stun, entangle, ward, cover, held weapons (including Natural Weapons attached to that location, labelled "Natural" in their icon's tooltip), and equipped armour, including damaged/broken condition icons - along with a row of tracked stats (Action Points, Damage Modifier, Luck Points, Magic Points, Tenacity) when applicable. The Equipped Items tab shows the token's Equipped inventory (Natural Weapons excluded from this tab specifically, since they don't need equipping). It does not show items placed inside a storage item. It also does not show storage items that are not "Carried". The equipped item filters are broken down to allow separately filtering for Clothing and Trinkets.
Add Armour
Select one or more NPC tokens and run Add Armour. Choose a type for each standard humanoid hit location, or use the Armour Set Type dropdown as a shortcut to set every hit location to the same type at once - changing any individual hit location afterward switches it back to Custom. Existing armour on a location is left in place.
This utility expects an Item compendium with collection ID mythras-angrygorillas-custom-macros.armour (the "Armour" compendium included with this module), whose pieces have their Fitting > Body Part field (requires the Fitting setting) set to match a hit location, and whose name simply contains the armour type (e.g. Padded, Half Plate, Mail, Plated Mail). Player-owned actors are skipped, so this is intended as a GM preparation tool.
Character And Campaign Utilities
Restore Action Points
Select one or more tokens and run Restore AP of Selected Tokens. Each actor's Action Points are restored to its calculated maximum.
Restore Luck Points
Run Restore Luck Points of All Player Characters to restore each non-GM user's assigned character to maximum Luck Points, and (if enabled) reset the Group Luck Points widget's current total back to its maximum. Users without an assigned character are reported and skipped. This is best run by the GM.
Group Luck Points Widget
A small floating window tracks a shared pool of Group Luck Points, separate from each character's own Luck Points. It is controlled by the Group Luck Points Widget module setting (enabled by default) and appears in the lower-left corner of the screen until dragged elsewhere; each user's window position is remembered individually. Players see the same luck point pips, updated automatically as the GM changes them, but they cannot edit them.
Luck Point Re-rolls
Right-clicking any Attack, Parry, Evade, Skill Roll, or Contest chat card offers Re-roll (Character Luck Point) and Re-roll (Group Luck Point) options (hidden once damage from that exchange has already been applied). Attack cards additionally offer Re-roll Hit Location and Re-roll Damage options, once those sub-rolls have happened - separate from, and in addition to, the existing free Re-roll Damage button/Special Effect.
Any player can trigger a re-roll on any card, not just their own - forcing someone else to re-roll always spends the forcing player's own Character Luck Point (their currently selected/assigned character) or a shared Group Luck Point. Every re-roll requires GM approval via a prompt before the dice are rolled. Once rolled, the triggering player is shown the original and new results and chooses which one to keep - the luck point is spent either way. The card is updated in place (no new chat message is created) and a note is appended recording who re-rolled it, what was spent, and the outcome. Locked cards (where damage has already been applied) cannot be re-rolled, matching the same lock used by the (Difficulty) badge.
Upgrade Skill
Select a token and run Upgrade Skill, then choose a Standard, Professional, Combat Style, or Magic skill.
- With Custom Change enabled, enter a direct training increase and optional reason.
- Otherwise, the macro spends one Experience Roll and rolls
1d100 + INTagainst the skill value. - A successful improvement roll adds
1d4 + 1training; a failed roll adds 1 training.
The result and remaining Experience Rolls are posted to chat.
Manage Currency
Select a token and run Manage Currency. Enter an amount for each currency item, choose whether it is paid or received, and optionally record a reason. The complete payment is validated before any balance changes, then an old/changed/new summary is posted to chat. This dialog only displays currently items that are present on the selected actor (even if the quantity is zero - or negative, for whatever reason).
Randomize Build
Select one or more NPC tokens and run Randomize Build. Choose levels for characteristics and Physical, Utility, Deception, Social, and Combat skills. The macro rolls new values, restores AP, and refreshes hit-location HP.
Player-owned actors are skipped. This is a campaign utility, not a Rulebook character-creation method; review its result bands for your creatures and campaign power level.
Skill Roll
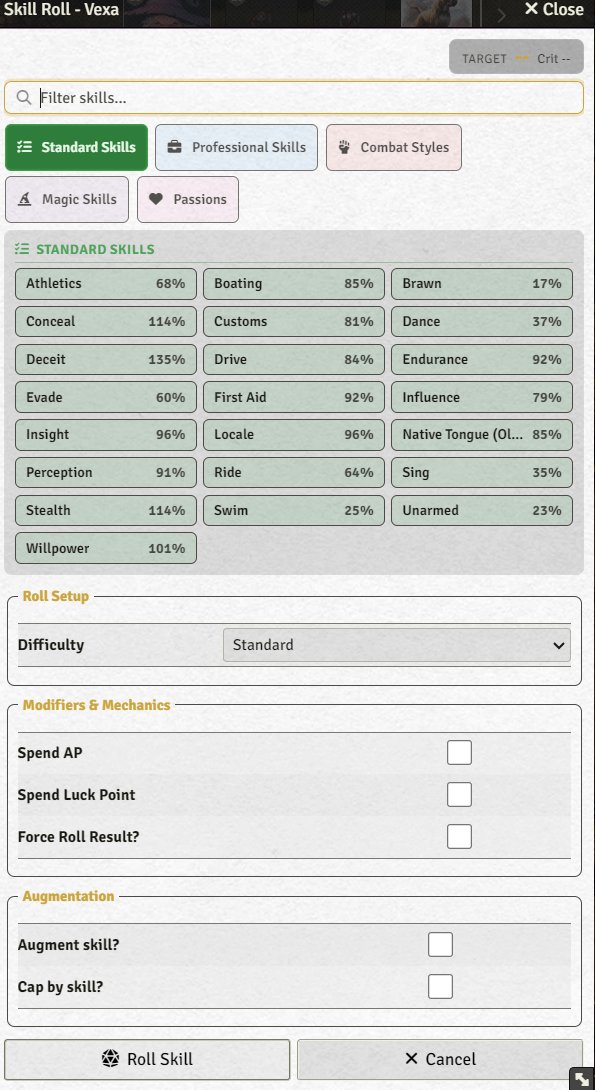
Select a token and run Skill Roll to roll any of its Standard, Professional, Combat Style, Magic, or Passion skills, grouped and filterable by name. It supports the same mechanics as Attack/Parry/Evade rolls: choosing a difficulty grade, Augment (from the acting character or any targeted character), Cap by skill, a Custom Augment Value, Spend AP, Spend Luck Point, and Force Roll Result - and posts the same style of chat card, complete with a clickable (Difficulty) badge and an All Difficulties roll tooltip.
Every Skill Roll (and every Attack/Parry/Evade card) also exposes a Contest button. Clicking it opens the same Skill Roll dialog for whichever single token is currently selected, pre-filled with context about what's being contested (the opposing character, skill, and result). Rolling produces a Contest card showing both combatants, the winner, and the Levels of Success - reusing the same opposed-result rules as Parry/Evade. A Contest card can itself be Contested again, chaining as far as needed; each Contest only ever compares itself against the single roll it directly contests.
Changing the difficulty of any card in a contest chain (via its (Difficulty) badge) automatically recomputes every Contest rolled against it, cascading down the chain. Skills over 100% are handled the same way as Attack/Parry/Evade (see Skills Over 100% above): a contester's target is first reduced by any excess the roll they're contesting already pushed forward, and if the contester's own skill is over 100%, a checkbox lets that excess be applied both to their own target and retroactively back onto the roll being contested.
The Fatigue Roll Endurance prompt uses this same dialog (pre-selecting Endurance), gaining full Augment/Cap/Spend AP/Luck Point/Force Roll Result/Over-100%/Contest support that their older bespoke implementations did not have.
Multi-round Task
Select a token and run Multi-round Task for a task that takes several rounds of the same skill to resolve (crafting, research, extended exploration, and similar GM-adjudicated activities) instead of a single roll. The dialog is the same Skill Roll dialog with an added Task Progress section:
- Task Round Unit - a number and a time-unit dropdown (Seconds/Minutes/Hours/Days/Weeks/Months/Years) for how much in-game time this round costs.
- Initial Success Score (Round 1 only, editable, defaulting to 0%) / Current Success Score (every later round, read-only) - the task's running progress. Mythras allows a Success Score to exceed 100%, so this is never capped.
Rolling posts a card exactly like a Skill Roll's, plus:
- The Task Round number.
- The Success Score progress (before/after and the delta this round applied): Critical +50%, Success +25%, Failure +0%, Fumble -25% (floored at 0%, uncapped above).
- The total time spent on the task and the time spent this round (durations from different units add up correctly, e.g. an hour-long round followed by a 20-minute round).
- A Next Round button next to Contest, which re-opens the dialog for the next round with every setting defaulted to whatever the previous round used, plus the Success Score and total time carried forward - repeat as many rounds as the task needs.
Since a Task Round card uses the same underlying roll data as a Skill Roll, it also supports the (Difficulty) badge, Contest, and Luck Point Re-roll exactly as described above (a difficulty change or re-roll recomputes that round's Success Score delta too, since it depends on the round's result).
Timed Buff/Debuff
Target one or more tokens and run Timed Buff/Debuff to apply a time-limited buff or debuff that automatically reverts and posts a notification once its duration expires. Usable by any user (GM or player) - if you don't own a targeted token, the change is relayed through an active GM.
The dialog has two tabs:
- Apply Effect - a Skill Roll-style picker (search filter + category tabs) covering every Characteristic and Attribute mod field, Movement, each skill's Misc value, and each Hit Location's Natural Armour and Max HP. Entering a non-zero value for one or more stats will select those to be buffed/debuffed. Each field accepts either a plain number (positive to buff, negative to debuff) or a dice formula (e.g.
1d6,3d4+6) - formulas are rolled and their result used as the amount, once for the whole application (the same rolled value is applied to every targeted actor). Skills and Hit Locations are matched by name across all targeted actors, so a mixed group of targets is supported - any target missing a selected skill/location is simply skipped for that one field. Optional Spend AP/Spend Luck Point checkboxes deduct from whoever is applying the effect (your controlled token, or assigned character), mirroring the Skill Roll dialog. Set a Description (shown on the chat card) too - leaving every stat field at 0 is allowed as long as a Description is provided, letting this macro double as a simple RP effect tracker with no mechanical impact. - Manage Active Effects - lists every currently active timed effect on the targeted token(s), with its remaining time and a Cancel Now button to revert it immediately (posting the same notification as a natural expiry, just labelled Cancelled).
The Duration field accepts a number or a dice formula, combined with a unit: Seconds, Minutes, Hours, or Days always measure real/game-clock time via Foundry's world time, so they keep advancing correctly whether time passes via combat, manual GM adjustment, or a real-time clock module (e.g. Simple Calendar Reborn). If every currently targeted token has a combatant in the active, started combat encounter, two additional units appear: Turns and Rounds. A Turns-based effect counts down only the affected character's own turns (identical to how this module's Stun Location status progresses) - the counter decrements once each time that character's own turn ends. A Rounds-based effect instead counts down once per full Combat Round of the encounter, regardless of whose turn it is. Both automatically revert (and post the usual expiry chat card) once their counter reaches zero, exactly like a time-based effect - they just aren't tied to world time, so they won't progress at all outside of that combat encounter's own turn/round advancement.
The Duration formula can also reference a target's own characteristic by abbreviation - STR, CON, SIZ, DEX, INT, POW, or CHA (case-insensitive, e.g. 1d6+CON). Unlike every other formula field in this dialog (which rolls once and shares that result across every target), a characteristic-tagged Duration is rolled separately for each target using that target's own characteristic value, so a mixed group of targets with different characteristics can end up with different expiry times for the same application.
Applying posts a chat card naming the target(s), who applied it, the duration, and every changed stat (including the dice formula next to any rolled value, and omitting the Changes section entirely for a stat-less RP effect). Once a timed effect elapses, the module automatically reverts every changed stat back and posts a card showing the before/after values for each. A token with 1+ active timed effects also shows a small overlay icon, hoverable for a tooltip listing every active effect, its source, remaining time (or remaining turns/rounds), and affected stats.
Timed Effect Presets
A Presets tab in the same dialog lets you save a reusable "template" (stat changes, duration, description, Spend AP/Luck Point checkboxes) under a name, then load it into the dialog with one click instead of re-entering everything each time. Loading a preset only pre-fills the already-open dialog - it never applies anything by itself, so you can still tweak values for this particular casting before hitting Apply Effect.
Presets are created and managed through Configure Settings > Mythras - AngryGorilla's Custom Macros Manage Presets (GM only). Each entry can be Edited, Duplicated, or Deleted, and the editor includes an optional Reference Actor(s) picker - since the editor has no live targeted token to pull a skill/hit location list from, pick one or more actors there to populate the stat-change picker with their actual skills and hit locations. A preset's stat changes are matched by name when later loaded or applied, so it still works against different actors than whichever ones were referenced while building it; if a referenced actor is later deleted, any stat changes already saved on the preset are preserved regardless.
Presets are world-shared (every user sees the same list), but each user can star any preset as a personal favorite by clicking its star icon, both in the Presets tab and in Manage Presets - favorited presets are sorted to the top of the list for that user only. Deleting a preset automatically removes it from everyone's favorites too, so no stale entries are left behind.
Lose Sanity
Select a token and run Lose Sanity for a Willpower roll to apply the Sanity mechanics in the Mythras Companion. The dialog is the same Skill Roll dialog, hardcoded to the acting character's Willpower skill, with an added Intensity dropdown (Mild/Unsettling/Disturbing/Shocking/Devastating) that automatically sets the roll's Difficulty grade to match. Devastating also offers a Hopeless difficulty: choosing it skips the roll entirely and posts an automatic Failure, with no difficulty badge and no roll to re-roll - everything past that point works exactly the same as a rolled Failure.
The chat card's outcome text depends on the result (Critical/Success/Failure/Fumble) and the chosen Intensity. Every result except a Critical shows a Reduce Tenacity By... button, which rolls the loss formula for that Intensity/result combination and deducts it from the character's Tenacity - Tenacity is allowed to go below zero. Once clicked, the button is disabled and the roll's difficulty can no longer be changed.
The resulting Tenacity Loss card always offers a Roll for Condition button, regardless of result - the GM decides whether and when to use it. Clicking it opens a small dialog to choose the Type of Trauma (Fear, Horror, Madness, Torture - treated as Horror, or Psionic/Magical - treated as Madness) and an Onset of Immediate or Deferred (Torture defaults to Deferred, matching the Companion's own guidance, but every choice can be freely overridden). Rolling posts a Condition Roll card naming the Condition rolled against the Mythras Companion's Condition Tables (p.26).
That card's Roll Duration button rolls the Condition's own duration dice and registers it with the same Timed Effect system used by Timed Buff/Debuff - Immediate Conditions (measured in Rounds) use Mythras's 5-second Combat Round, while Deferred Conditions (Weeks/Months/Years) use calendar approximations, so either way the Condition automatically clears and posts a notification once its duration elapses, and shows up on the token's active-timed-effects overlay icon in the meantime. If Tenacity has dropped below zero, a notice on the Tenacity Loss card reminds the GM that Conditions should be rolled on the Deferred table and are considered permanent until treated (Companion p.26), regardless of the Onset actually chosen.
The main Willpower roll supports the same (Difficulty) badge and Luck Point Re-roll as a Skill Roll. The Tenacity Loss amount, Condition Roll, and Condition Duration rolls each support their own lightweight Luck Point re-roll from the chat card's context menu (defaulting to keep whichever result is better - i.e. lower) but don't expose a (Difficulty) badge of their own.
Rules And Homebrew At A Glance
Rulebook-Oriented Automation
The module assists with Action Points, Luck Points, attacks, hit locations, armour, Parry, Evade, opposed outcomes, fatigue, Bleed, weapon reach, cover, and several combat Special Effects. It reduces bookkeeping while leaving eligibility and interpretation up to the GM.
Companion And Expanded Combat Options
The Special Effects catalogue includes expanded some combat options intended for tables using broader Mythras material, including the Mythras Companion. Supplements and campaign assumptions vary, so the module filters by roll state and traits but does not certify that every displayed effect is valid in every encounter. Lose Sanity's Condition Tables are reproduced directly from the Companion (p.26); the GM remains responsible for judging when a Sanity check applies and which Type of Trauma/Onset fits the situation.
Explicit Homebrew
Enable AngryGorilla's Homebrew Rules and Content only if the table wants the Re-roll Damage Special Effect, the non-standard Awful/Exemplary quality tiers, or the Drinking macro's Awful/Exemplary quality options.
Troubleshooting
A macro says its function is not loaded
Confirm the module is enabled, then reload the world. Imported macros only launch functions supplied by the active module. Also ensure that you are not using an outdated version of the macro. You may need to re-import the macro from the module's macro compendium.
A ranged weapon says Not loaded
Run Reload and complete the required Load actions. Ranged weapons with a Load value of 0 do not require this step.
A weapon does not appear in Attack or Parry
Run Equip Weapon and assign it to a holding location. Also check whether it is broken, pinned, lodged in another target, held by an entangled or stunned location, outside usable Reach, or not fully loaded. If it's marked as a Natural Weapon, it doesn't need equipping at all - check instead whether every hit location it's attached to is stunned.
Add Armour cannot find armour
Confirm that the module's mythras-angrygorillas-custom-macros.armour Item compendium exists and contains the piece, and that each piece's Fitting > Body Part field is set to the target hit location and its name contains the selected armour type, as described in the dialog.
Movement controls are unavailable
Enable Movement State Control in Combat and reload the world so its combat hooks and dialog helpers initialize.
An indicator is stale
Update the associated actor/item once or refresh the scene. If old combat flags are no longer valid, run Clean Up Combat Flags.
A tooltip appears in the wrong place
Use a supported browser zoom level. Status indicator tooltips intentionally remain hidden while their canvas position is covered by a Foundry window.
Module Limitations
This module's features are fairly thorough and deep, but they still have several notable limitations.
- No automation or consideration has been added for magic in this module. I always run magic-sparse campaigns. As such, I have no plans to work on features that automate magic usage.
- The Attack sequence currently has no consideration for attacks hitting multiple opponents or multiple hit locations. Each attack, in such cases, must be made separately. However, the Attack, Parry, and Evade dialogs do provide a "Forced Roll Result" option if all of these individual attacks need to be dictated by a single dice roll. In such cases, a 1d100 can be rolled by the user first and then the Attacks can be made with a Forced Roll Result value matching the result of that first d100.
- While I have tried to gate several of the optional features behind module settings, there may still be undesired features that specific GMs may not want on their tables. The detailed tooltips provided by this module may additionally be a hindrance for some GMs, as they may convey information the GM does not want their players to see. Unfortunately, individual settings for such information is out of scope for my module.
- Some individuals may find the overlay icons on the token to be crowding and undesirable. Unfortunately, with the informative tooltips I had envisioned, using the FVTT Native Active Effects simply did not suit my needs. As such, I had to find an alternative solution, and this was the best I could do.
- As there is no siege weapon or firearms item type in the Foundry VTT Mythras system, these weapons can be designated by adding "Siege" or "Firearm" combat effects to the relevant weapons instead. This is only relevant for the automatic filtering in the Special Effects selection dialog.
- The quality of the weapon and armour overlay icons will depend heavily on the images you use for your items. Visual parity with your own icons is not guaranteed with the icons this module provides.
- This module is very English-centric and not localization friendly. Localization is, unfortunately, not in scope for this module. However, developer-minded folks are welcome to fork my repository to localize it if they choose to. It will be up those individuals to keep their version of this module up-to-date, though.
Credits
- Module Author: AngryGorilla / AngriestGorilla / Amir Goriya / GroggyGorilla (assisted by several Generative AI models - see Generative AI Usage under Developer Commentary)
- System: Mythras for Foundry VTT developed chiefly by Greshbolt, but supported by several other community developers.
- The Attack workflow was originally inspired by DogBoneZone's all-in-one combat macro, but has since been overhauled almost entirely for this module.
- The tokens, maps, and other visuals in the screenshots use a mix of assets from Forgotten Adventures, Flaticon, and custom creations.
Mythras and related product names belong to The Design Mechanism and their respectful right-holders. This is an independent community module.
Developer Commentary
Recommendations of Use
I will be using this section to keep track of recommendations and tips and tricks on how to use this module effectively.
- For a smooth turn sequence where the Action Points are managed as efficiently as possible, I recommend turning on the Reduce AP option provided by the Mythras system. Then, simply go through the attack sequence using this module's macros with the default Spend AP selections. Parries and Evades have Spend AP turned on by default to automatically spend AP with those reactive actions, while the AP expense of Attacks and other Proactive actions can be automatically resolved by proceeding to the next turn in the cycle. Spending a Luck Point or selecting Do Not Parry in the Parry dialog automatically unchecks the Spend AP option as well.
- For rolling skills efficiently, open the skill roll macro, start typing the skill name (the cursor is prefocused in the search filter). Press enter as soon as the desired skill is the first search result. This will select that first skill as the one to be rolled. Press enter again (assuming you have not clicked anywhere else) to execute the roll.
Generative AI Usage
Please be informed that this project has been developed with assistance from various Generative AI models. Users with principles against Generative AI usage may prefer to avoid this module.
That said, software development is my day job - my bread and butter. I have endeavoured to use AI tools responsibly and with accountability. All features within this project are conceptualized and designed by me with care, using my understanding of the Mythras rules. AI was mostly used for the menial labour of writing out the logic I was explicitly describing. Additionally, I have tested every feature quite thoroughly. That's not to say the module is guaranteed to be bug-free, but, I have made great effort to test as many edge cases as I could. If you discover any uncaught bugs, I encourage you to report them through the GitHub Issues feature.
End Goal
I have tailored this module to suit my own table's playstyle and my preferences as a GM. As such, there may be several features added and decisions made for this module that may not be favourable for other GMs and tables. I have tried to make the module with as much flexibility as I could provide within the interest of time, but, it may not scratch everyone's unique itches. You are welcome to make feature requests on the repository, but, be warned, I am hyper-discriminative when working on features, so nothing personal if your feature requests get ignored. For any developer-minded members of the Mythras community, you are welcome to fork my repository to make your own flavour of these features. The best I can hope for is to be included in the credits, but I don't plan to chase anyone down either way.