Overview
This guide will walk you through the process of creating a self-contained module that holds your custom content. The process of packaging a module is fairly simple, and requires no special tools beyond a functioning copy of Foundry VTT and a text editor (windows notepad, notepad++, etc).
For more information about how to distribute and protect a module created using this process, please see the Publisher's Handbook.
The Built-In Module Maker
Since V11 Foundry VTT has included a built-in Module Maker which can be used to create and edit modules in Foundry, no coding necessary. The Module Maker can create and edit compendium packs, authors, system and module requirements, and more. This is the recommended way to create modules for Foundry VTT. If you're using the Module Maker you can skip to Step 2 below.
Why Use a Module to Distribute Content?
A Module that contains one or more Compendium Packs is a great solution to distribute your content. Using this method, the latest version of your content is stored and updated in a single location. Users can then easily access that content within any World by enabling the Module.
Before Adventure Compendium Packs were implemented, content creators often created and distributed pre-packaged Worlds. This approach is no longer recommended.
Step 1: Module Customization
The first major step is to install the official Foundry Content Module Template (https://foundryvtt.com/packages/my-content-module), and begin customizing it to suit your needs.
Actions:
- Install the Foundry Content Module Template from within Foundry VTT's add-on module tab in the setup menus.
- Begin making modifications to the module to customize it to fit your own module.
Note: Please be sure to shut down Foundry before you begin editing your module. While it's unlikely to damage anything, you will not see any changes until Foundry is restarted, so it is best to simply close the software until it's needed.
Customizing the Template Module
First, in your module's folder locate the module.json file in the FoundryVTT/modules/my-content-module folder and edit it. Any text editor will work for this task. The first block of text contains the majority of the identity of your module, and needs to be changed to represent it.
If you need help finding your user data please refer to the Application Configuration article.
- "id": "my-content-module",
This is the unique name for your module, it must be an all lower-case string with no special characters and should use hyphens (not underscores or space).
Note: Make sure that you rename the
modules/my-content-modulefolder to exactly match the name you put here!- "title": "My Content Module",
This is the name displayed in the Foundry VTT user interface, on the website, and is the human readable title for the module.
- "description": "A collection of my content.",
This field contains a lengthy description of the module. This can be used to describe the functionality, list content contained within, or provide any other information you feel is important. This field can contain HTML to structure and style your text.
- "version": "1.0.0",
This is the version number of your module. Please see our Versioning and Releases article for more information on verison numbering options!
- "authors": [{"name": "Me", "email":"me@myemail.com", "discord":"@me#1234"}],
That's you! Or it might be the creator who you are making this module for. Provide a name, discord handle, or email, or all of the above for the module author.
- "compatibility": {"minimum":"10"},
This specifies the minimum Foundry Virtual Tabletop version which is required in order for this module to function properly. We default this to 10. which is the current baseline stable release of the software at the time of this article's creation. If a user has a core FVTT version which is older than the specified minimum core version, the module will not be able to be installed unless the user first updates the core software.
Step 2: Asset Staging
The next step is to create all of the folders necessary to contain your module, place your files, and make sure they are properly named. The folder you want to work out of is FoundryVTT/modules/your-module-name which will be where Foundry looks for your assets when your module is loaded. By placing these files into your module folders before you put together the content and compendia you will save yourself time and headaches down the line.
Actions:
- Create any needed subfolders for assets.
- Place your module assets in their appropriate folders.
- Rename your assets, removing any spaces and special characters.
The Media Optimization Guide contains general guidance on file naming, organizing and formatting your assets in these folders. It is highly recommended that you read the guide in full to understand how to best prepare your assets for Foundry VTT.
Once all of your assets have been placed in your module folders, you will want to make sure that you work from these folders when creating the scenes, journals and actors. This is so that foundry automatically points to the assets in the module folder, and saves you having to manually reset the file paths for everything later.
Step 3: Content Exporting
Now that you've staged your assets in a nice and neat tree of folders, it's time to start assembling your module and its content. It's important to work out of a fresh world so that you don't accidentally include any assets not intended for the module.
Actions:
- Create a clean world to work out of, utilizing the system your module is meant for.
This world should have no other modules loaded except for the one you're working on. If you already have the world setup for this, make sure that it's clean of all other modules. - Create the content that will be going into your module.
Set up actors, set up scenes, create, format and stylize your journals, lay down walls and lighting in your scenes, fine tune everything. Basically you will now build your module as you want it to appear when being imported. If you have already built this content in a pre-existing world, now is your opportunity to polish and organize it before the next step. - Once all of the content has been created, export it to your compendia using the steps below.
By putting the content into compendium packs now, you can simplify later steps of this guide.
Note: It is important to remember that you want to build your content using assets you staged in the FoundryVTT/modules folder earlier. If you create content from other folders on your computer later steps of this guide will not be doable without creating extra work to correct.
Can I build an Adventure instead of using basic compendium packs?
Yes! Reference the Adventure Documents article for guidance on how to do so. This will walk you through the specific steps tied to using Adventure documents. Please note that there is a fair bit of overlap between content packing and adventure packing, and both guides will be relevant to the process.
How do I put content into compendium packs?
Moving content to compendia can be done one of two ways:
- The document in question (a scene, actor, journal, etc.) can be dragged from the sidebar to a compendium that you've opened which matches that type of document.
- If you have been using folders in Foundry VTT to organize your content, you can right-click on the folder and select "Export to Compendium" which will prompt you to select an unlocked compendium that matches the document type contained in that folder.
Note: For both of the above actions, make sure that you have the appropriate compendium unlocked for editing. You can tell if a compendium is locked as it will have a padlock icon ( ) to the right of its name when it's locked. To unlock a compendium, right-click the locked compendium you plan to put content into and select the " Toggle Edit Lock option.
Note: When exporting content from a folder to a compendium pack you'll have two additional choices:
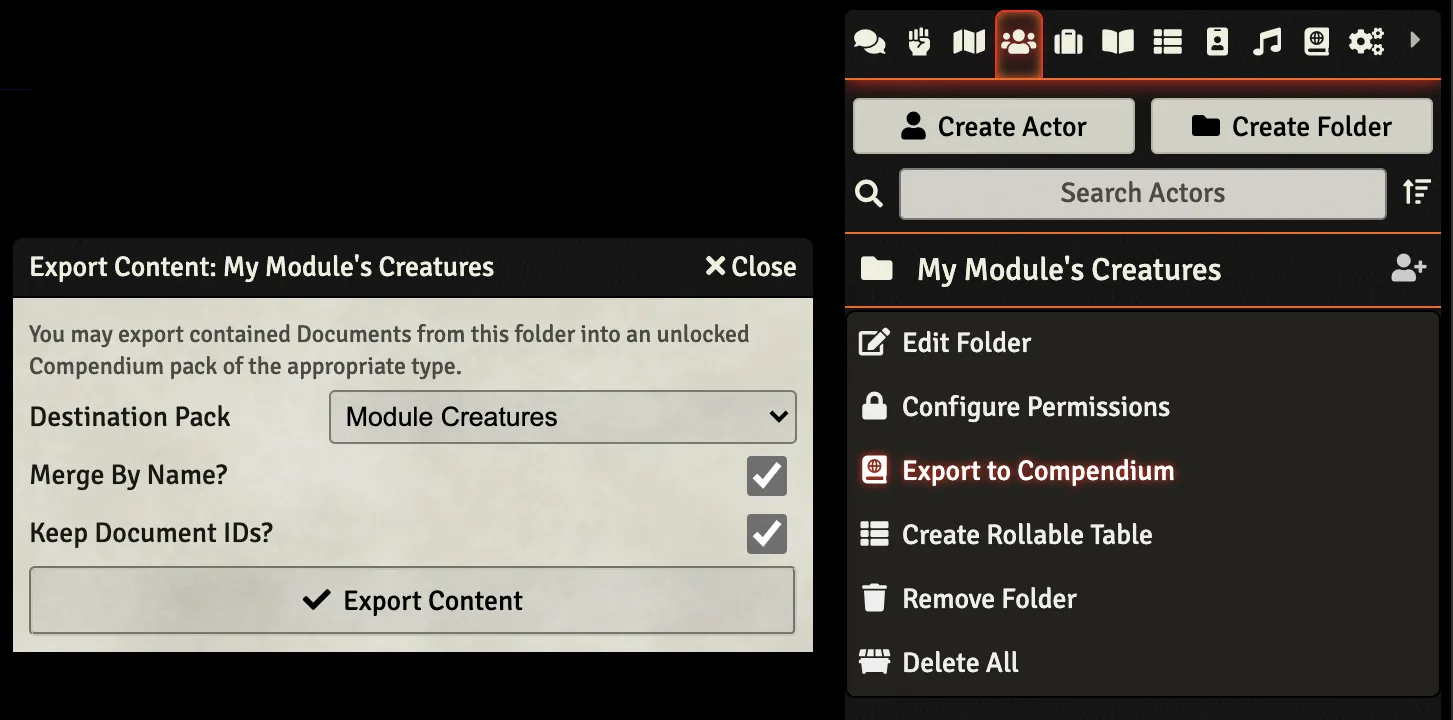
- Merge By Name
- When Merge By Name is checked Foundry will overwrite existing documents that have the same name as one of your exported documents. When it's unchecked Foundry will create new copies of those documents.
- Keep Document IDs
- Every document in Foundry VTT has a unique ID that represents it. When you export a document like an actor or a journal entry into a compendium pack Foundry will generate a new ID for it. If you check the Keep Document IDs option on export it will use the same ID as the document in the world. This can be useful when you want to maintain links in journal entries, character biographies, macros, and more.
Why should I deactivate modules?
Certain modules can inject unwanted information into actors, items and scenes which could interact badly with another user's world, causing them to suffer performance issues, bugs, or data loss. It's possible to create modules that have dependencies or requirements for other modules though, and we'll discuss that later in this guide.
To better understand compendia we recommend also reading the Compendium Packs article.
Step 4: Module Cleanup and Testing
Now that your module is working, and filled with content, the next step is to remove any packs you don't need, and test your module and make sure that all of the content is in place and looking how you want it to.
It's best to use a world that does not have any other modules loaded or any of the content from your module. Once you've loaded your module you'll want to select the Compendiums tab, then right-click on each of your module compendiums and import the content.
Actions:
- Rename any packs to fit your module's name.
- Delete any packs which are unused by your module.
- Load your module into a world and import its content to check that everything's in order.
Make sure all of the content imports correctly, and make any last-minute corrections necessary. Note that since you're working with content coming directly from the module, you can re-import the content to the module compendiums as per Step 3: Content Exporting, and it will go directly to the module.
This is also a good time to be sure that your file names conform to the guidance given in the Media Optimization Guide.
Editing Compendium Pack Entries
By default the template module includes a single entry for each type of compendium pack, however you may not need each of these packs for your particular module, or may want to rename them to specify what they contain. Doing so is relatively simple.
An entry for a pack looks like so:
    {
        "name": "module-creatures",
        "label": "Module Creatures",
        "path": "./packs/creatures.db",
        "type": "Actor"
    }
To rename a pack, open the module.json, and change the label field.
To delete a pack, simply delete everything inside of curly brackets ({,}), and the brackets themselves, then save your file. For V10 and prior you should also delete the associated .db file in the /packs folder and in V11+ delete the associated database folder (which will have the same name) as it won't be needed.
Note: Make sure all of the pack entries except the last one in the list have a comma (,) following the closing curly bracket. If there is a comma missing, or if the last entry in the packs list has an unneeded comma your module will not be recognized by Foundry when it next loads.
Step 5: Final Details
At this point your module should be completely set up and ready to go. You'll want to make sure that your module description is complete, and that any external files (such as adventure .pdf files or licensing documentation) are included in the module's folders, or are provided as links in the module's description.
There's no specific action for this step, because at this point you're likely aware of what final details need to be sorted out.
Conclusion
This concludes the Foundry VTT Module Packaging Guide! Thank you for reading. If you have any questions about the process or the steps involved, please reach out on the Foundry Community Discord (http://discord.gg/foundryvtt) or through the Foundry Contact Form (https://foundryvtt.com/contact-us/), and we'll do our best to help you.