Updated January 16, 2026 (Version 13.351)
Overview
Foundry Virtual Tabletop is a "cross-platform" application that is compatible all major operating systems including Windows, macOS, and various Linux distributions.
This article covers downloading, installing, and activating Foundry VTT for all platforms and for several different purposes:
- The Recommended Installation Process
- This section covers the standard method to download, install, and activate Foundry VTT. The vast majority of new and existing users should follow these instructions.
- Installation Options
- Additional available download and installation options are covered here.
- Specialized Installation Instructions
- This article also presents instructions for downloading and installing Foundry to achieve specific goals, such as:
- Downloading and installing an older version of the software
- Installing a "portable" version of Foundry VTT
- Managing multiple versions of Foundry VTT on the same machine
- Setting up a dedicated "headless" Foundry VTT server
The Recommended Installation Process
This section covers how to download, install, and activate the standard Foundry VTT desktop application so that you can "self-host" Foundry VTT games directly on your own computer.
Unless you are an experienced Foundry VTT user and have a specific reason, you should always follow this standard process to download, activate, and install Foundry VTT.
Downloading Foundry VTT
Typically, to download the software you must own a valid Foundry VTT license. If necessary, you can purchase one here.
-
Log in
First, ensure that you are logged into the Foundry VTT website with the account that owns your license.
-
Click "Download Software" ( )
Clicking this button automatically takes you to the "Purchased Licenses" tab of your user account where you can download the software.
You can also access this same "Purchased Licenses" tab clicking it directly in your account profile.
-
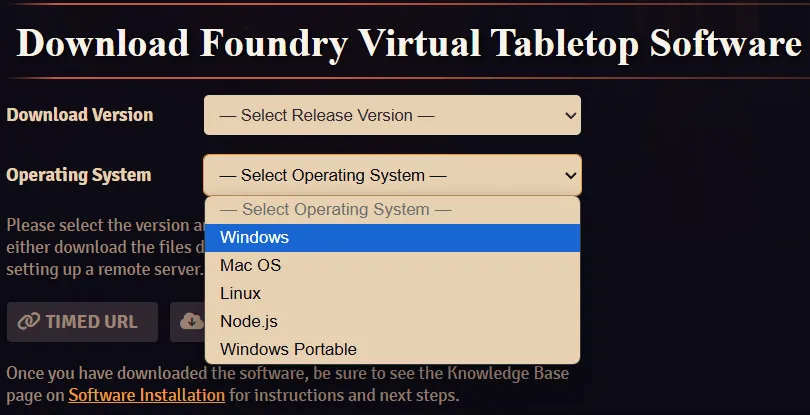
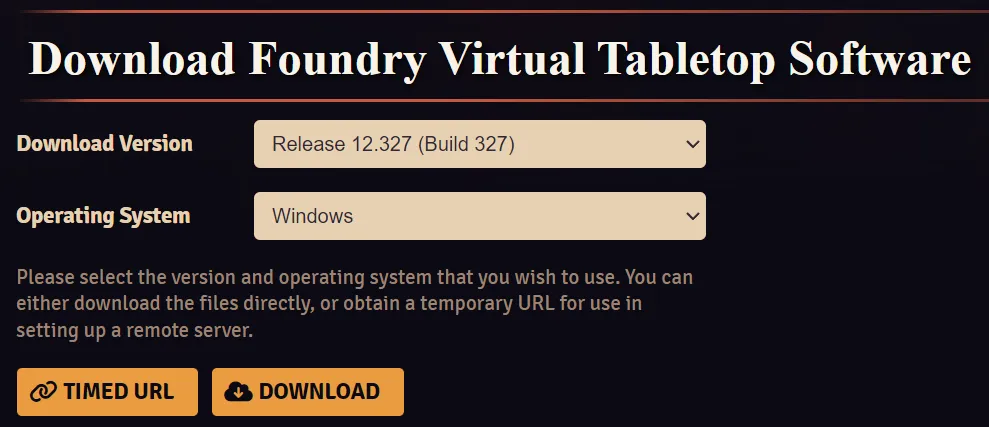
Choose your download options
- Version
- Choose the "Recommended" version at the very top.
- This is always the newest and most reliable version of Foundry VTT.
- Operating System
- If you are a Windows user, choose the "Windows" option here.
- If you use macOS or Linux, choose that option instead.
For information, please see Additional Installation Options.
-
Click "Download"
When you click this button, your download begins!

NOTE: If you do not see the "Download Software" button or the "Purchased Licenses" tab, you are not logged into an account that owns a valid Foundry VTT license.
If you believe that you do own a Foundry VTT license, you may accidentally be logged in with duplicate acount. If you need assistance, please use the Contact Us form.
Installing the Software
Next, use the downloaded file to install Foundry VTT like any other application:
To install the Foundry VTT Desktop application, run the setup executable file as usual.
(Optional): if you choose a custom installation location outside the usual Program Files directory, you may avoid some potential hassles with Windows permissions while updating the software.
Note: A convenient Windows portable build is also available for Foundry VTT Version 13 and newer. This allows easily installing multiple versions at once.
If you are using the macOS version of Foundry VTT, there are some steps which are required to allow you to run the app.
Because the macOS copy of Foundry VTT is not code-signed through Apple's official process, you may see a notification when you try to run the app that advises you that the application cannot be opened.
Note: More information on this security process from Apple can be found on their website here.
For Linux users, Foundry Virtual Tabletop is currently distributed as a simple .zip archive. All you need to do is extract the zip file in a location of your choosing. Feel free to choose whatever installation location is best for you, a simple option would be to use a folder named foundryvtt in your user home directory.
unzip foundryvtt.zip -d $HOME/foundryvttOnce you have extracted the archive, locate the foundryvtt file in the directory and set the permission on it to allow execution as a program. This will allow you to execute it from the terminal with ./foundryvtt. Alternatively, on some Linux distributions (Deb/Ubuntu) you can rename the foundryvtt file to add a .sh extension. This will allow you to quickly launch it by double-clicking. At this time there is no Linux .desktop packaged with Foundry VTT.
Another option for Linux users to consider is using the Node installer. It is a bit lighter-weight than the traditional Linux installer and may be more compatible with certain architectures.
Activating the Software
Once Foundry VTT is fully installed, the final step of the installation process is to launch it and activate it.
When Foundry VTT opens, a screen displays asking for your Software License Key.
Copy your Foundry VTT software license key directly from either your receipt email or from the Purchased Licenses tab of the website, then paste it in and click Submit.
TIP: To prevent data entry mistakes, copying and pasting the software license key rather than attempting to type it in manually is highly recommended.

After entering your license key, the End User License Agreement displays.
Although Foundry VTT can typically be run entirely offline, you need an internet connection for this step so that your license key can be validated and that you can agreed to the software license.
If you cannot accept the license agreement, make sure that you pasted in your license key and ensure that all third-party ad-blockers, VPNs, and anti-malware applications are disabled.
When prompted, feel free to opt in or out to sharing your anonymized usage data as well. For full information about the (very minimal) data is collected and what we do with it, please see our privacy policy.
And that's it, you're now fully installed and ready to go!
From here, try checking out the Tutorial - Gamemaster Part One. Also, be sure that your players are able to connect by setting up Port Forwarding.
Additional Installation Options
For simplicity, the recommended installation process often provided instructions to pick a single option out of many. This section provides additional information about the other choices that are available during the process of downloading and installing Foundry VTT.
In addition to the current Recommended version, there are many other versions of Foundry VTT available in the "Versions" dropdown menu that experienced Foundry users might want to choose under certain circumstances:
- Older Stable versions
- Foundry VTT never forces you to update versions, and some users choose to download an older Stable version for that is more compatibility with a favorite game system or module.
- Experimental versions
- During the Foundry VTT development cycle, experimental builds are classified as Prototype, Development, or Testing so that community developers and power users can follow along with our progress and offer feedback.
- Please bear in mind that these builds are not intended to run live games and they should be used with few, if any, modules enabled. If you do want to check one out, please review the versions kb article before downloading and installing the software.
Although these options are called "Operating System" options, it's perhaps more useful to think of these options as "build types" for Foundry VTT. Five different Foundry VTT build types are currently available:
- The "Windows", "macOS", and "Linux" Installers
- These three options are the "standard" Foundry VTT installers. Each of these options install very similar desktop applications, just designed run on the specified operating system.
- The Foundry VTT desktop application that they create includes both a light-weight Foundry game server and a built-in, specialized Chromium web browser. Such an application is the classic way of running Foundry VTT—launching one of them allows you to "self-host" your Foundry VTT games directly on your own computer.
- The Node.JS Installer
- The Node.JS Installer is cross-platform and can run on Linux, macOS, or Windows. This is particularly useful to run a dedicated Foundry VTT server or to run multiple Foundry VTT installations on macOS or Linux.
- The Windows Portable Build Installer
- New for Foundry V13,, you can use the Windows Portable Build to create a "standalone" or "portable" installation of Foundry VTT that is entirely self-contained within a single folder.
- For additional details information and instructions, please see "Installing a "Portable" version of Foundry VTT".
Wait, where did the "Linux/Node" installers go? Why isn't the "Node" available for older versions?
The "Linux" and "Node" build types became available in Foundry VTT Version 13.338, shortly before the release of V13 Stable.
Previously, the legacy "Linux/Node" installer was used to install both the Linux desktop application and the Node version of Foundry vtt (for Linux, macOS, and Windows). Separating the Linux and Node installation process allows us to provide leaner installers.
The two new installers were not retroactively created for past versions of Foundry VTT. The "Linux" versions that are available for versions of Foundry VTT prior to version 13.338 are the exact same artifacts that were previously called the "Linux/Node" installers, just with a revised name.
You may have noticed the "Timed URL" button located next to the standard "Download" button. This button can be used to generate a temporary Foundry VTT download link, called a "timed url," which is useful in specific circumstances.
Please be aware that these timed URL download links expire after 5 minutes minutes.
When you click this button, the website creates and automatically copies a temporary URL link that can be used to download the software. While it is valid, you can use this link in two different ways:
- Web browser
- To easiest and most common way to use this download link is to simply paste it into the address bar of a web browser. If the link is still valid, the Foundry VTT software download begins automatically.
- Command line
- Alternatively, this link can be used to download Foundry VTT using a command line utility such as
wget. When using the link in the command, it is important to wrap the link in double-quotes. For example:wget -O foundryvtt.zip "PASTED-URL-FROM-FOUNDRY-WEBSITE-HERE"
Advanced Installation Processes
This section provides instructions for the more atypical ways to download, install, and configure Foundry VTT.
Sometimes users prefer to deliberately install an older version of Foundry VTT rather than the latest Stable version. This happens most frequently just after a new Stable version of Foundry VTT is released and a particular game system or module has not yet updated to the new version.
When considering which version of to use, it is important to know that when a world is launched in a newer version of Foundry VTT for the first time, an automatic data migration may begin automatically.
After a data migration, the World may no longer be launchable in older versions of Foundry VTT. This cannot be reversed except by reverting to a backup.
With proper backups, the process of installing an older version of Foundry VTT is quite straightforward and safe.
- Take a backup of any important worlds
- Uninstall the previous version of Foundry VTT
- Follow the recommended installation process, but in the the Versions dropdown pick the older version instead of the Recommended one
- Uninstall and reinstall your game system(s)
- If a world won't launch, restore it to the most recent backup from the previous version of Foundry VTT
A "portable" application is one that can be installed and run anywhere, such as on a USB stick or a dedicated external hard drive. This can be particularly useful when you are preparing for a game in one location, and then running the game from a different machine. This may happen while traveling, or when you are running an in-person game that is enhanced by using Foundry VTT connected to a physical display.
The best way of setting up a portable build depends on your operating system:
- Windows
- Foundry installations created using the Windows Portable Installer can be completely self-contained within a single folder, so multiple independent installations can be achieved just by using the appropriate Windows Portable builds in inside different folders. For additional information, see The Windows Portable Build below.
- macOS and Linux
- The architecture of macOS and Linux are much more friendly to running portable applications, so no dedicated Foundry VTT build is required. Folder-level Foundry installations are possible in macOS and Linux by using only the Node.js installer. For macOS users, there's a community-created guide on the topic that may particularly helpful.
The Windows Portable Build
New for Foundry V13, the Windows Portable Build isn't a traditional Windows installer at all. Instead, the "installer" is a single zip that can be extracted anywhere to create a self-contained version of Foundry VTT in that location.
The process of deploying and using a Windows Portable Build is quite simple:
- Use the recommended installation process, but pick "Windows Portable Build" from the "Operating System" dropdown instead of "Windows"
- Extract the downloaded zip file to the location you want to run Foundry VTT
- Open the
Appfolder, then double-click theFoundry Virtual Tabletop.exefile to launch it
When the Foundry Virtual Tabletop.exe file inside the App folder is run for the first time, Foundry VTT automatically creates three new folders in its parent directory- Config, Data, and Logs and automatically defaults to using them.
This portable installation is configured to use those folders by default for two important reasons:
- All the folders and files that Foundry VTT needs are already in one location for easy "out of the box" portability
- If you are using the portable build for testing purposes by running an experimental or newer copy of Foundry VTT, you are less likely to affect your "real" data
Because a fresh Config folder is created, this portable version of Foundry VTT starts out with a clean set of user settings which means that some setup steps may be necessary that you wouldn't normally have to perform when installing a new version of Foundry VTT, including:
- Entering your Foundry VTT software license key
- Accepting the license agreement and data sharing
- Potentially configuring Foundry VTT to use your GPU, if needed
For more information about these steps, see the recommended Foundry VTT installation process.
Other than its unusual installation process and first-run configuration steps, the Windows Portable build operates the same as any other Foundry VTT instance. For example, you are not required to use the built-in "Data" folder as the Foundry User Data path, and you can change it using the Setup screen as usual if you so choose.
Windows Portable Build Example
For example, this is what happens if a user decides to install the Foundry Version 13.351 onto a USB drive that Windows has registered as E:\
E:\
            ├──FOUNDRYVTT-PORTABLE-13.351
                    ├───App
                    └───README.txt
When this user runs the Foundry Virtual Tabletop.exe file inside the App folder for the first time, Foundry VTT automatically creates three new folders in its parent directory- Config, Data, and Logs:
E:\
            ├──FOUNDRYVTT-PORTABLE-13.351
                    ├───App
                    ├───Config
                    ├───Data
                    └───Logs
                    └───README.txt
Running multiple copies of Foundry VTT on the Same Machine
Particularly around the release of a major new version of Foundry VTT releases, it can be quite useful to have more than one version of Foundry VTT installed.
Using this approach, you can safely experience the new version of Foundry VTT first-hand and see how your favorite modules and game systems perform without affecting your "real" data. You can even use this method to run live campaigns on your machine using different versions of Foundry VTT, which may happen if one of your preferred game systems is particularly slow to update, for example.
Please Note: As always, be sure to take a backup before making major changes to your Foundry VTT installation or User Data.
The best way to install multiple copies of Foundry VTT on a single machine is to configure multiple independent portable installations of Foundry VTT, each in their own folder and using separate User Data folders.
It is even possible to run multiple versions of Foundry VTT on the same machine simultaneously, if you take a few precautions:
- Each copy of Foundry VTT needs to have its own port number
- You will also need to have a separate Foundry User Data folder for each instance of Foundry
If you wish to have external users to connect to one or more of these simultaneously-running worlds, there are some additional things to consider
- You may need to set up port forwarding separately for additional ports
- You may need additional Foundry VTT license(s) to ensure that you abide by the terms of the license agreement.
Hosting a Dedicated Server with Node.js
Note: Installing Node.js manually as described below is not part of the typical Foundry installation process.
Most users can simply install Foundry using the standard Windows, macOS, or Linux installer. If you are an advanced user who is planning on a more unusual method of running Foundry (such as creating a dedicated headless Foundry server), this section describes how to install Foundry VTT as a Node.js package.
To use the Node.js version of Foundry VTT, you must first install Node.js on a machine that meets the minimum requirements to function as a dedicated Foundry server. The minimum required Node version is 22 for V13 and below and 24 is required for V14 and above. We recommend using the latest stable version possible.
Note: Remember that odd numbered major versions (such as 21.x or 23.x) are not considered stable.
If your server runs the Windows or macOS operating system, you can just use the installers available here https://nodejs.org/en/download.
Installing Node.js for Linux Red Hat / Amazon Linux package manager
sudo yum install -y openssl-devel
curl --silent --location https://rpm.nodesource.com/setup_20.x | sudo bash -
sudo yum install -y nodejs
Installing Node.js for Linux Debian / Ubuntu package manager
sudo apt install -y libssl-dev
curl -sL https://deb.nodesource.com/setup_20.x | sudo bash -
sudo apt install -y nodejs
Downloading, Extracting and Launching the Server
Next, you will need to download Foundry. Use the standard instructions "Downloading Foundry" above, but be sure to pick the "Node.js" option in the "Operating System" dropdown menu.
Note: The separate "Node.js" installer only exists for Version 13+. For older versions of Foundry VTT, use the Linux installer which also includes the necessary Node.js files.
Now that you have downloaded Foundry VTT and installed Node.js, it's time to extract the zip, create your data directory and launch your Node.JS server. This process varies depending on the operating system of your server.
# Create application and user data directories
cd $HOME
mkdir foundryvtt
mkdir foundrydata

# Install the software
cd foundryvtt
wget -O foundryvtt.zip "<foundry-website-download-url>"
unzip foundryvtt.zip

# Start running the server (FoundryVTT V13 and newer)
node main.js --dataPath=$HOME/foundrydata
If you are using an older version of Foundry VTT, use the following launch command instead.
# Start running the server (FoundryVTT V12 and before)
node resources/app/main.js --dataPath=$HOME/foundrydataFoundry VTT is supported on macOS as a native Electron application, but you can also host the software using Node.js directly if you wish.
Use Finder to install Node.js
- Use a web browser to visit https://nodejs.org/en/download/ and download the recommended macOS installer
- In your user's home location, create a folder named
FoundryVTT_Node - Download and install the Node version of Foundry VTT into this new folder
Use the macOS terminal to configure and run the Node process
You can now configure and run the server using the macOS terminal using the instructions below.
# create a user data directory
cd $HOME
mkdir foundrydata

# Go to the location where you installed the Node version of the Foundry VTT software
cd ~/FoundryVTT_Node

# Start running the server (FoundryVTT V13 and newer)
node main.js --dataPath=$HOME/foundrydata
If you are using an older version of Foundry VTT, use the following launch command instead.
# Start running the server (FoundryVTT V12 and before)
node resources/app/main.js --dataPath=$HOME/foundrydataYou can also run a dedicated server on Windows. You will first need to download and install Node.js from https://nodejs.org/en/download/. Once Node.js is installed, you can launch the server process from whichever location you installed the Foundry Virtual Tabletop software using your preferred windows command-line client like the Command Prompt or Windows Terminal.
# Make a folder in a location of your choosing to store your Foundry VTT data
cd %userprofile%
mkdir foundrydata

# Launch the Node.js server from the location where you installed the Foundry VTT software
cd C:\Program Files\FoundryVTT\

# Start running the server (FoundryVTT V13 and newer)
node main.js --dataPath=%userprofile%/foundrydata
If you are using an older version of Foundry VTT, use the following launch command instead.
# Start running the server (FoundryVTT V12 and before)
node resources/app/main.js --dataPath=%userprofile%/foundrydata
Now that you are running Foundry VTT via Node, open any modern web browser and connect to http://127.0.0.1:30000 to access your server.
Running as a Service
If you wish to keep the server running perpetually, you may wish to run Foundry VTT using a process manager like systemd which is recommended for standalone installations or PM2 which is recommended for operating a cluster of instances. Such service managers can be helpful but are not required.